Clicking on any image below will take you to a gallery page.
Clicking on any image below will take you to a gallery page.
This is a journal of our trailer and tow vehicle history, and was created for several reasons, foremost amongst them being that I can maybe share some ideas with the good folks on the Escape Trailer Owners Forum which has been a real gold mine of information and ideas over the past few years. Secondarily, I'll have an easy way to remind my wife of all the hard - and sometimes bloody and painful - work that's been done so I can play that card when trying to earn points or get a new camera lens or whatever. Also, I get to putz around with the fabulous Microsoft Expression Web 4 (which has some goofball 'auto-style class' thing that does stuff that I don't want it to do and I don't understand and am too lazy and disinterested to bother figuring out and makes me reflect fondly on the bad old days when Notepad was a great html editor, and in any case I ultimately took the easy way out and used a free-bee JQuery utility). And finally, when that sad day inevitably comes and we have to sell the Escape, I'll have an account of all the modifications that were done to it, thereby hopefully raising the sales price appreciably and facilitating a quick and easy sale. Beyond all that, it also gave me something to do while butt-sitting and bored silly for 3 weeks having shingles.
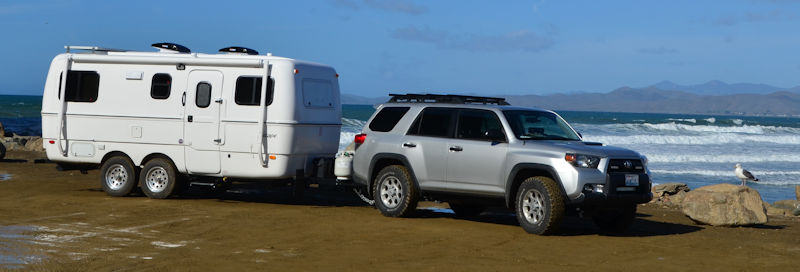
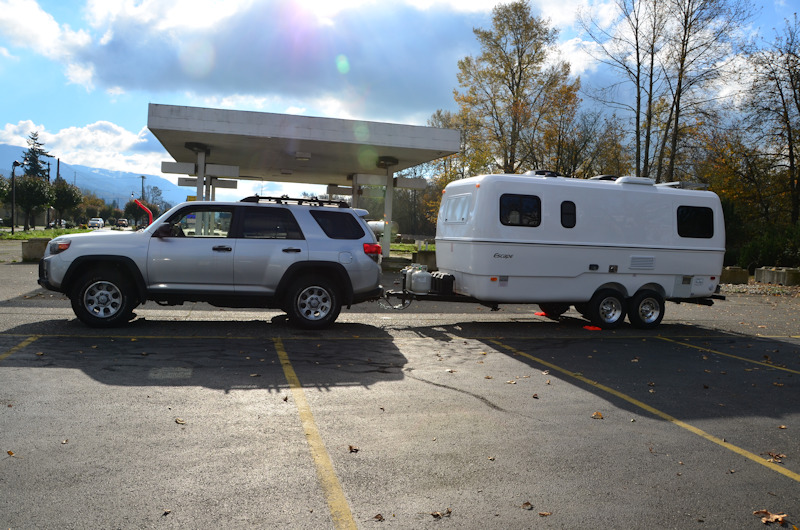
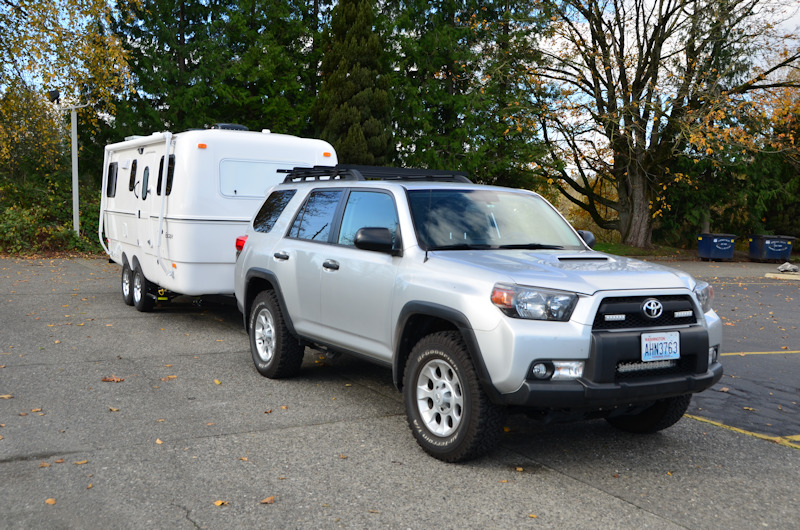
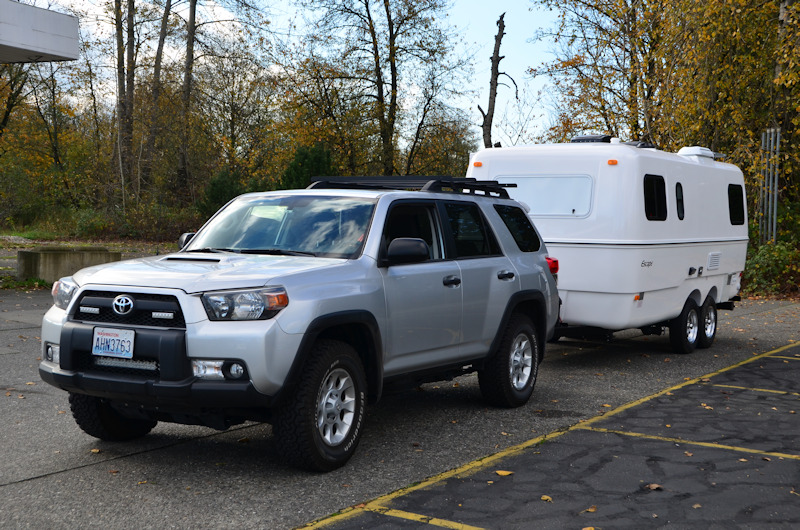
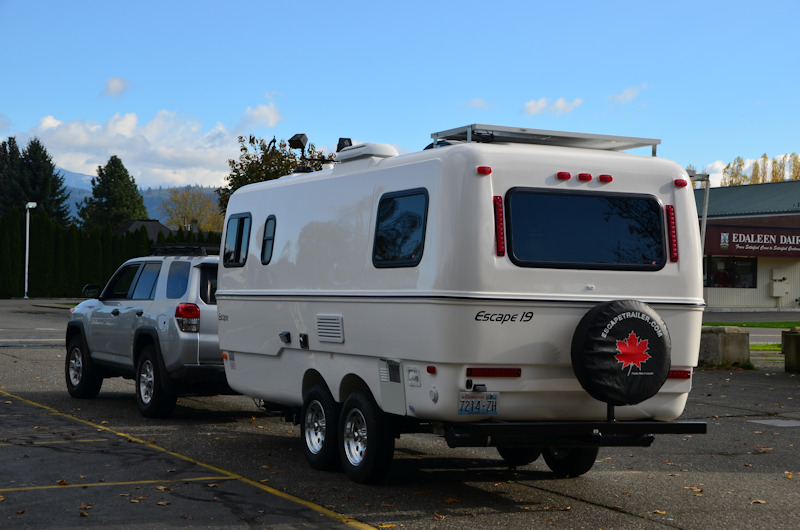
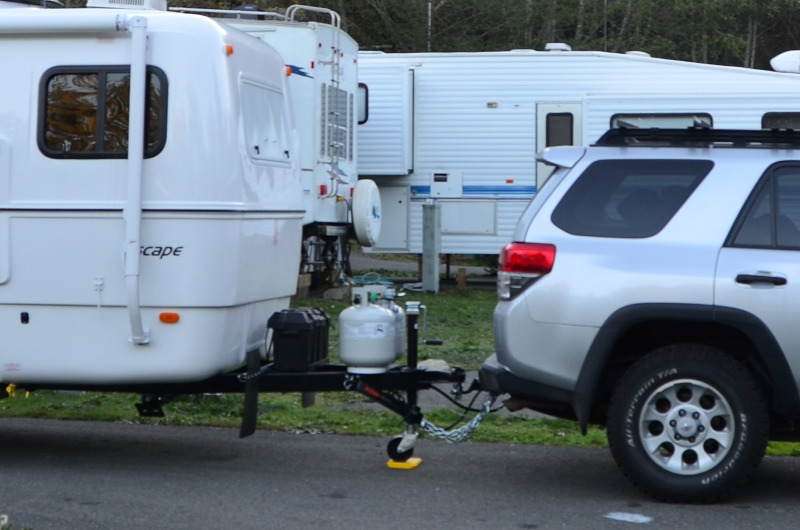
By way of background, our Trailer 1.0 was a 2001 Chalet Alpine A-Frame folding roof trailer which we got in August of 2011, and it was really intended to be our "training trailer", since we would use it to determine if we really wanted to buy into the whole trailer towing / camping paradigm. While it was thoroughly used, it wasn't entirely used up, and it gave us enough trailer experience to convince us that we were indeed trailer-enabled individuals. We certainly enjoyed not sleeping in the car while camping - we never were much for tent camping except when backpacking - and we kind of enjoyed the whole towing adventure / wagon train / Beverly Hillbillies scenario, starting out towing with our beloved 2002 Mazda Tribute SUV which was ok enough for towing the smallish and lightish Chalet, but when we started wandering around off-pavement more extensively, we decided that we wanted a tow vehicle that could handle rougher conditions. We traded in the Mazda for a new 2012 Toyota 4Runner Trail Edition, which could handle a bigger and heavier trailer, as well as deal with some fairly rough off-pavement conditions, particularly when leaving the trailer behind and heading out onto the rough stuff. As much as we loved the Chalet, we wanted something that didn't need to have the roof raised and lowered every time we used it, and we really wanted a permanent bed, having converted the Chalet front and rear dinettes from tables to beds and back way too many times. So the search was on for a newer and bigger and better equipped Trailer 2.0.
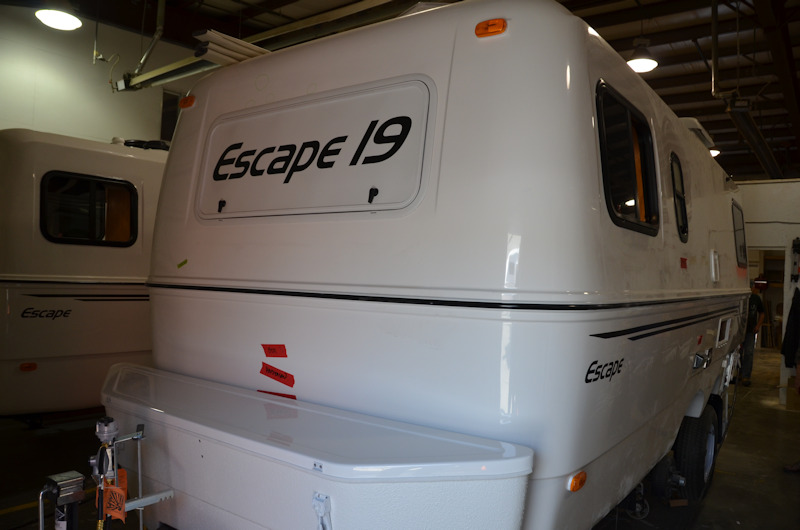
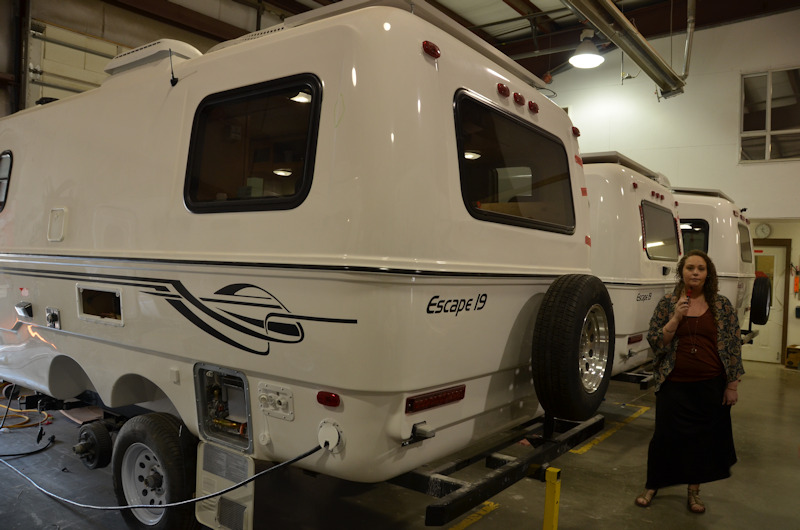
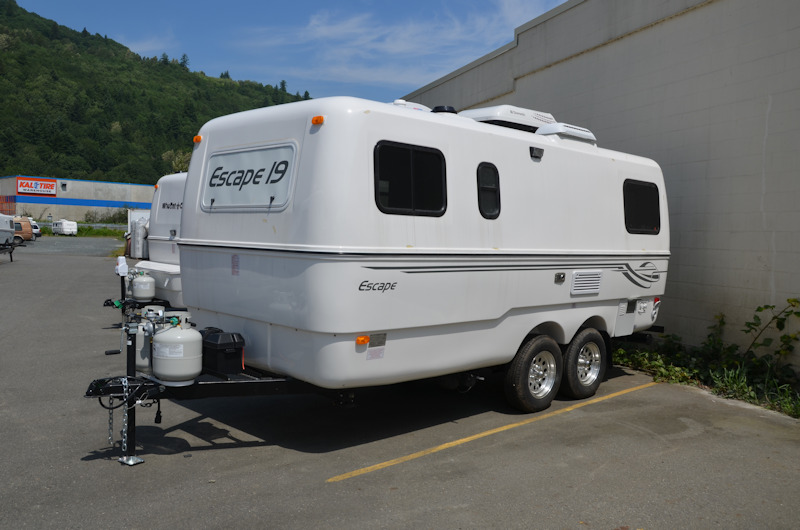
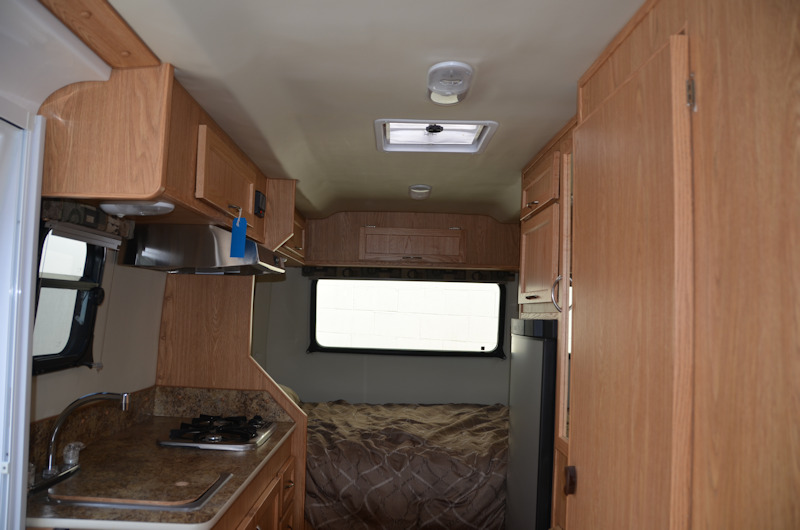
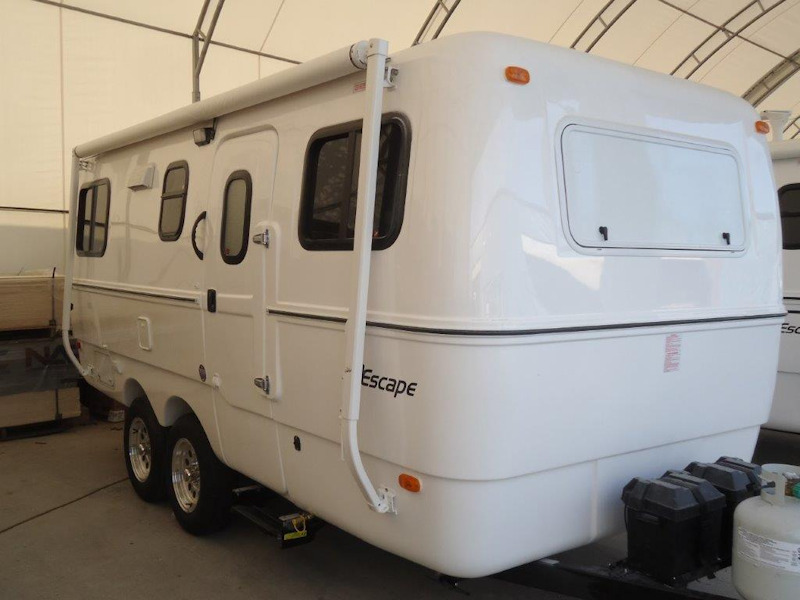
The Escape 19' Trailer
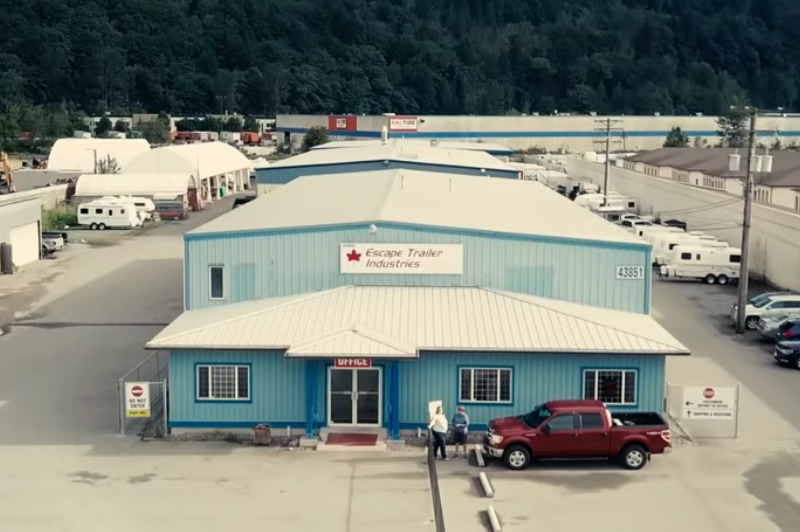
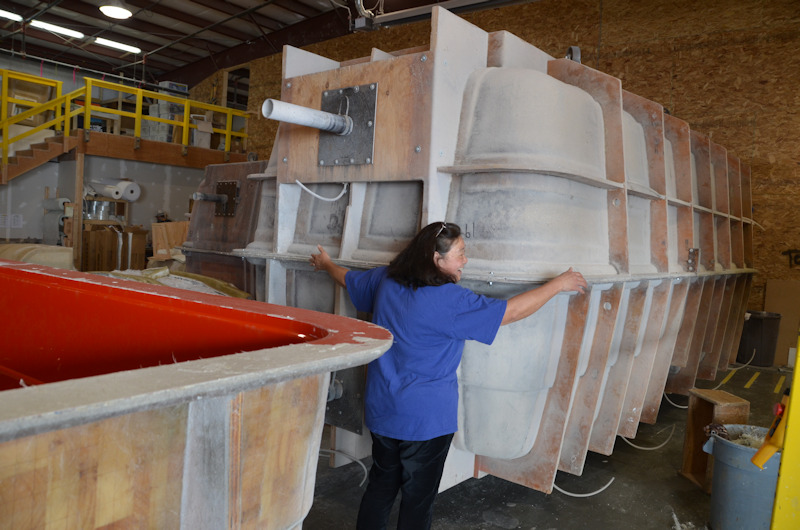
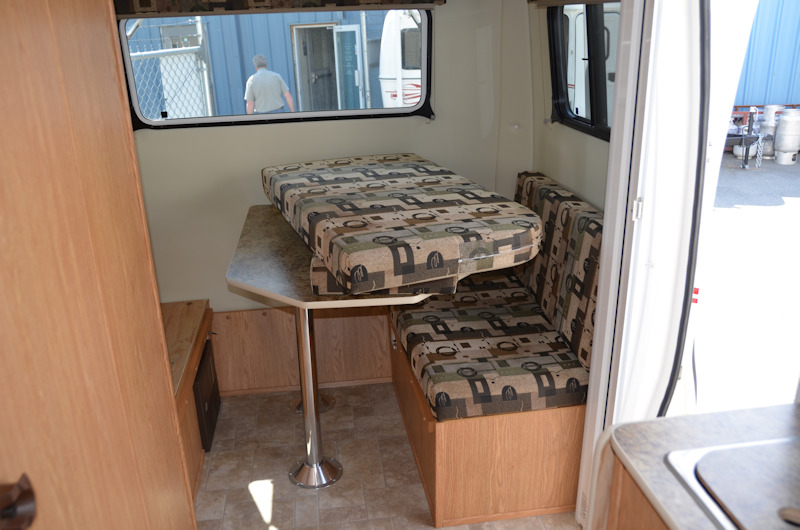
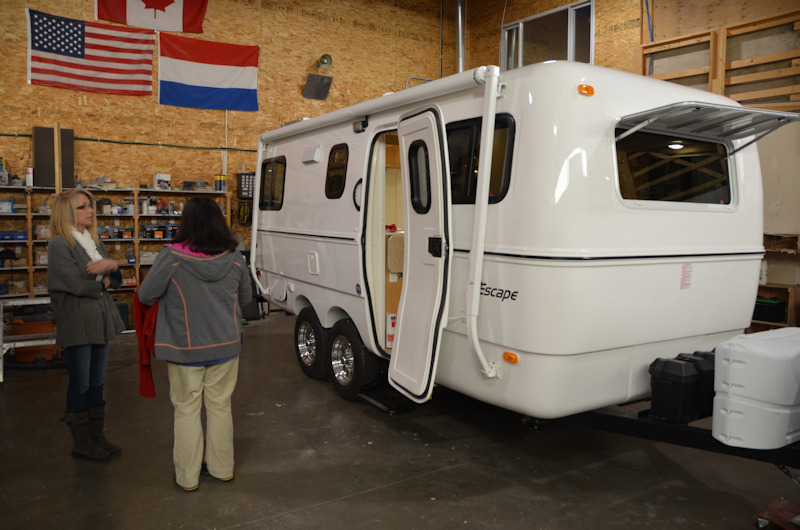
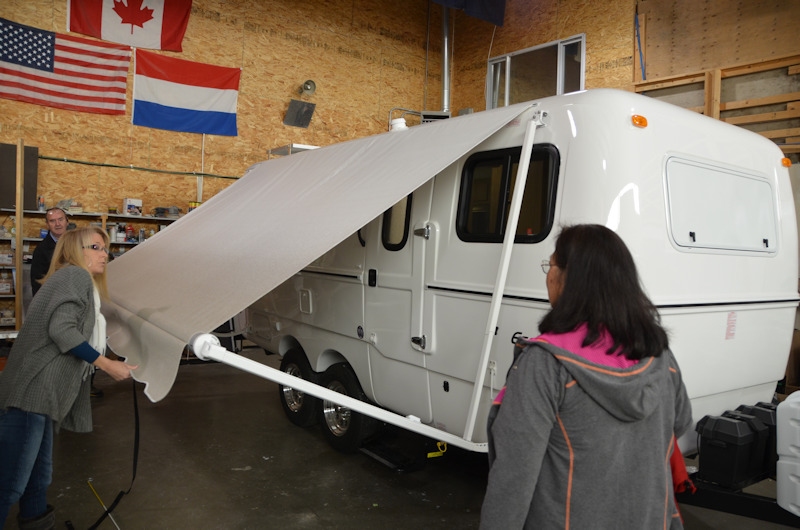
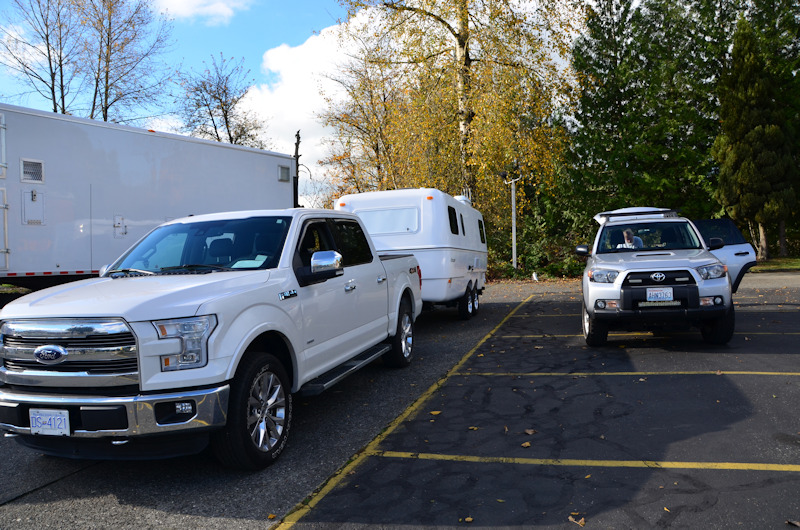
We had spent a full day making the rounds of the plethora of RV dealers in the Everett, WA, area, and were more than somewhat disappointed with the crappy quality of all of the stick and OSB trailers, were negatively amazed at the cost of a new fully equipped A-Frame Chalet at 26K, and even looked at a nearby privately owned older Lil Snoozy (interesting but not for us). Having come up empty handed, and after rooting around on the web looking at trailers for what seemed like forever and pretty much deciding to go fiberglass, on May 22, 2015, we found ourselves heading up north to the Escape factory in Chilliwack, BC, for a factory tour, looking in particular at the 19' model.
After the lunchtime factory tour, we lounged around in a finished 19'er for a big chunk of the afternoon, and finally came away from the whole thing with a generous dose of positive mojo and were pretty well convinced that there was a new Escape 19 in our future. The dual axles, permanent queen bed with a real mattress (to appease a painfully herniated disk), along with the additional space, were the main factors that prompted us to go with the 19' rather than the 17', and given that we wanted to stay "as small as possible, as big as necessary", we ruled out the 21'. Plus, the tongue weight of the 21' would have been pushing the 500 lb limit of the 4Runner.
After much discussion, head scratching, testing the seemingly infinite patience of Crystal and Hayley up at the Escape factory, mulling over the options and whatnot, and spending lots of time on the Escape Owners Forum, we ended up placing an order on May 11th, 2015, with a delivery date of March 18, 2016 - a long 10 months to wait. But then, happily enough, while aimlessly perusing the Escape Trailer web site one day in July we spotted a newly available delivery date that had opened up due to a cancellation - we could move our original delivery date up from March 2016 to November 2015! And as an added bonus, that meant that we would get the trailer and our chosen options at the 2015 prices rather than the 2016 prices, thereby saving us $800 on the price of the trailer and $300 on the price of the options we ended up choosing. Plus, the Canadian Dollar vs. US Dollar exchange rate was real favorable for us at that time (.75 USD = 1 CAD), so we really wanted to jump on it while such a favorable rate was in effect. Our next task was to get our build sheet finalized by August 31, which meant deciding what build options and interior colors we wanted. That opened up a whole new set of discussion points, and yet more testing of Crystal and Hayley's patience. We finally made up our minds about everything, and got our final Build Sheet up to Escape on the day it was due. In September we made a bittersweet final trip with the Chalet down into Central Oregon for some hiking, and when we got back home were very lucky to make a deal with a neighbor who wanted to get rid of his antique tent trailer to buy our old Chalet. With that deal done, we just had to wait till November 3rd to pick up our shiny new Escape.
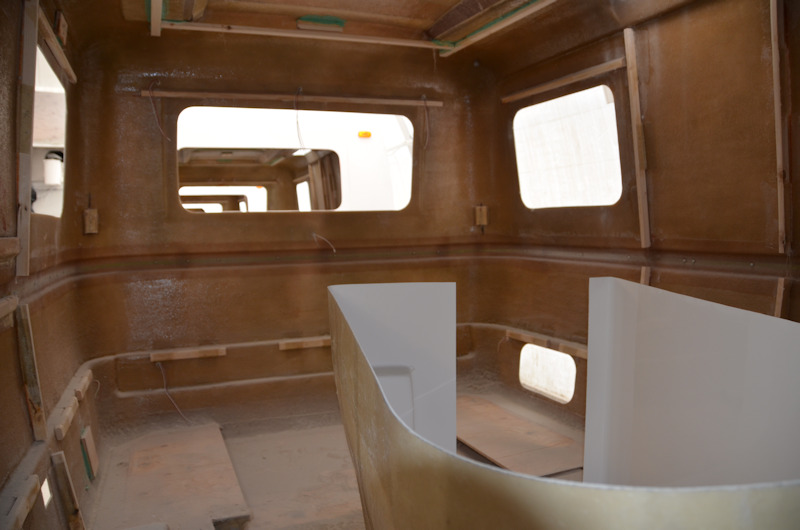
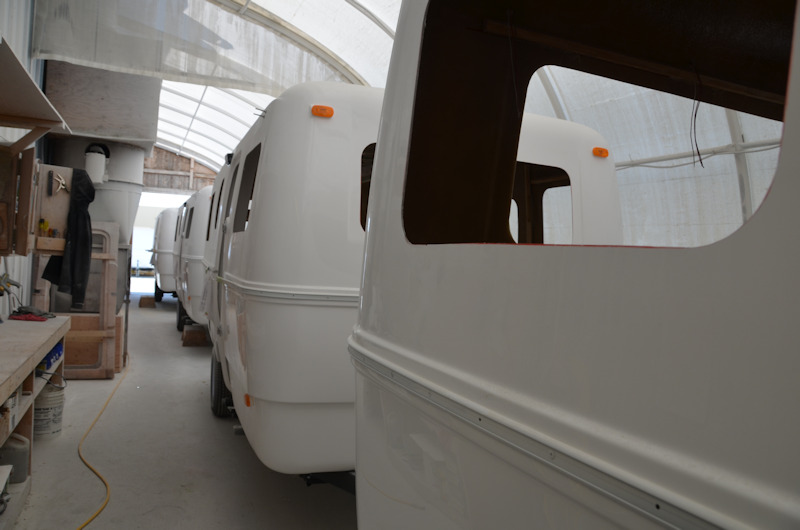
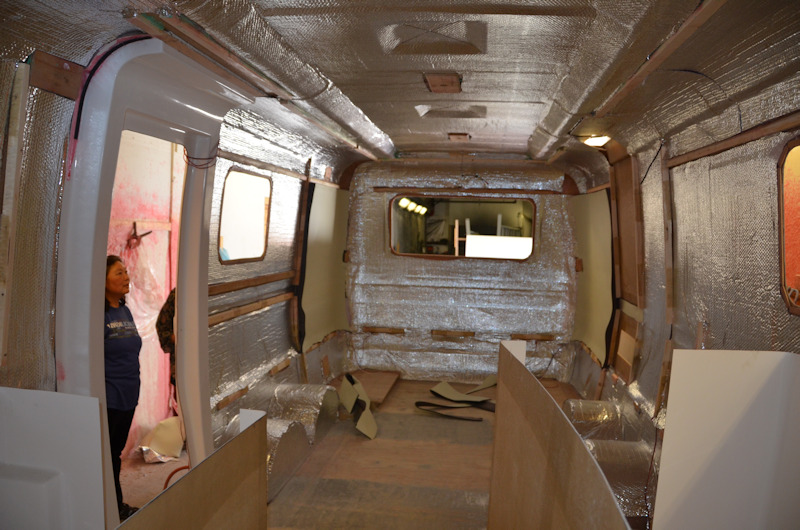
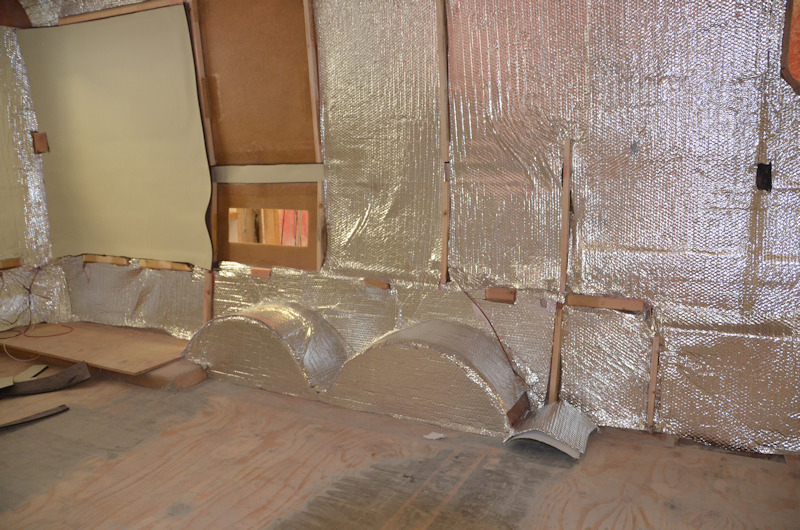
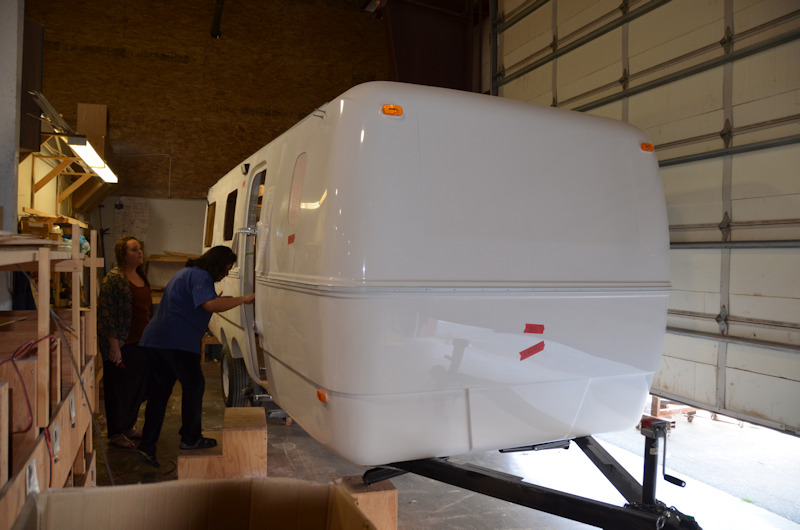
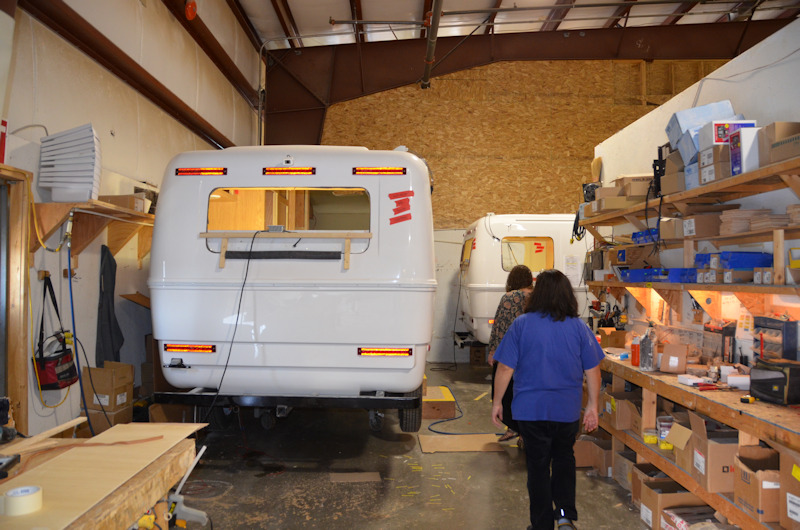
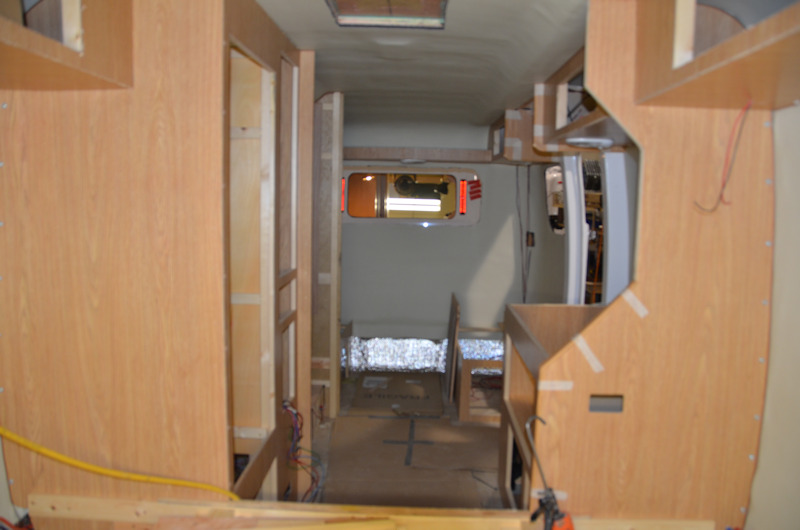
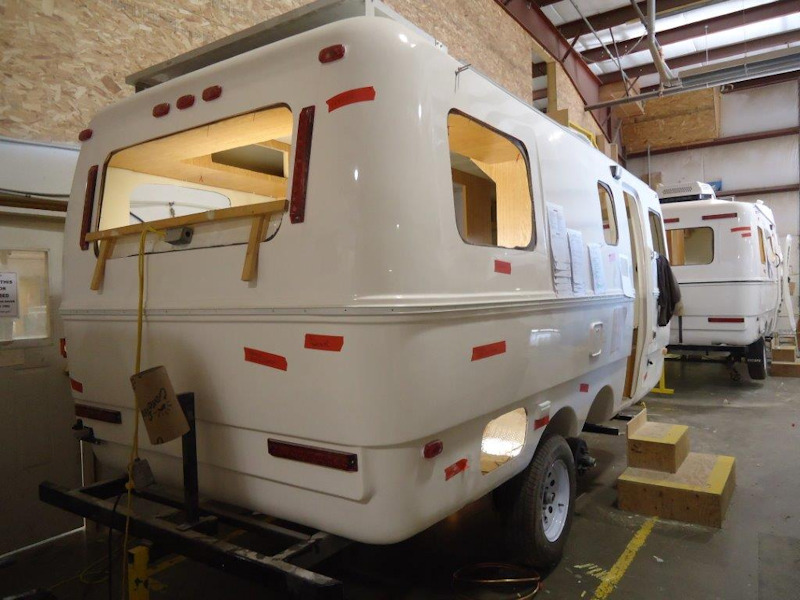
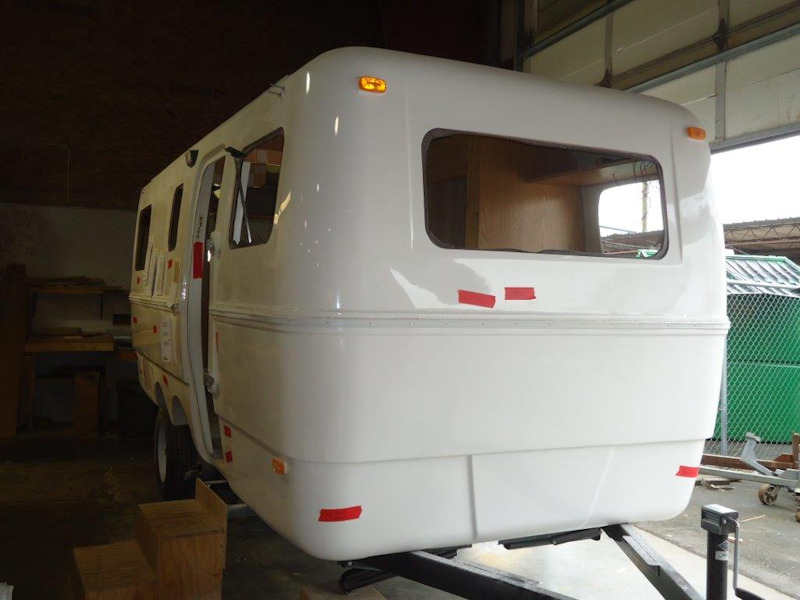
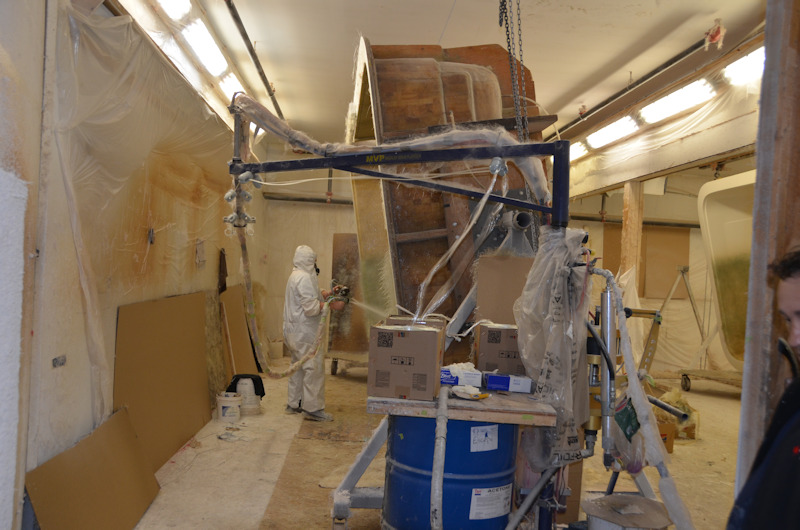
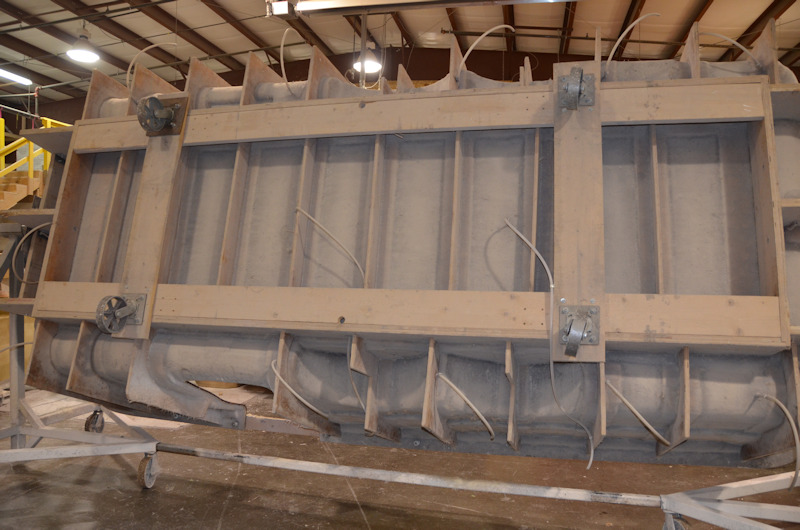
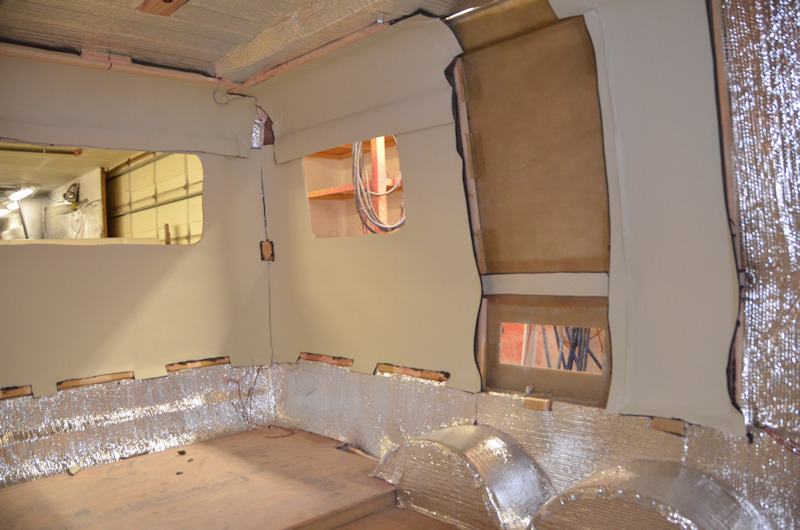
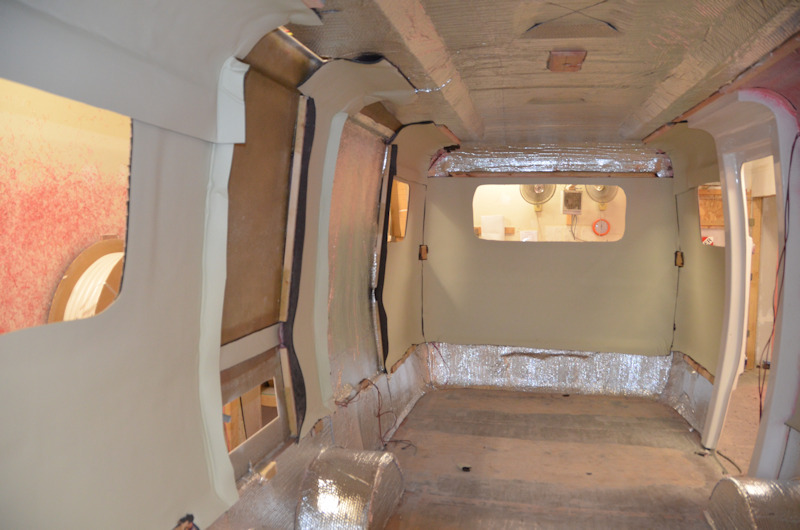
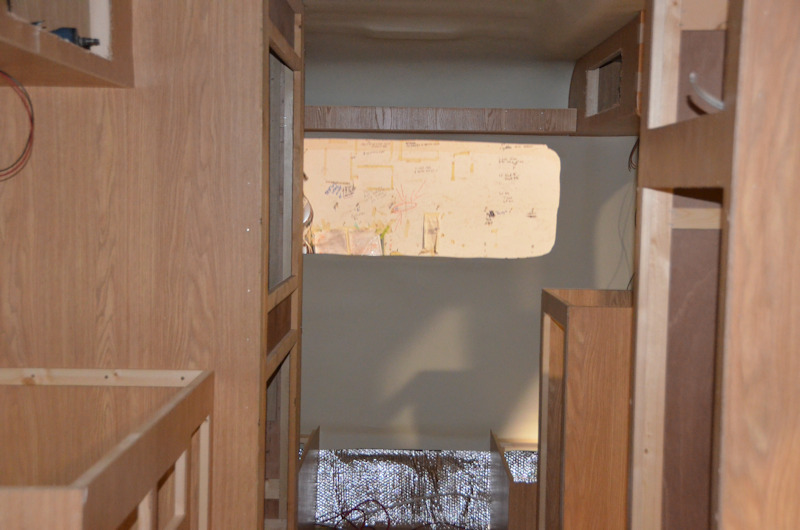
Warmly and fuzzily enough, about twice a week during production the good folks at Escape send to their customers pictures of their trailers at various stages during the build process - try that with the mass production guys - so during October we received some shots of our trailer being built.

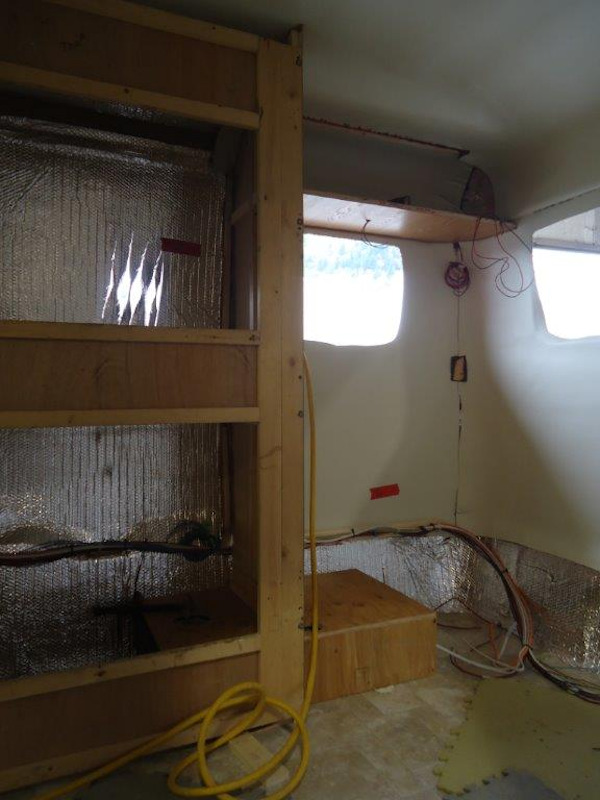
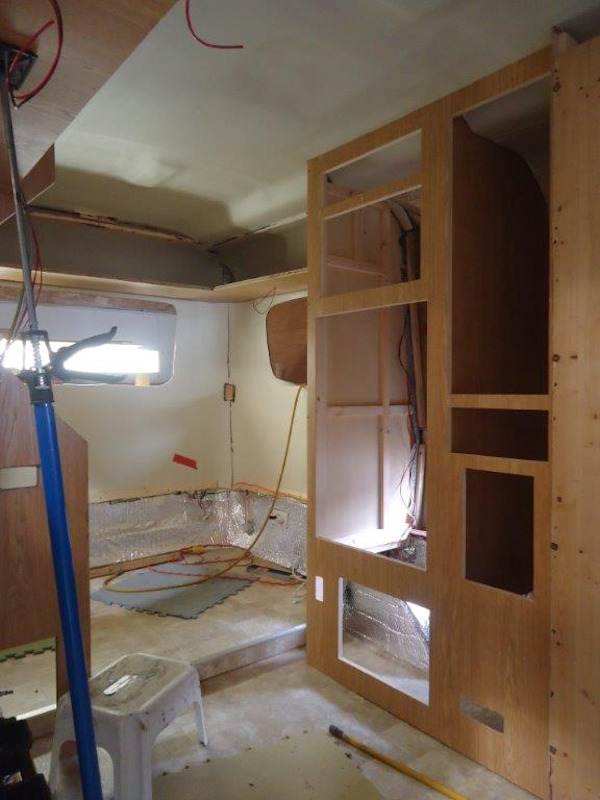
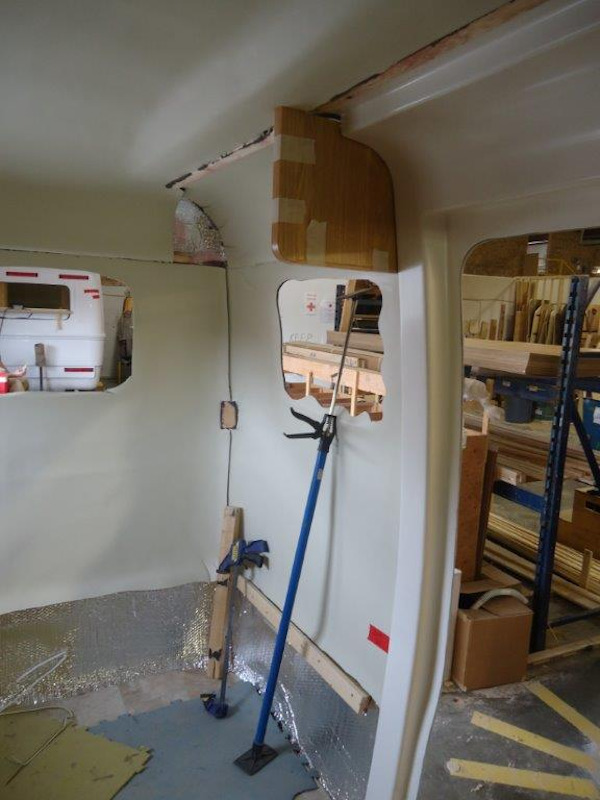
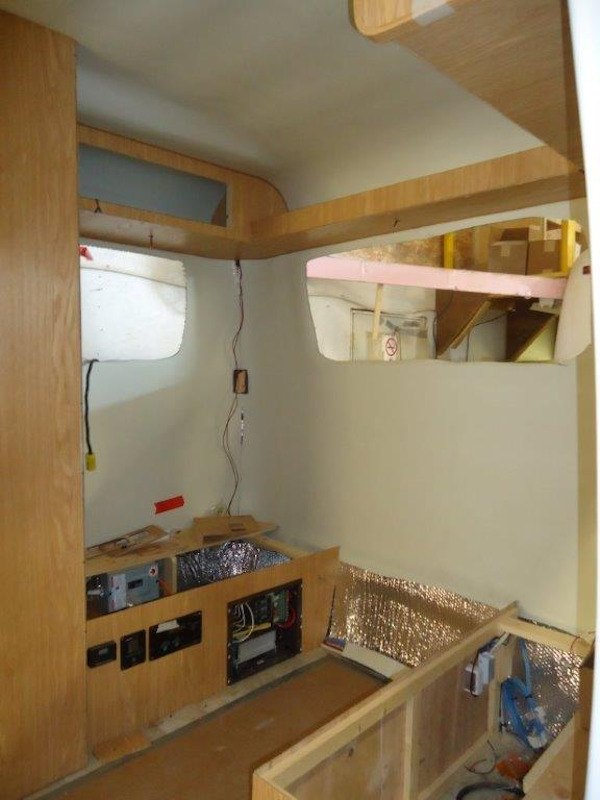
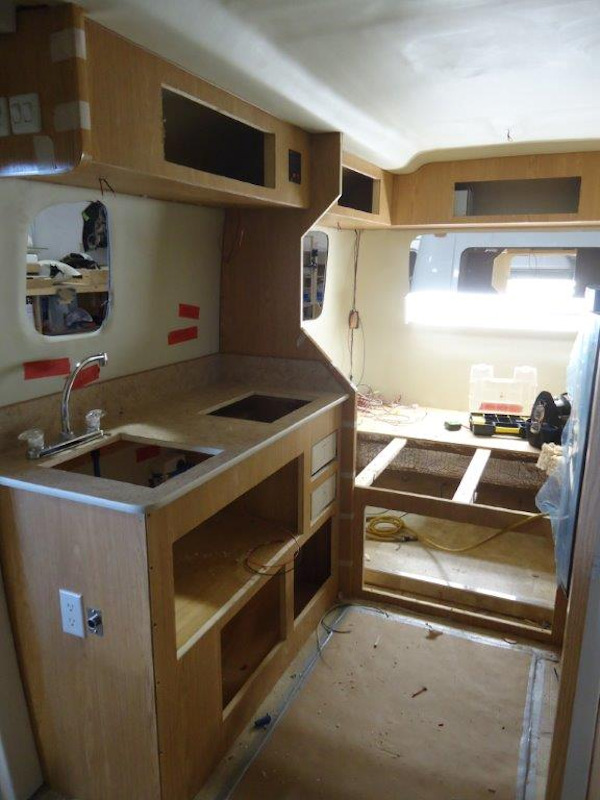
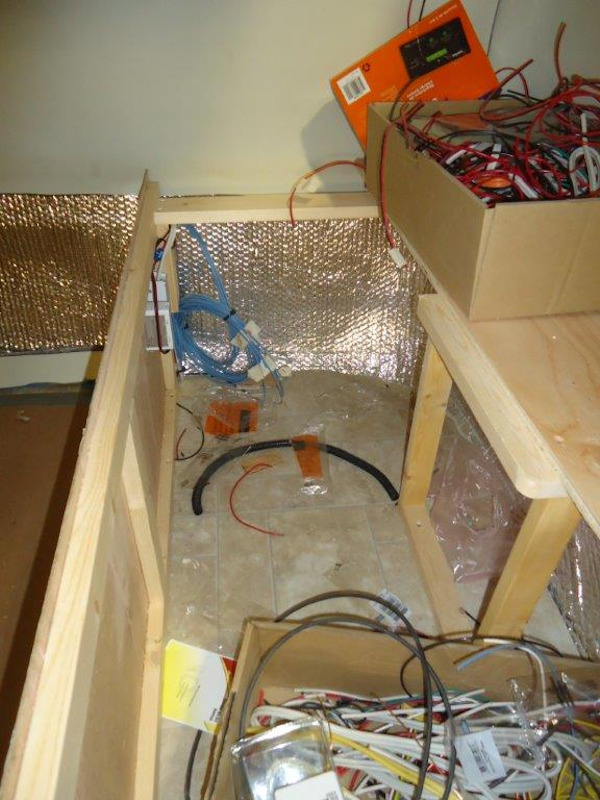
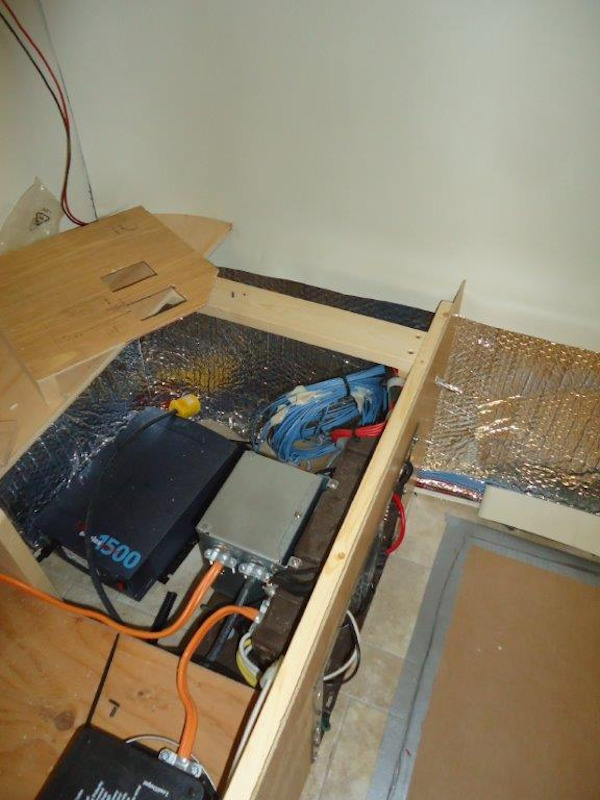
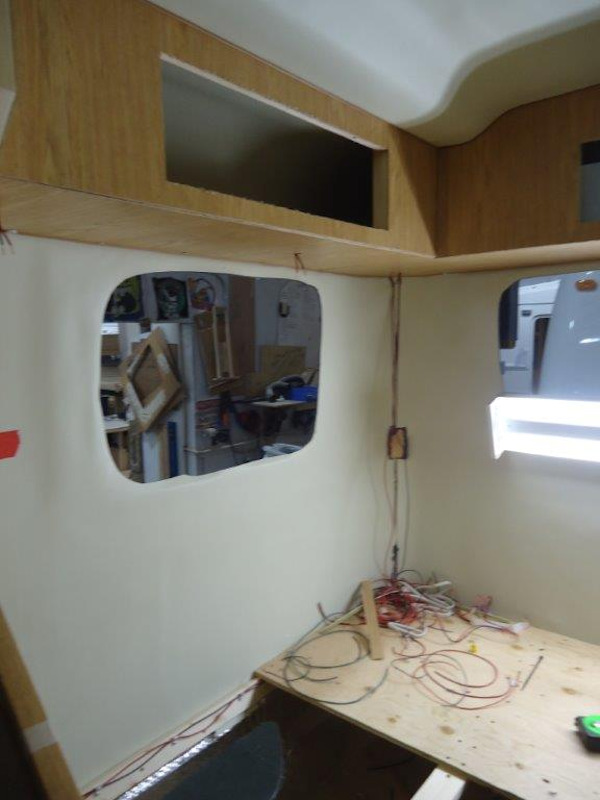
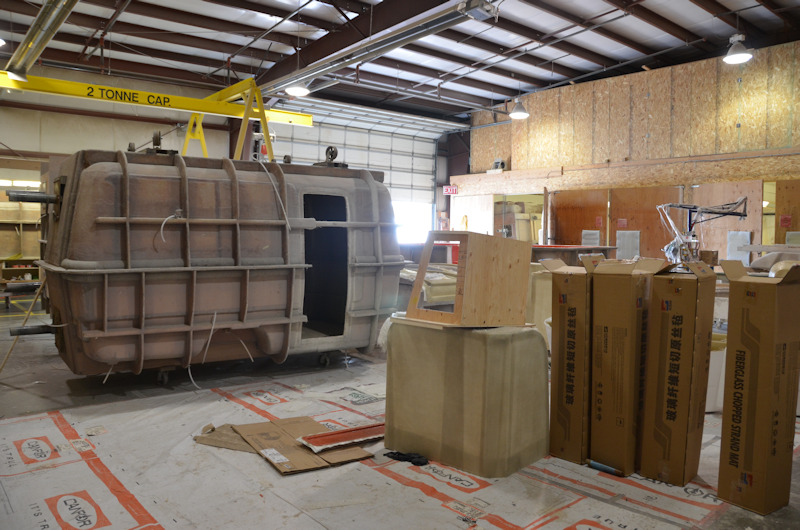
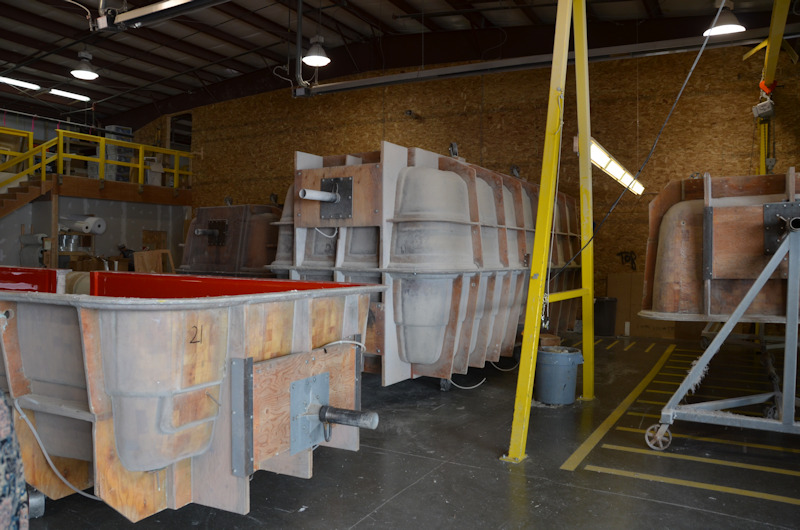
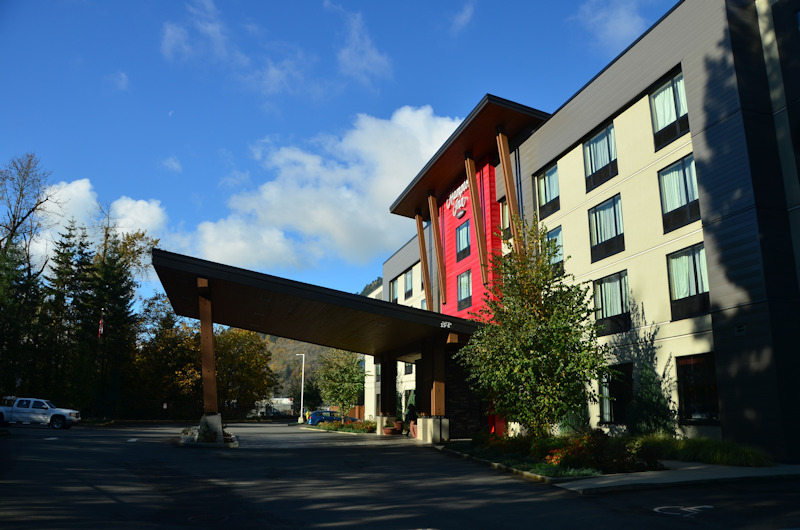
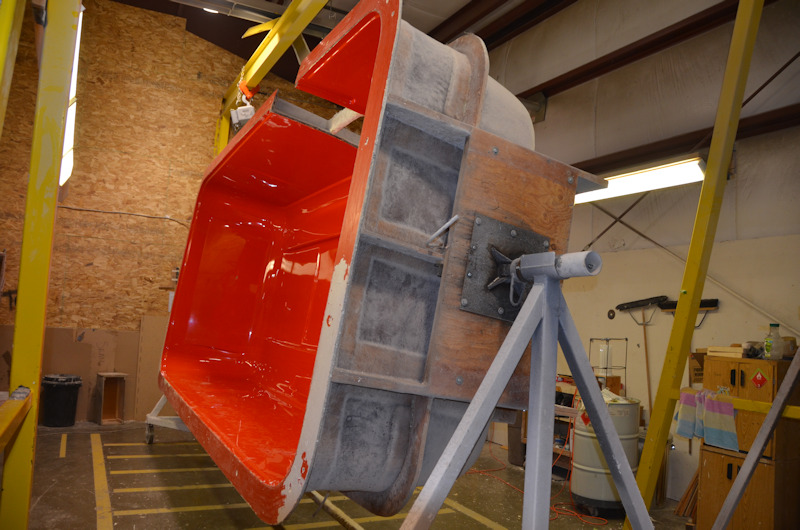
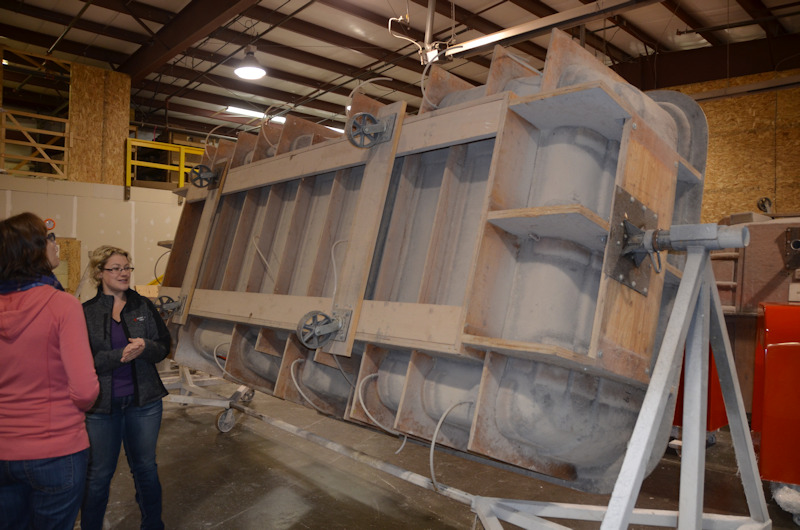
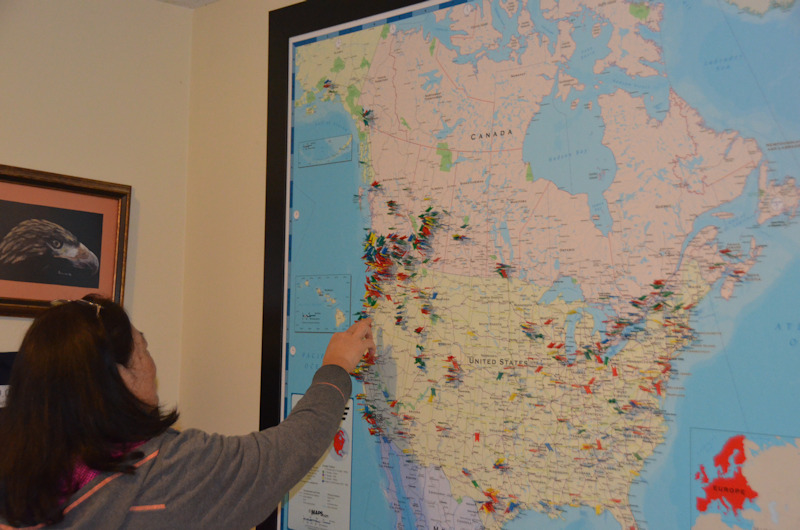
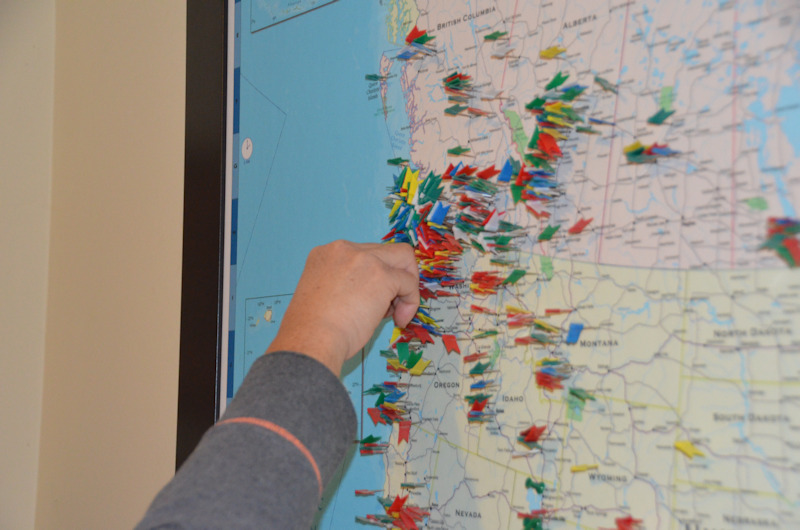
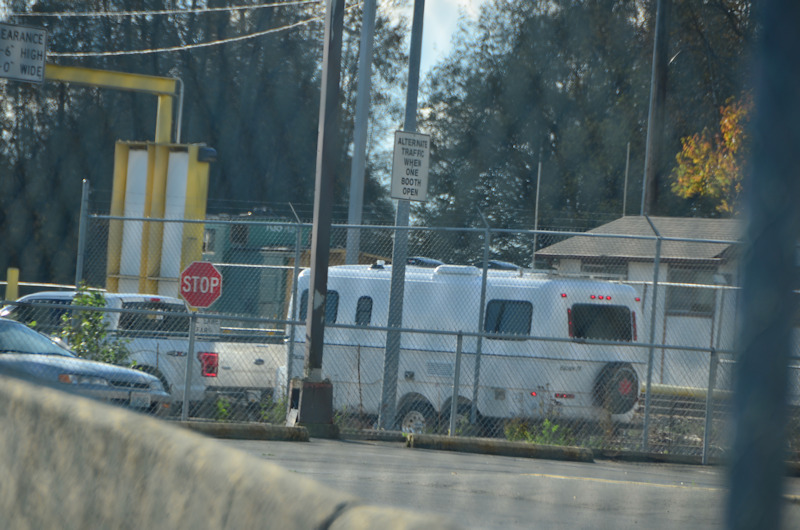
The much-anticipated Trailer 2.0 was scheduled to be all ours on November 3, 2015, and we headed up to Chilliwack a couple of days early and enjoyed the (for us) opulent and somewhat decadent luxury of the spanking new Hampton Inn just down the road from Escape (discounted room rate for Escape customers!) and went through our second factory tour the next day at lunch time, during which we (one of us at least) paid particular attention to the partly finished 19's that still had the trailer innards visible before being hidden by the paneling and wall and ceiling covering. Then it was back to the motel for the night, and up early the next morning for the trailer "care and feeding" orientation session with Rae, culminating with the solemn but nonetheless festive sticking in of a 19' pin on the big wall map of Escape Trailer owner locations, and finally we were off to Bob's Burgers & Brew across the border in Sumas, WA, to meet up with the delivery driver and trailer in the restaurant parking lot. We got through the whole border crossing thing ok, and in fact while we were waiting in line we even got to watch through the fence as our trailer snaked its way through the commercial crossing lanes. As the trailer pulled into Bob's parking lot for the handoff, we were waiting there, lurking furtively, and kept looking back over our shoulders at the border crossing thinking "So yeah, OK - we'll make the drop in the Bob's Burgers parking lot and then get the hell outta here - they'll never catch us!", as if we were big-time international trailer smugglers or something.
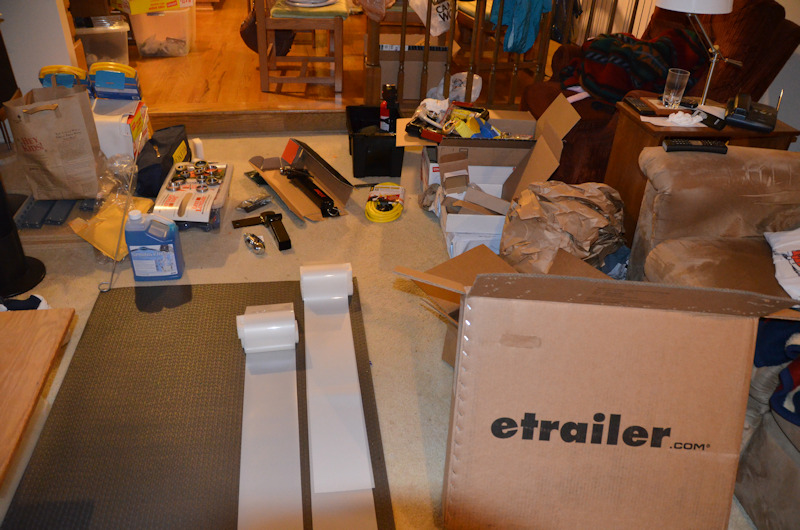
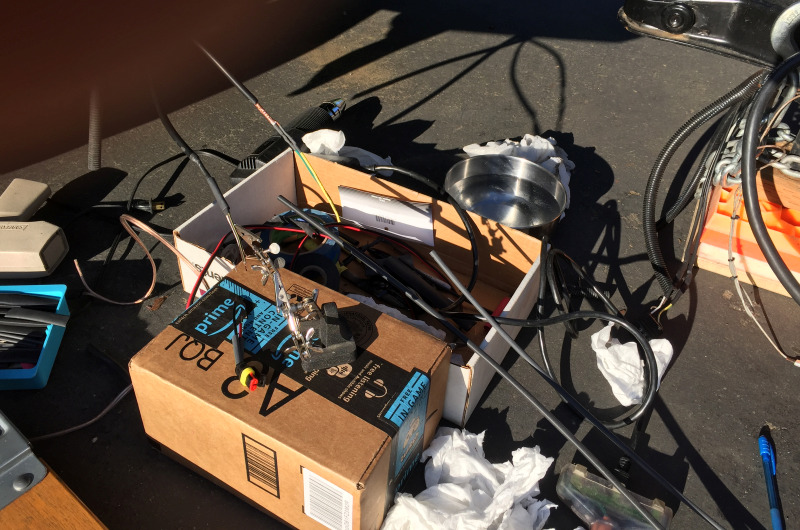
After a thankfully uneventful trip home, we immediately began a pretty much unprecedented frenzy of Amazon and E-Trailer orders, starting with towing and hitching and setting up bits and pieces, sewer and water hoses and fittings, electrical stuff, locking lug nuts, rear view cameras and monitors, and the many sundry miscellaneous electronical and mechanical gizmos and gadgets without which we figured we just couldn't survive.

Our planned "Very Big Very First Trip With The New Trailer" was perhaps somewhat ambitious with a brand new and untested trailer - south from Seattle on Interstate 5, over to the Oregon coast via Astoria, down the coast on Highway 101 to California and then Highway 299 east over the Coast Range and down into Redding, back on I-5 south to I-80, south on 680 to Cupertino for a few Thanksgiving days with family, then south to Pinnacles National Park via 101 and 25, back over to I-5 and down to Bakersfield on 58, over Tehacapi Pass to Barstow and finally into Joshua Tree National Park, then down the east side of the Salton Sea and back up the west side to Anza-Borrego State Park, over to the coast at Ventura, up the coast on 101 to Cupertino for a family Christmas, then a speed run up I-5 and finally home - but we had complete faith that the good folks at Escape had given us a trailer that was up to the task, and we were not to be disappointed.
But before heading out, we needed to take care of a few things on the new trailer, which proved to be only the start of what has become a multi-year "hobby" of finishing off the trailer just the way we want it - can't leave things bloody well enough alone it seems. What follows is an approximately chronological account of the modifications that we have made to the trailer. Note that, in general, the descriptions include references such as "we did this" and "we did that", but in reality, and in all fairness, it must be said that this is only marginally true. Although the dear wife made suggestions and often (ahem) supervised the work, and she pretty much bankrolled the activity while she was still employed (but thankfully this too has passed), the actual work, with the attendant grunting and groaning and grousing and moaning, was done by your humble writer. Happily enough, and generally speaking, adequate, if not generous, compensation was, in various forms, forthcoming. Yeah, I kinda like clauses and commas.
The 4Runner was already pretty much ready to go, having already been used to tow the old Chalet, but the shiny new Escape needed a few essential things before its "Very Big Very First Trip", and unfortunately it was already November, with a chill wind blowing eastward off of Puget Sound, sending rain and wind up into the Washington Cascades, directly through our driveway, so any outside work would be done with cold - if not also wet - hands.
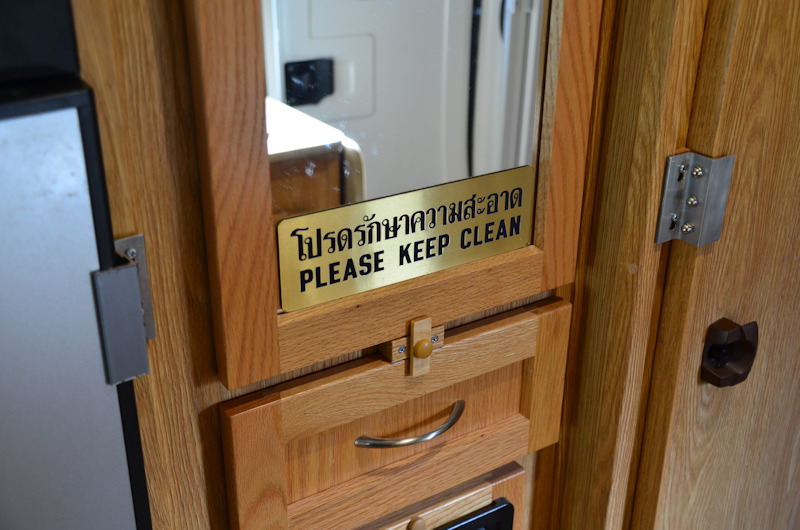
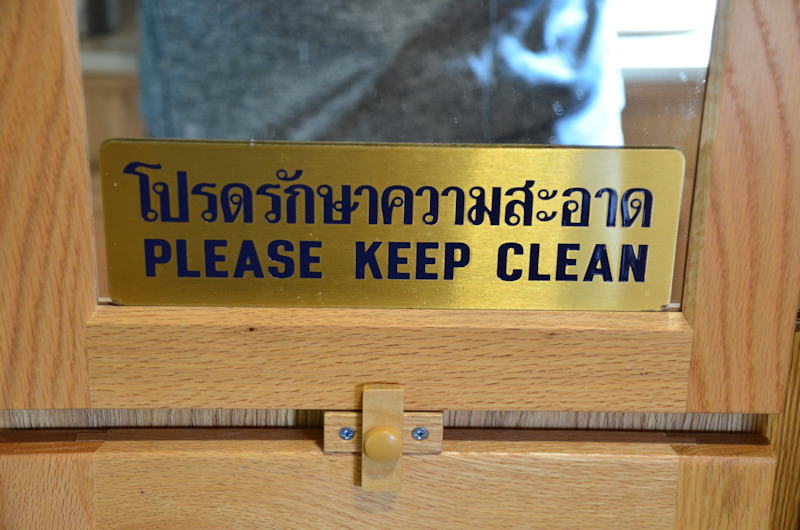
The very first modification was to proactively stick a nice big "Please Keep Clean" sign to the bottom of the closet mirror, a reminder to everyone involved that "An Untidy Trailer is an Unhappy Trailer".
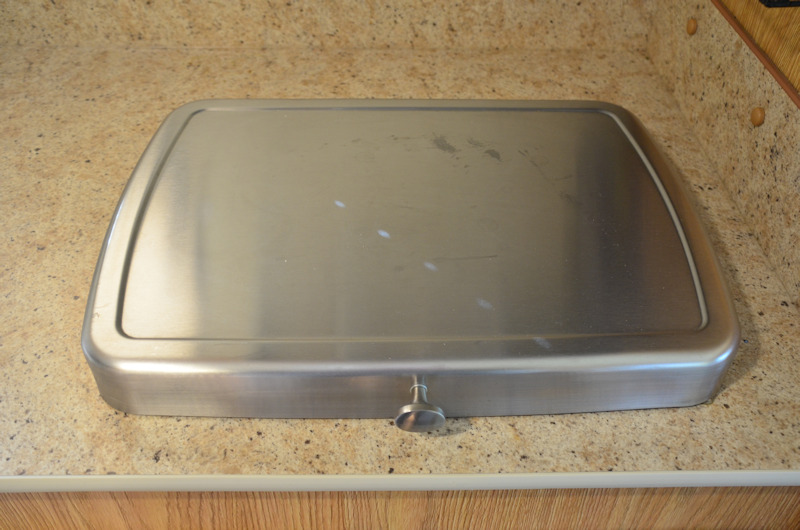
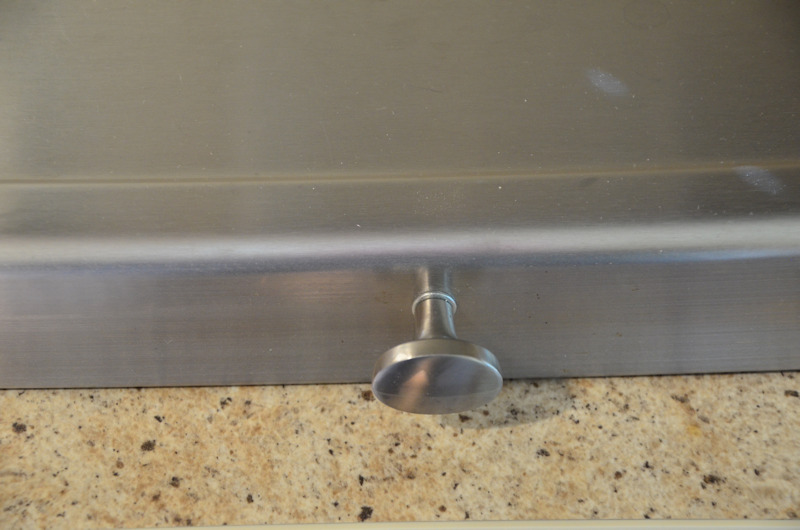
The second modification was in response to the chef's anguished cries about not having a good way to open the cover on the stove. It really did need a handle - the only way to open it was to grab the left and right sides where there was really nothing much to grab, and kind of scrunch the cover between your hands and swing it up - quite awkward indeed - and then not have a hand with which to hold it open. A quick trip to the local Home Despot soon solved that problem with a nice shiny new nickel drawer pull. Gotta keep the cook happy.
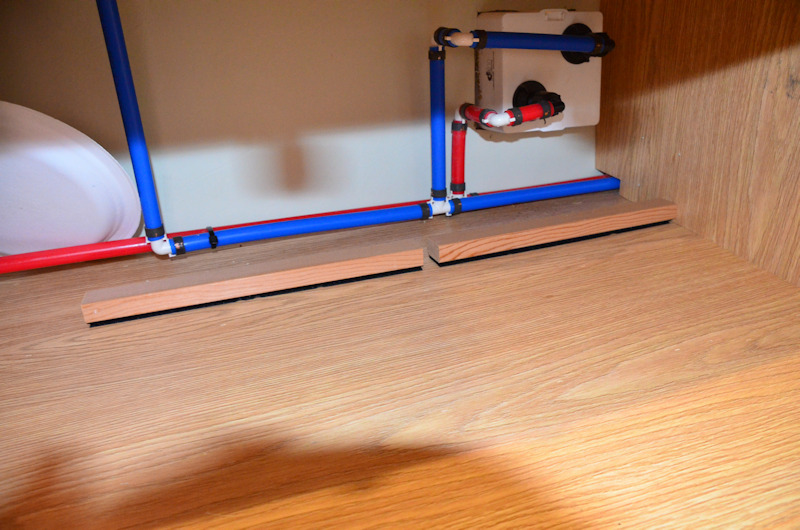
Next up was a way to keep the two relatively heavy boxes of pots and pans and kitchen stuff from sliding around in the main kitchen cupboard and bashing into the sink and outdoor shower plumbing running along the inside of the wall. Having faced all too many household plumbing problems, the plumber amongst us was inclined to be very protective of the trailer's somewhat delicate-looking plastic plumbing bits and pieces, and a few lengths of 1x2 furring strips securely self-stickem velcro'ed to the shelf effectively corralled the potentially wayward boxes, addressing this issue quickly and easily enough. The strips of 1x2 have stayed put just fine for the 3-1/2 years since they were installed.
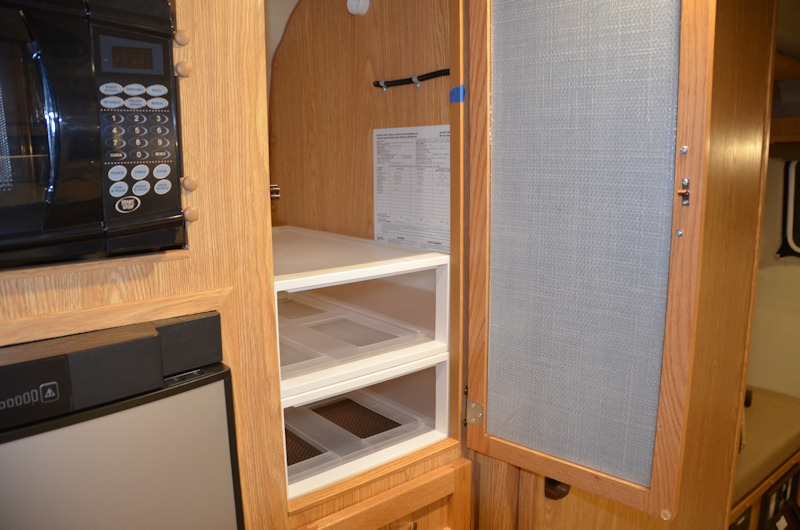
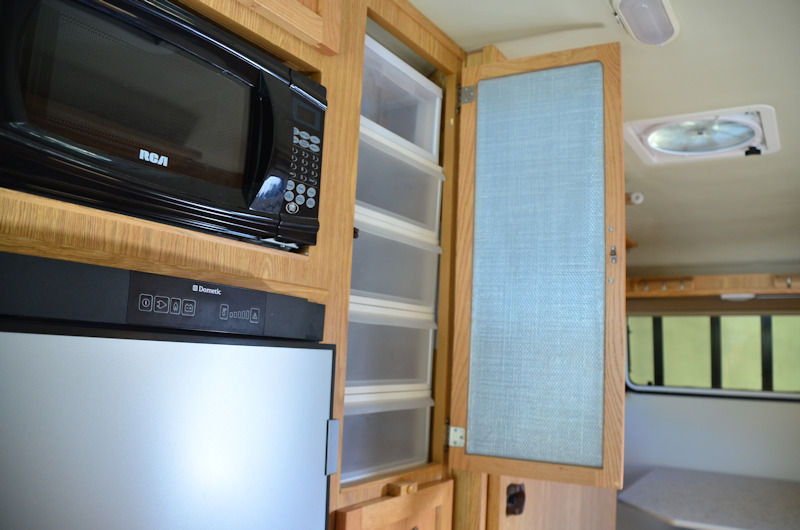
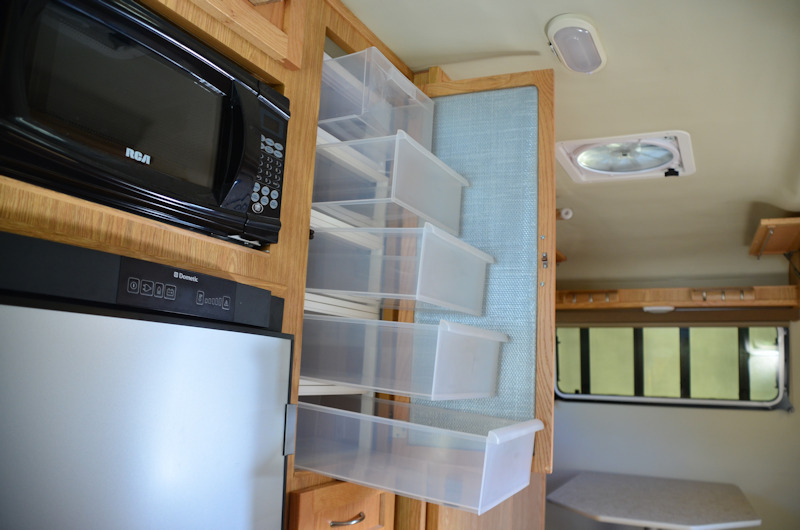
Having decided to not have shelves or hangers in the closet, we pulled out the clothes hanger bar and found some perfectly sized plastic drawer units at The Container Store, wanting maximum clothes storage density, since anticipating shoulder season coldish weather camping and doing lots of hiking we would need room for a mountain of clothes. The drawer units were just the right width and full depth, and they even had reinforced molded-in bosses in the tops and bottoms that could be drilled out to allow them to be bolted together with some #10 machine screw to make it all into a single unit. They stacked in the closet opening nicely, but there was no way to insert the top one since there wasn't enough room to tilt it up at an angle and slide it in on the top of the stack, and it needed to be shallower than the others since the curve of the trailer shell pinched down into the available space. We found a top unit which was the right height and depth, but sadly it was a bit narrower than the others and destroyed the visual integrity of the unit as a whole, but all in all we were happy with the end result.
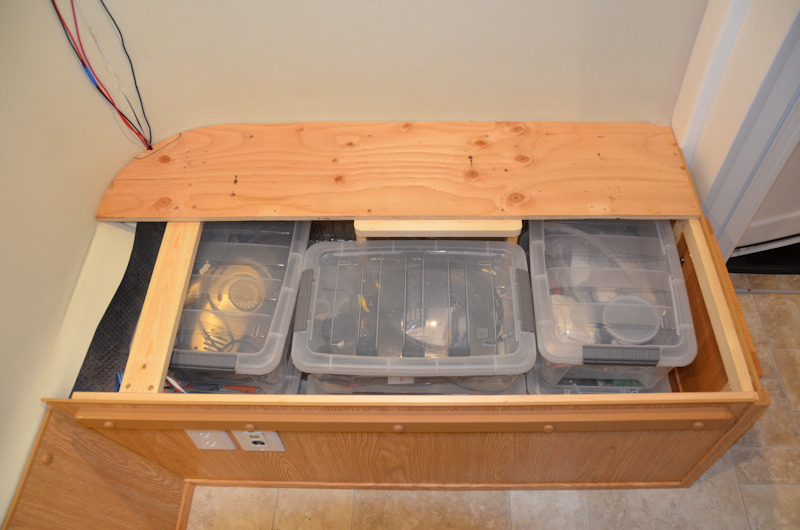
We also found some plastic boxes that would live happily in the passenger side dinette bench seat; six of them fit in there perfectly: One for electrical stuff, one for plumbing stuff, one for mechanical stuff, one for the 12 volt vacuum cleaner, and two for whatever else. There was even room enough in there for our 2 little folding plastic tables from Camping World, along with a big fresh water funnel and a couple of empty plastic one gallon jugs. We also lined all the kitchen drawers with some of that anti-skid foamy coushiony stuff, and rounded up some small organizer boxes for the drawers and some plastic boxes for the overhead cabinets.
The under-the-bed storage compartment was pleading for a nice cargo management solution of some sort, but since we only had limited time before the "Very Big Very First Trip With The New Trailer", we had no choice but to just throw everything under the bed in a big heap, and came up with a remarkably simple yet functional solution, kinda like fishing for stuff. Developing a drawer system or roll-out contraption of some sort to handle under-the-bed cargo was added to the top of the trailer to-do list.
Speaking of cargo, we didn't get the Escape factory front storage box - they always looked to us like they had melted or come unbolted and were perilously close to tipping over, in stark contrast with the proud and upright profile of the trailer. Adding a home-brew front storage box would be a top priority when we returned home from our inaugural trip, and we resigned ourselves to keeping all the typical front storage box stuff in two big plastic tote boxes on the back seat of the 4Runner for the duration of this trip. We really didn't want to drop $700 for the Escape storage box, and in any case wanted to come up with something that weighed less than its 60 pound empty weight, trying to minimize our tongue weight.
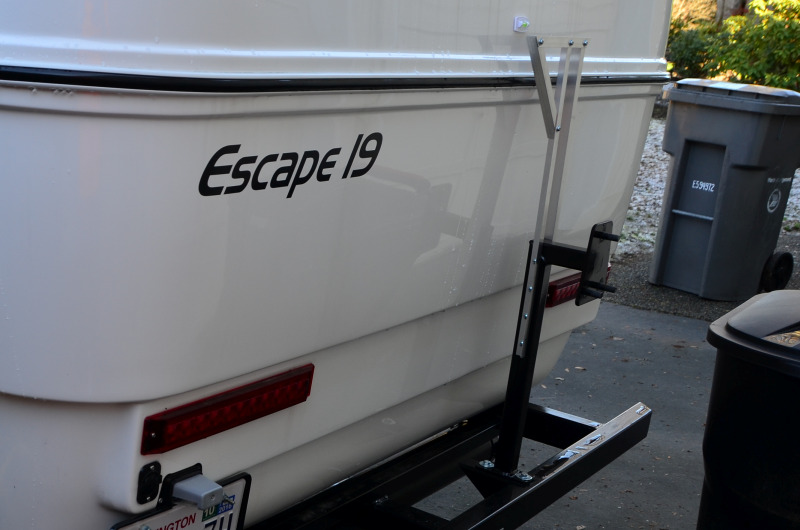
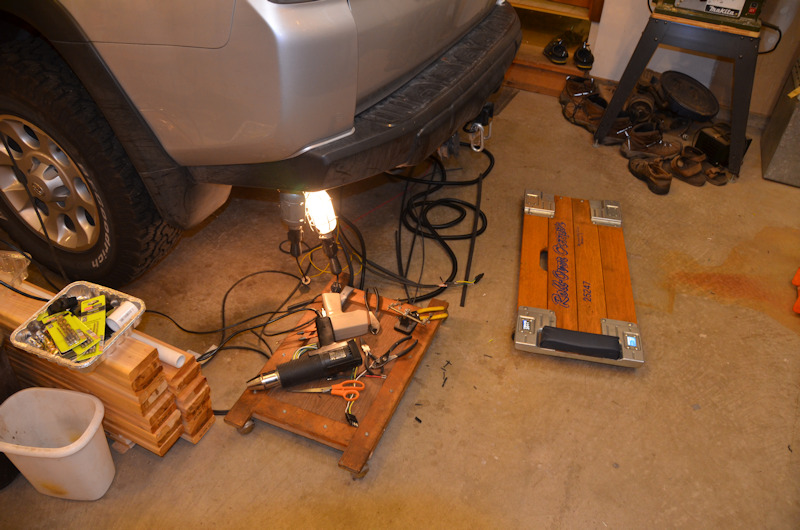
When there was finally a pause in the rainy weather, it was time to tackle the outside stuff, and the rear view camera situation was the first to be addressed. Actually, it was rear view cameras - plural. We had installed a camera on the back of the Chalet, and wouldn't want to tow without one. Someone had the bright idea that if one camera was good, then having two cameras would have to be twice as good. We shied away from wireless camera / monitor systems, given the mixed reviews pertaining thereto, and considering that the few ones available were hideously expensive. The 4Runner was already wired with coax cable for the monitor, running from the top of the dashboard, through the firewall, underneath the car and along the driver side frame rail back to the hitch area, and for the second camera a parallel run of coax would need to be installed, and a new top-of-the-dash mount for two monitors needed to be built. In order to avoid drilling camera-mounting holes in the trailer shell, it was decided that a bracket would be fabricated that would mount to the spare tire mount and run up the back of the trailer, peeking over the spare tire, to provide a platform on which to mount the two cameras. It worked quite well - the cameras were angled at 90 degrees to each other when viewed from above, and provided a wide enough angle to actually see from one high-mounted tail light to the other - a full 180+ degree view. In order to preserve the integrity of the perspective across the 2 monitors, it was decided to painstakingly make the camera mounting bracket so that the cameras would be centered left-to-right on the trailer. We could check that the trailer lights were functioning just by looking at the dual monitor displays. The coax runs for the trailer were routed through the inside of the driver side frame member, and then climbed up the bracket to the cameras. Finally, the two halves of a 6-conductor connector plug were soldered into place (only 4 conductors used) on both the trailer and 4Runner, the 12 volt and ground lines were run to the cameras, and the addition of an on/off switch for the cameras was added to the to-do list. The spare tire mount was bolted back onto the rear bumper using stainless steel fasteners - including oversized flat washers - starting the gradual conversion of exterior fasteners from zinc plated to stainless steel hardware. A pad of 1/16" foamy rubber was used between the bumper and the spare tire bracket to eliminate paint-to-paint and eventual metal-to-metal contact, thereby reducing paint chipping and the resulting rust; this was to be only the first of several such applications.
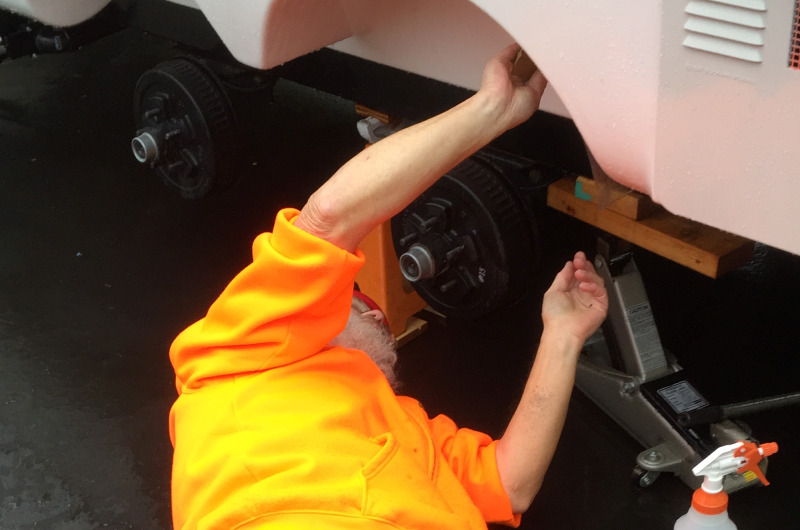
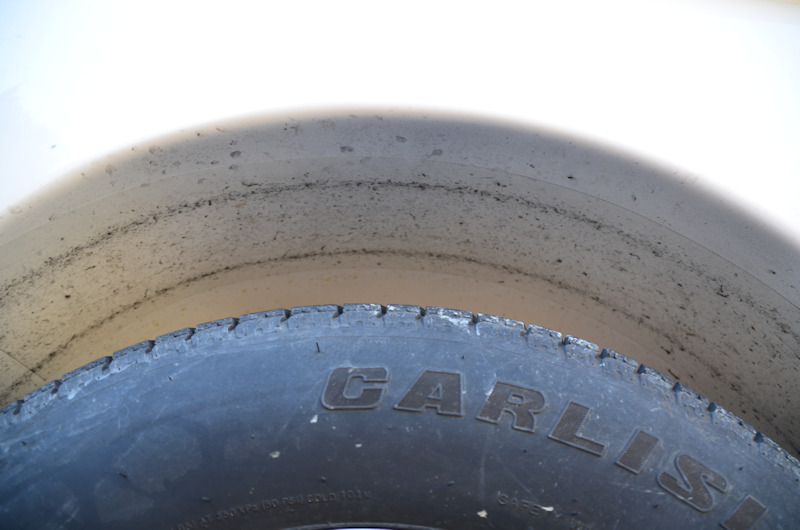
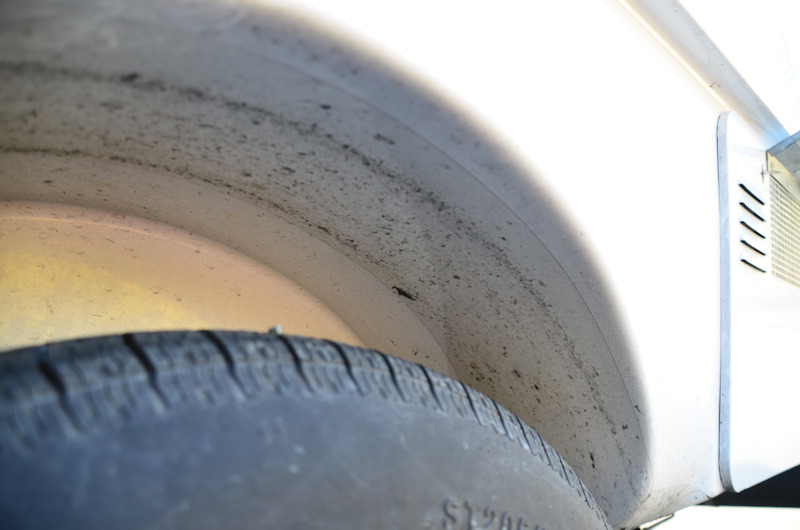
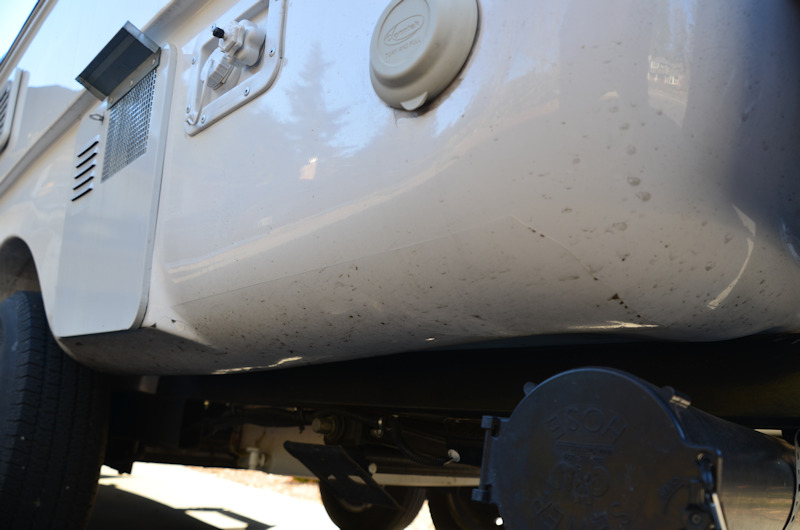
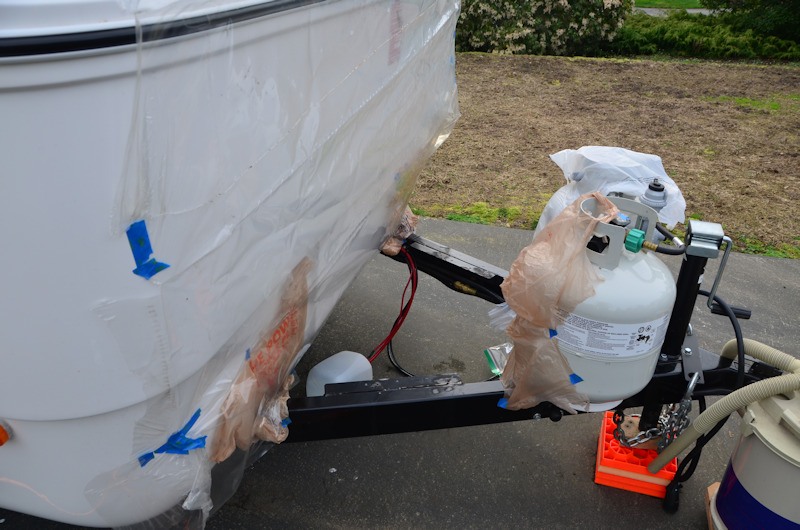
Next on the list was lining the wheel wells with 3M clear protectant film, wanting to protect the gel coat right from the beginning, knowing that the trailer would be destined to see some fair amount of gravel roads in its lifetime. Applying the film requires the use of a water and isopropyl alcohol solution, so before we did anything we checked with our friends at Escape about whether it would be ok to use this on the shiny new gel coat, and happily enough were told that there would be no problems. On the appointed day, the temperatures were in the upper 30's but the skies were clear and blue when we got the whole shootin' match up and on jack stands. The application wasn't exactly a real pleasure, but everything went ok, and once the feeling came back to our hands and feet we were glad we had gotten the job done.
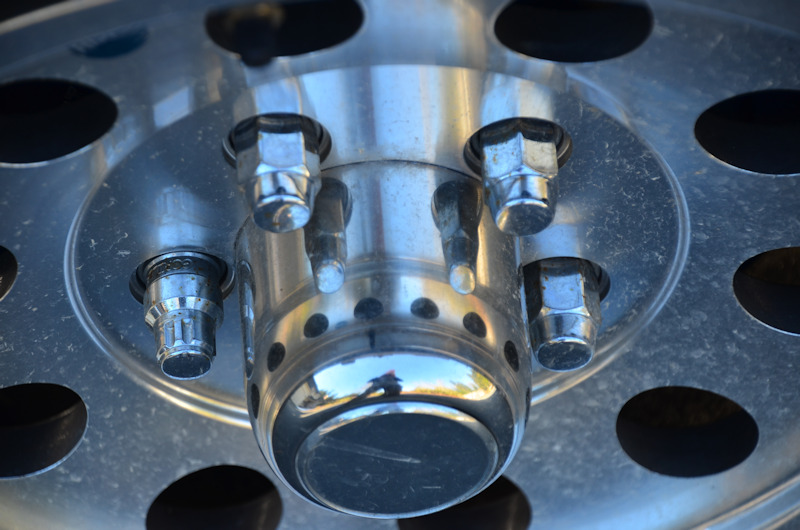
A set of 5 matching "locking" - i.e. fluted - lug nuts was duly ordered from our good friends at Amazon, and installed when reinstalling the wheels after doing the 3M film.
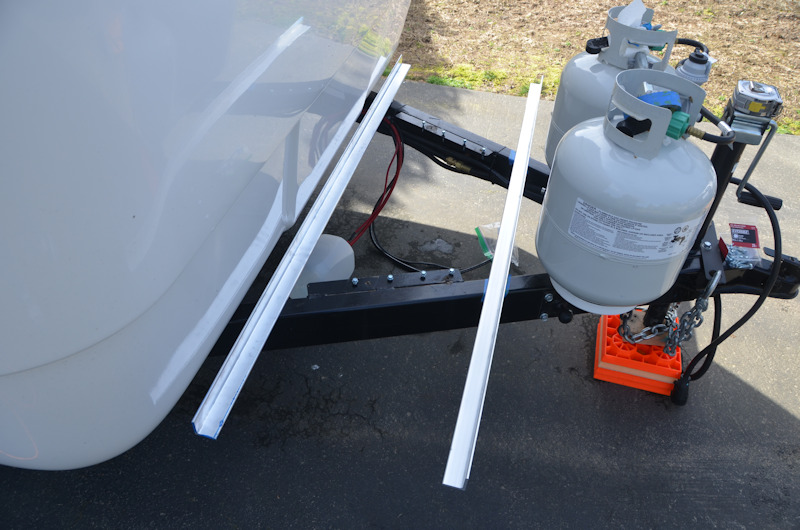
We didn't have time to put together anything permanent to protect the front of the trailer from the onslaught of kicked-up rocks and miscellaneous road detritus, so a length of 1-1/2" conduit was bolted to the rear battery mounting bracket, spanning the trailer side-to-side, from which a couple of thick rubber truck mud flaps were hung on 1/4" bolts. Crude but effective. We had requested that Escape not install the snaps for the vinyl snap-on front corner protector pieces, wanting to eliminate the holes in the trailer shell that the snaps would presumably necessitate.
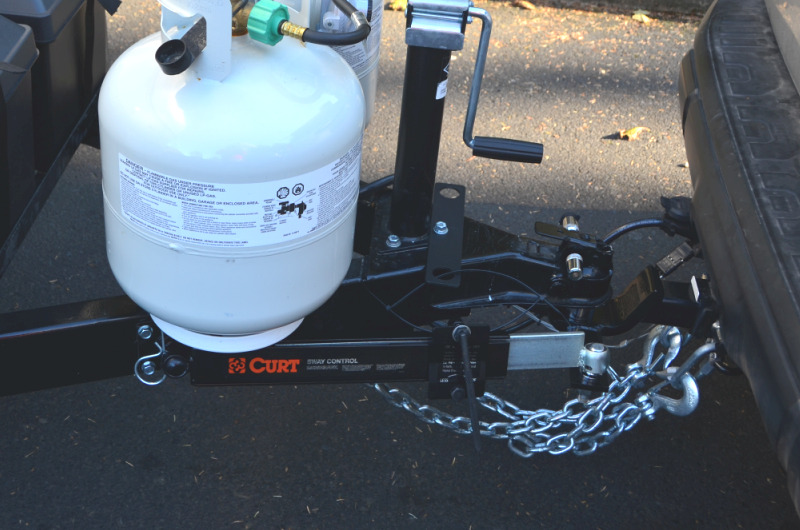
Lastly, we installed a friction anti-sway device, having obtained a ball mount with the big bracket welded to the side on which the cute little anti-sway ball mounted. The most gruesome part of the install was drilling the holes in the side of the trailer tongue frame to mount the little ball. We hit a local parking lot to check for binding with the 4Runner turning both left and right with full lock, and saw no issues.
We grabbed a big pile of clothes, a mountain of hiking and kitchen stuff, some bedding, and our beloved 'gadget box' containing all manner of things electronic and photographic, and finally hit the road just as the temperatures were taking a real nosedive on the day before Thanksgiving. After spending well over an hour to go all of 8 miles and hearing reports that traffic throughout the greater Puget Sound area was completely gridlocked, we turned around and went back home. We tried again early the next morning, and, meeting with more success this time, were soon speeding southward.
While in transit, we hit the Home Despot in Morgan Hill for a 1-1/2" hole saw to cut a hole in the wall between the bed and kitchen through which to run the VPAP nose hose for your humble and apneamatic writer. We were soon to discover, not surprisingly, that running the VPAP off the 120 volt inverter was not going to be a viable long-term option, after it singlehandedly chewed our available battery capacity down to 50% overnight. The electrons' convoluted and treacherous journey from the dual batteries' 12 VDC, to the 120 VAC from the inverter, and finally to the 18 VDC coming out of the VPAP's power supply, was the inefficient way of getting from point A to point B, so a 12 VDC to 18 VDC converter was added to the shopping list, but would have to wait till we got back home. Meanwhile, the batteries would just have to tough it out.


Ultimately, the 5 week and 3,276 mile "Very Big Very First Trip" was an unqualified success, with highlights that included hiking and 4-wheeling at Pinnacles and Joshua Tree National Parks and Anza-Borrego State Park, and a most enthralling, if somewhat unsettling, visit to Slab City. When we got home, we had to figure out what to do with the trailer storage-wise, given that our beloved home owner's association gets negatively excited about residents leaving trailers and other vehicular eyesores sitting around in driveways and yards or otherwise being "visible from any publicly accessible area". In fact, close scrutiny of our CC&R's and Neighborhood Standards reveal that doing such things constitutes an Infraction Level 2 Offence, rendering the offender subject to the following fine schedule: $200 for the first violation, and $100 thereafter until compliance is restored. These guys aren't fooling around about this stuff. We poked around the immediate area and found a nice storage place just 6 miles from home - complete with tall fences and big locks and video monitoring and barbed wire, and we moved the trailer, towed hard and put away dirty, into its new "Trailer Jail" home for the winter till the sun would, we fervently hoped, inevitably and eventually, return to Seattle.
Some weeks later, the sun did indeed, inevitably and eventually, return to Seattle, so it was time to dig out the trailer and get back to work.
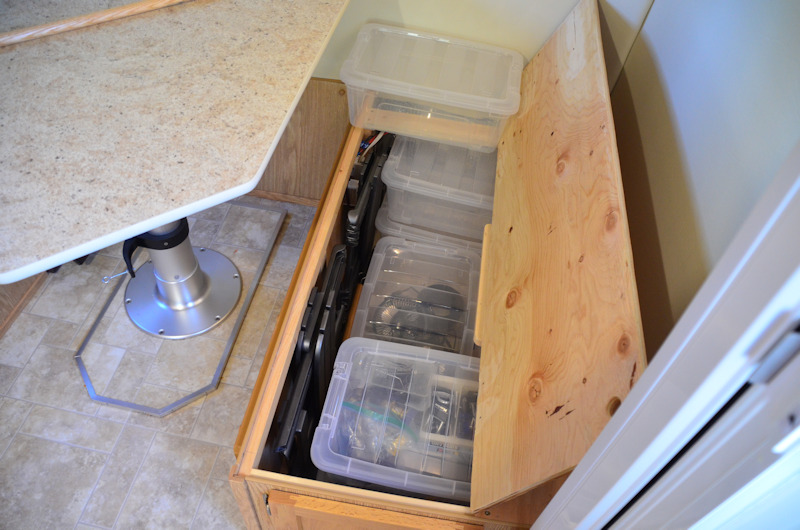
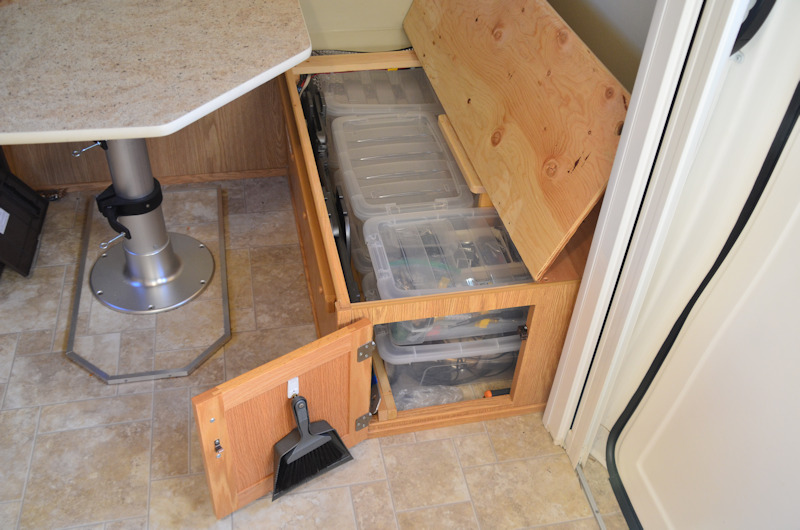
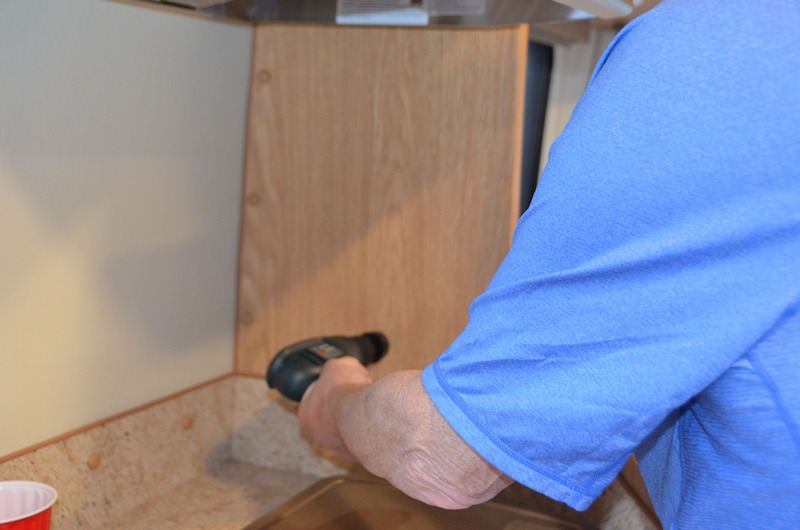
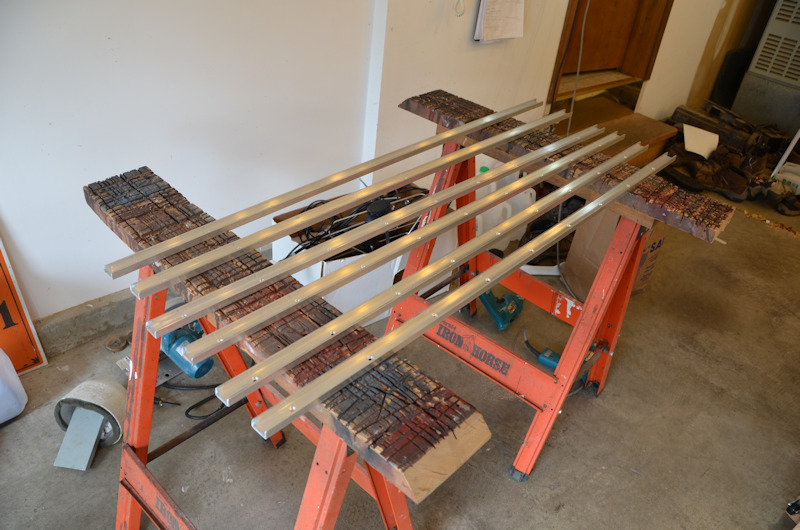
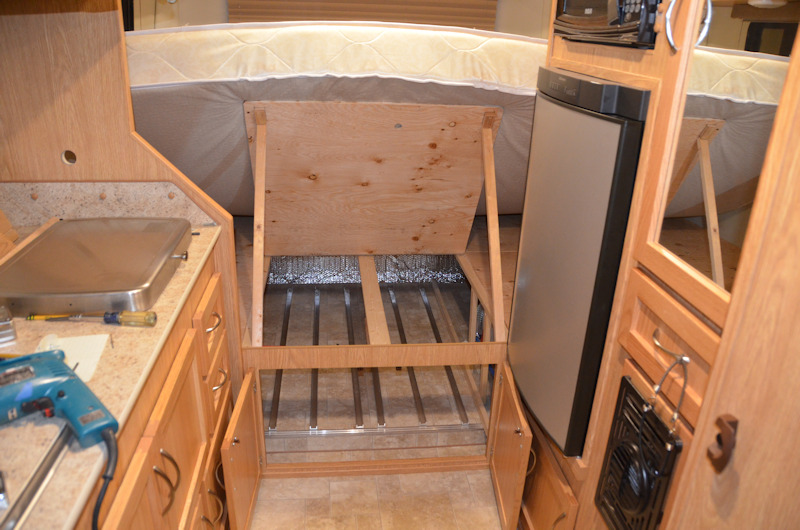
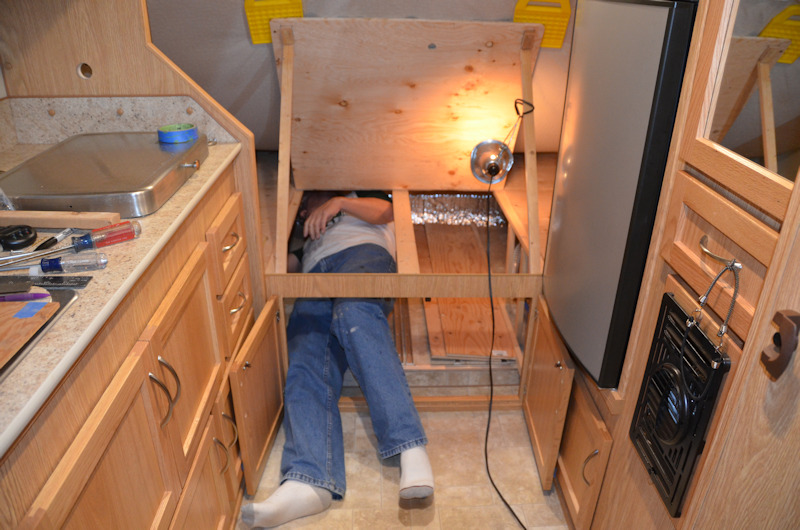
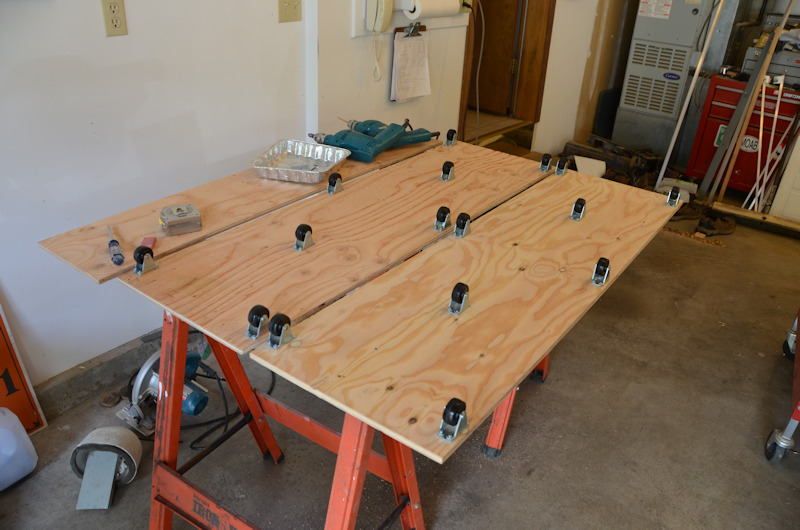
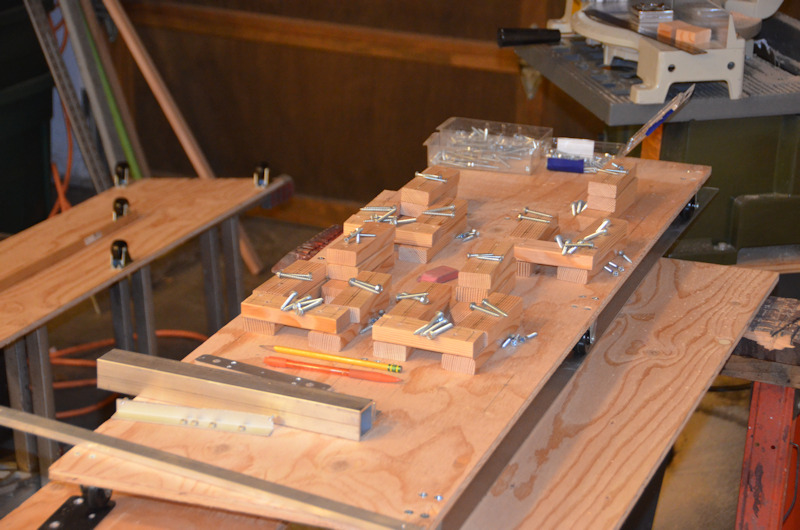
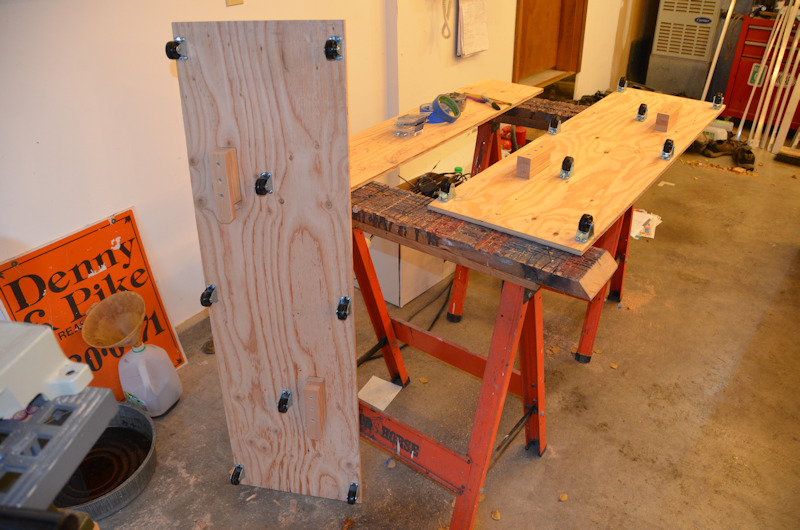
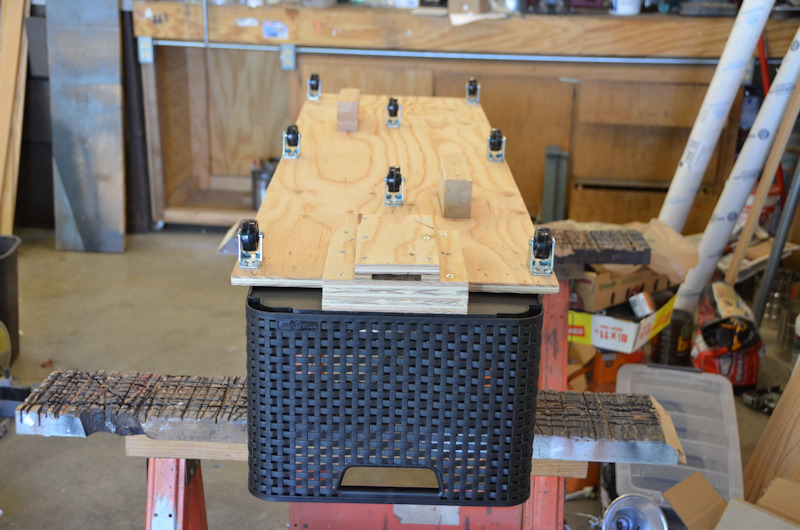
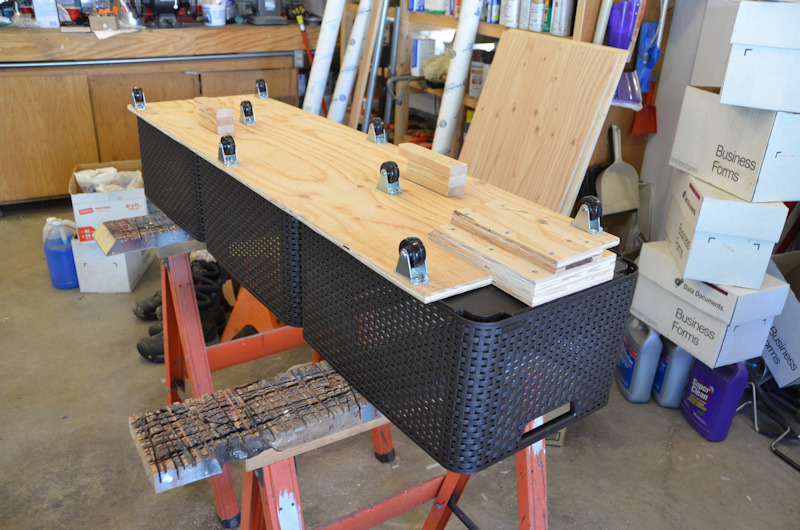
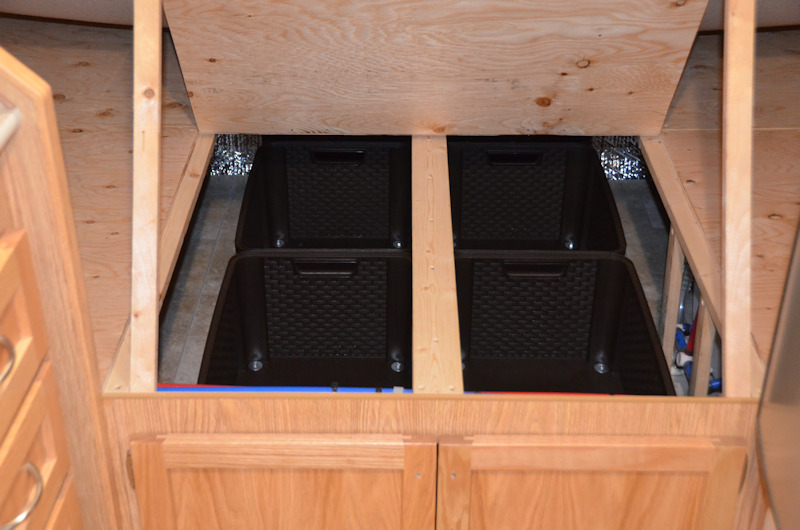
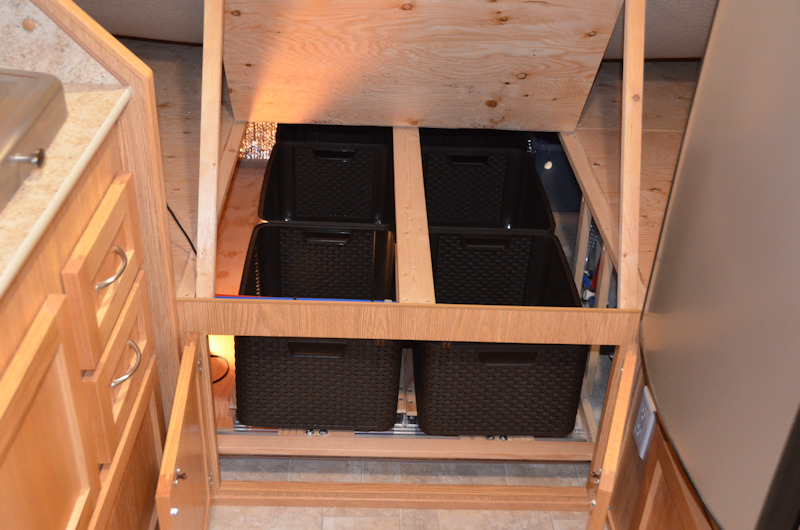
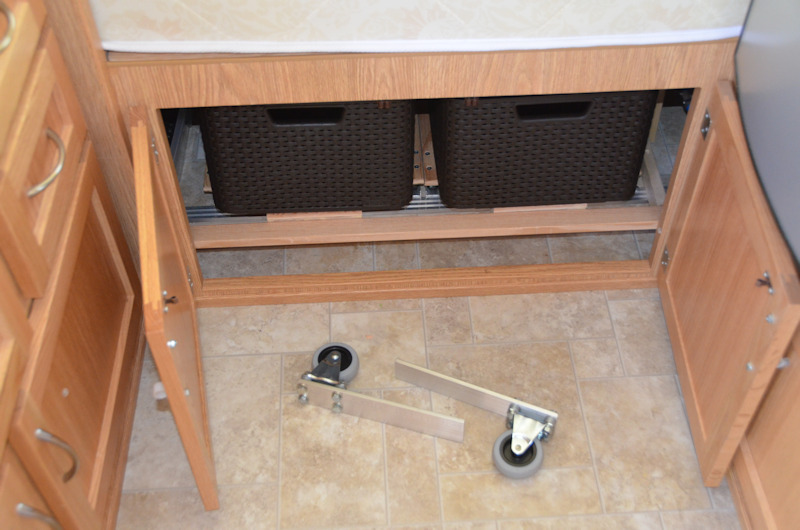
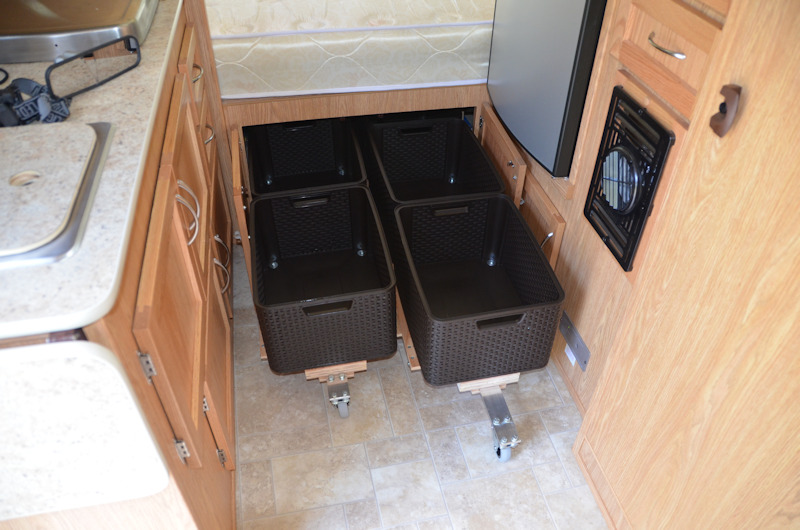
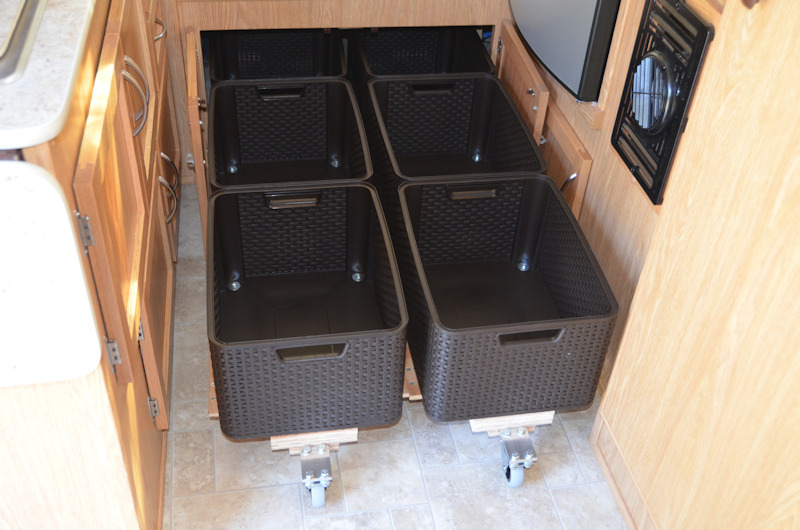
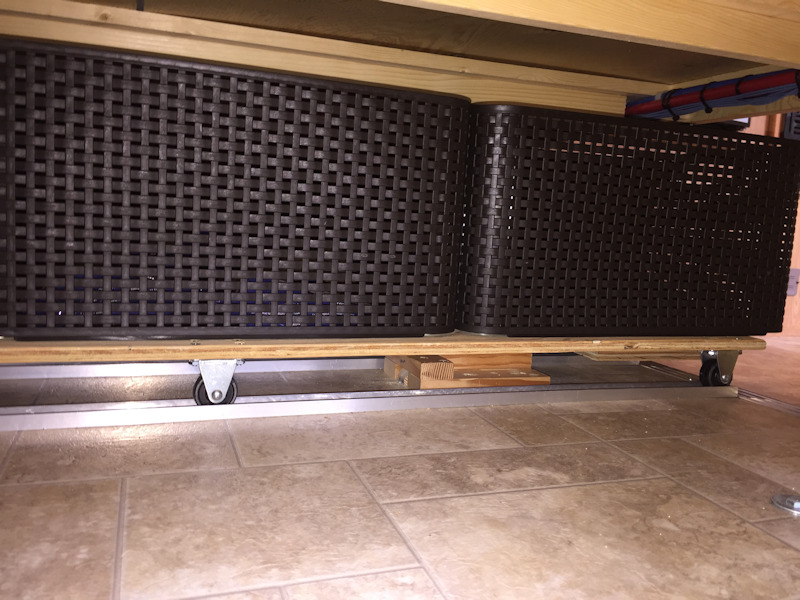
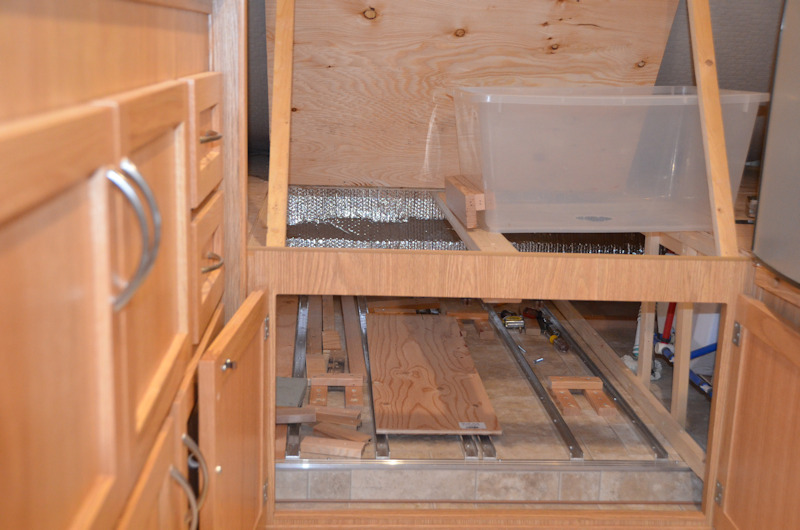
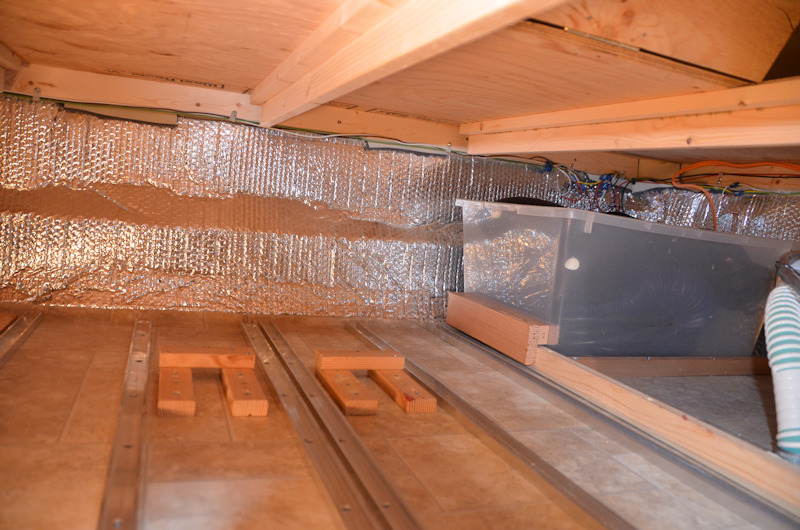
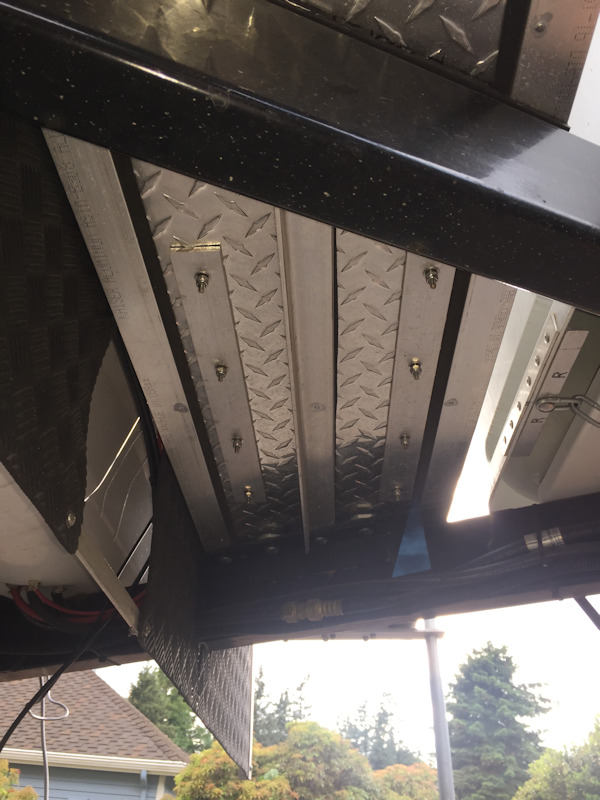
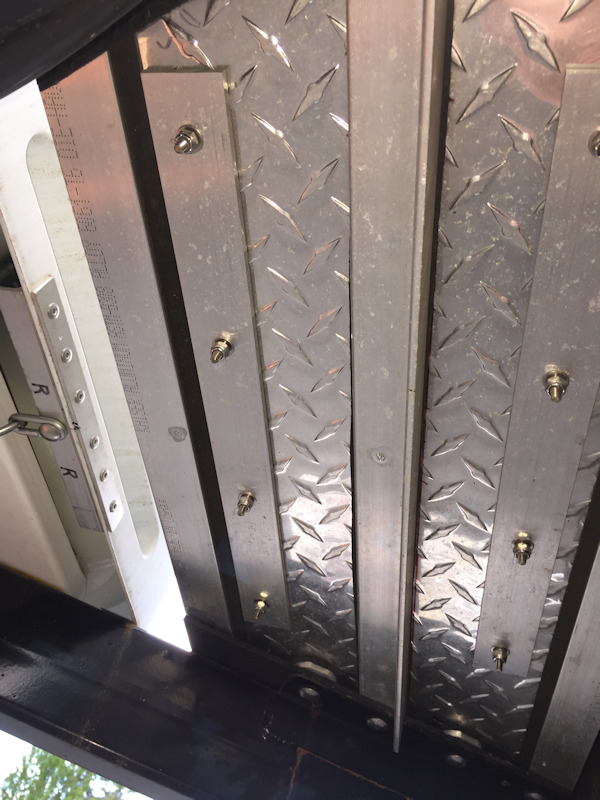
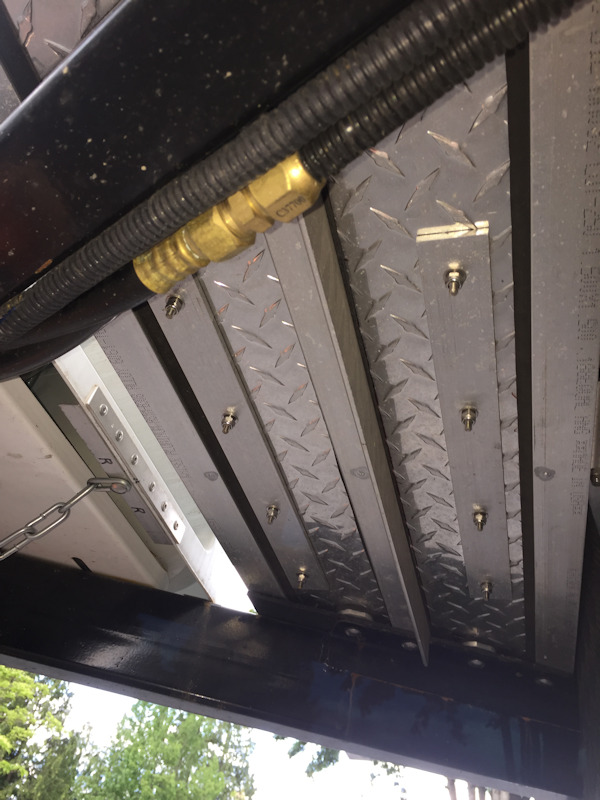
Most urgent was a way to organize all the stuff in the storage space under the bed - the 5 weeks of pawing through the under-bed dungeon had made that abundantly clear. We first thought about making big plywood storage boxes and using big long drawer slides, allowing the drawers to pull out from under the bed into the center aisle of the trailer, but we really wanted to keep the weight as low as possible, and even if made out of 1/2" plywood they would still be pretty heavy with full sides and bottoms, and the big long drawer slides would weigh a bunch, and we really needed something that would be firmly anchored to the trailer floor for when we hit rough dirt roads, so some loose sliding things wouldn't work. We ended up deciding to install aluminum U-channels on the floor under the bed, use a bunch of cute little short casters to maximize the available storage height and spread the weight around, and make up some 1/2" plywood sheets with nice light weight plastic boxes screwed to them. The only problem would be that when rolled out from under the bed and deployed into the aisle, the unsupported ends would take a nosedive into the floor. Some easy on / easy off casters mounted on aluminum flat stock would take care of that, and some latchy-clampy things made up of 1x2's would secure the rolling platforms to the floor when stowed, restricting side-to-side and rearward motion, and an easily installed length of 1x2 across the front would keep everything from moving forward during those troublesome panic stops. Tolerances were tight enough so that the original door handles on the double doors leading under the bed would hit the opposing cabinet faces when opened all the way and prevent the sliding boxes from being able to extend out fully, so some cheezy-looking low-profile wiring clamps were pressed into service - on a "temporary" basis 3 years ago - as somewhat unattractive, albeit highly functional, door grabbers.
While still sore and miserable and grumpy from working under the bed so much, it was decided to go ahead and install a big plastic storage tote way back in the left-rear corner of the trailer. It grabs the original on-edge 1x2 running along the floor by simply dropping down so that the 2 pieces of 1x2 bolted to the box engage with the on-edge 1x2. Due to the inconvenient access, the box is used to hold stuff that should very seldom be needed: The original big heavy 30-amp power cord, a set of clamp-on extendo rear view mirrors (just in case the local gendarmes get all excited about such being required for towing), and two foamy rubber sewer hose connections (just in case we're ever staying at an RV park that requires such things).
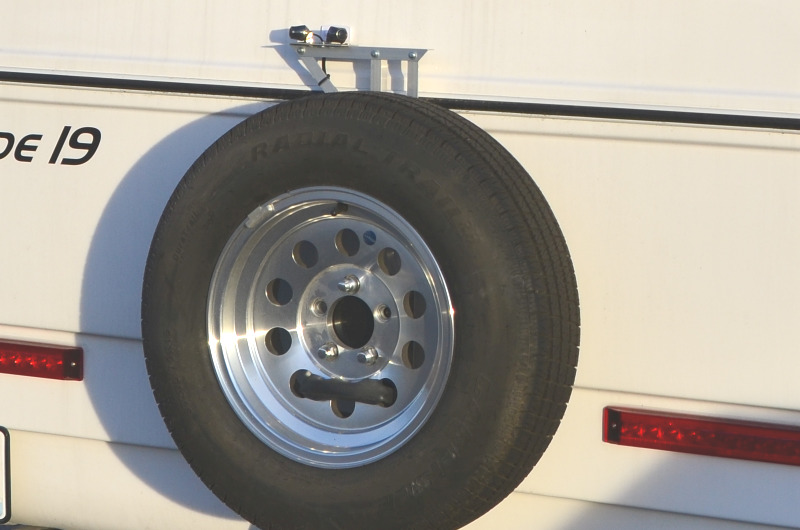
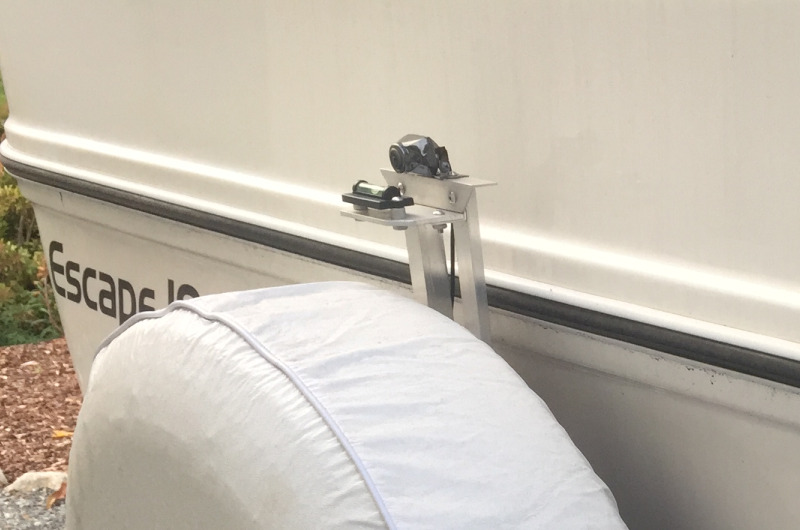
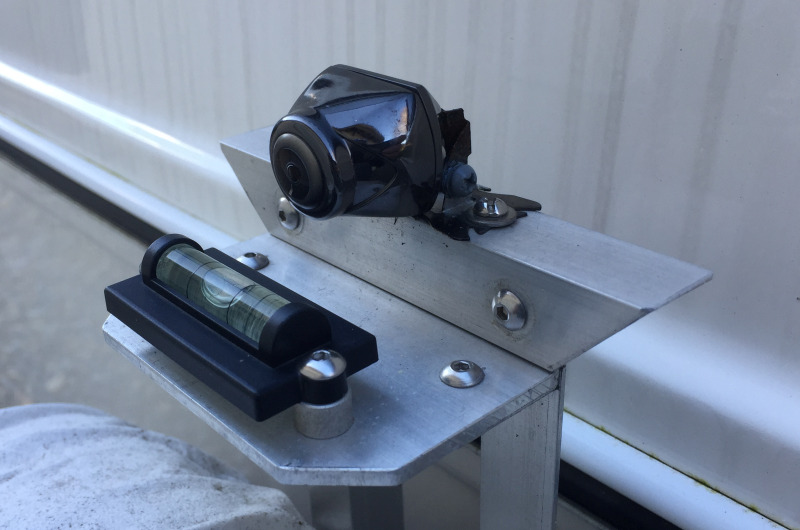
During the course of the "Very Big Very First Trip" it had become apparent that the dual rearview camera and dual monitor installation would be short-lived. In particular, the navigator and "I Only Tow On The Freeway And Don't Even Think About Asking Me To Back Up Never Ever" relief co-driver made it abundantly clear that she found the 2 camera / 2 monitor rearview situation untenable. Admittedly, it was somewhat confusing, disconcerting even, to have the image of e.g. a following vehicle span across the 2 monitors, one headlight on one monitor and the other headlight on the other monitor, and the promise was made to revert back to a single camera and monitor scenario when we got home. Going back to a single camera made it less important to have the camera centered side-to-side on the trailer, so it was installed straight up from the spare tire bracket, and was therefore somewhat offset to toward the passenger's side of the trailer. The de-installation was relatively quick and easy, but it was unfortunate that all that time and effort had been spent on the dual camera installation, only to have it all be for naught.
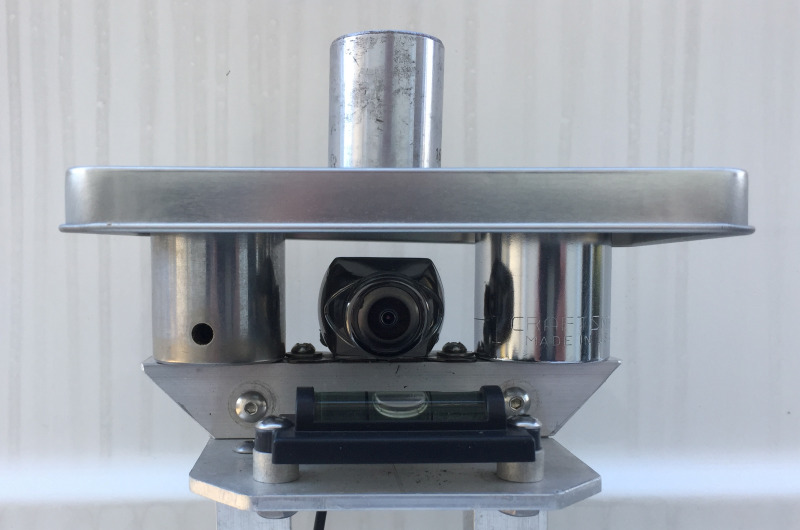
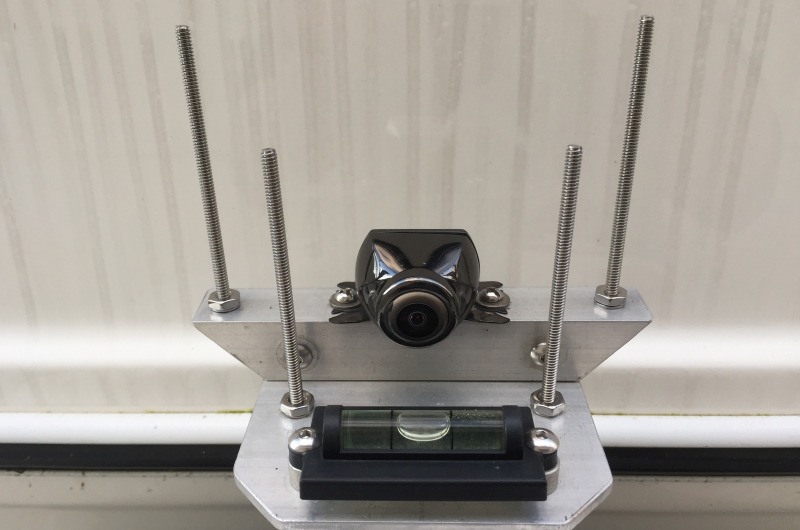
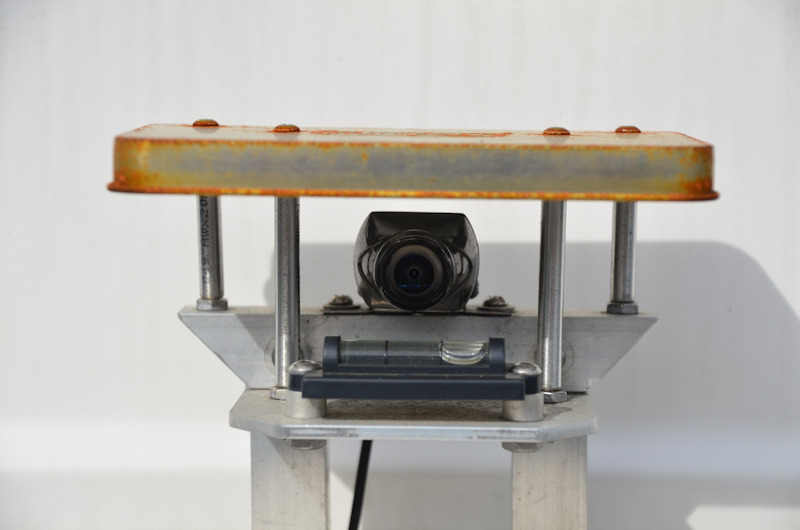
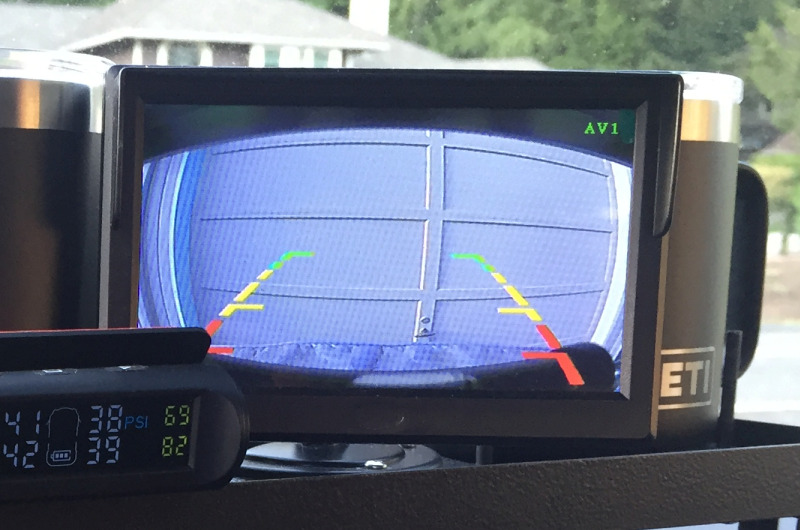
Having encountered a number of undulating campsite parking spots and facing the related communication issues regarding the side-to-side levelness of the trailer, namely with the ground crew member trying to direct the driver to pull slightly forward or backwards in the parking area in hopes of finding a sweet spot where the trailer would be adequately level side-to-side based on the machinations of the mysterious and mystical transversely-mounted bubble level, and said ground crew member having no small amount of confusion about the bubble being to the left or right of center and what it all really meant regarding which side of the trailer was too high or too low, it was decided that it would be generally advantageous and maritally beneficial to mount a bubble level in such a way that it would appear along the bottom edge of the image in the camera monitor. That way, the driver could simply inch forward or backwards as needed, while watching the bubble level on the monitor, to hopefully position the trailer so it would be acceptably level side-to-side, which has since proven to be a real useful feature. We wanted to protect the camera from the elements so made a little umbrella that floats above the camera, gracefully supported by 4 long machine screws inside pieces of stainless steel tubing, using the lid from a metal storage box which sadly enough eventually corroded and got ugly, so the search continues for an appropriately-sized white or silver plastic or aluminum lid of some sort to be used in its place, or failing that, it would be a simple matter to bend up something from a piece of sheet aluminum.

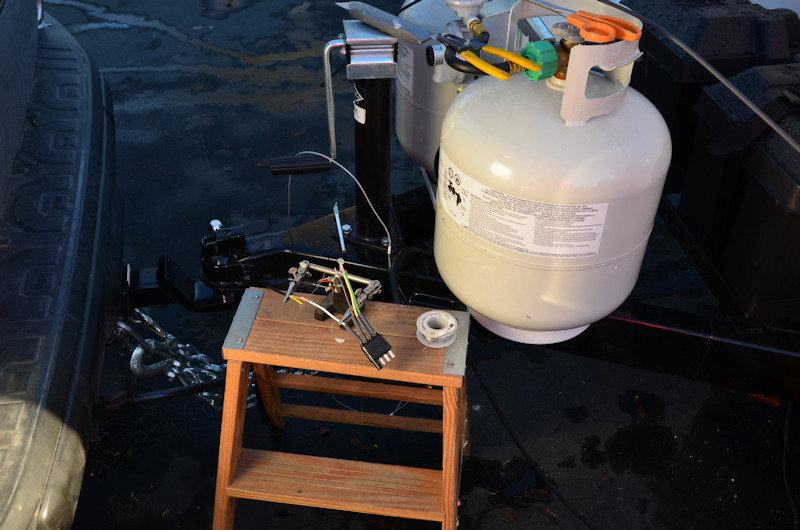
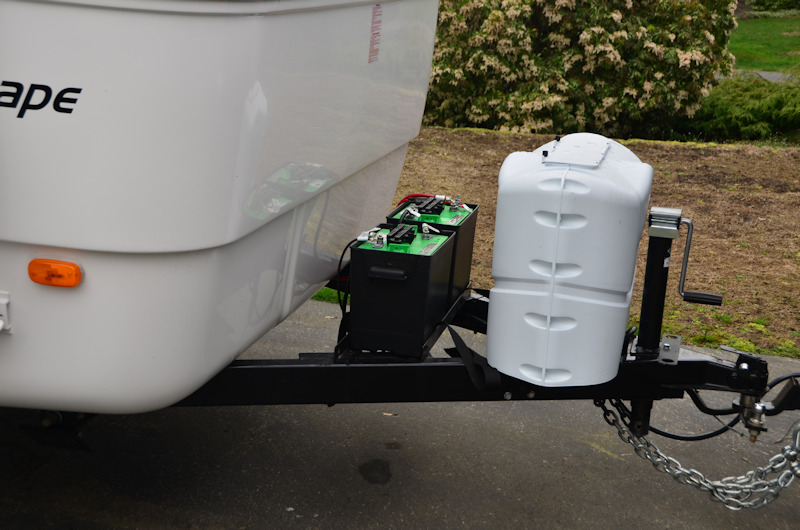
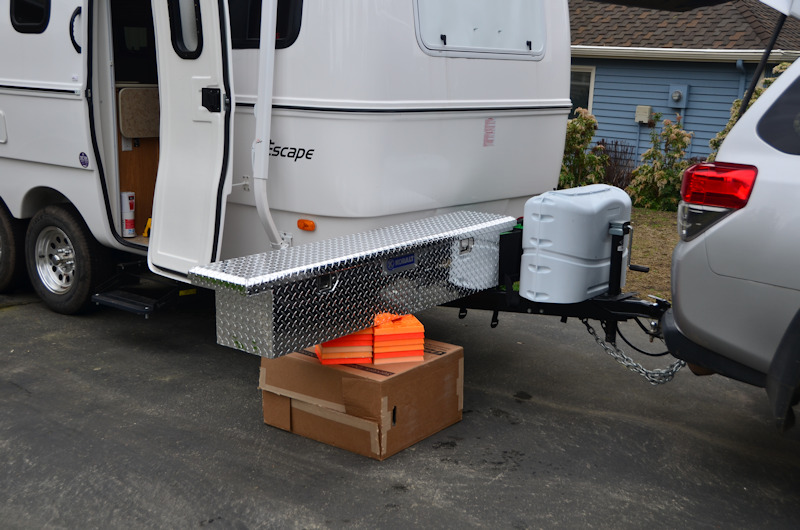
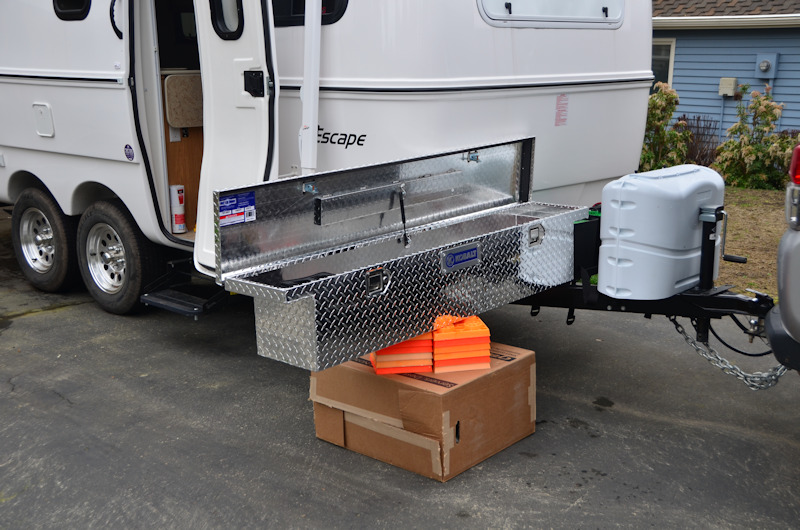
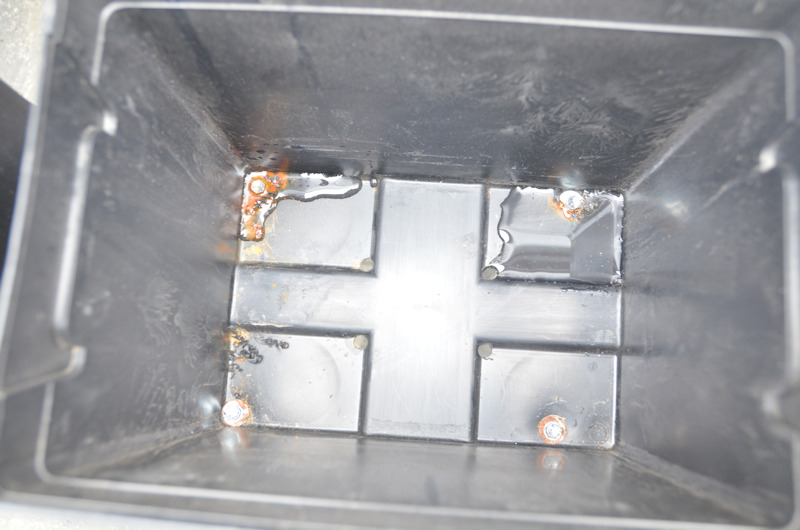
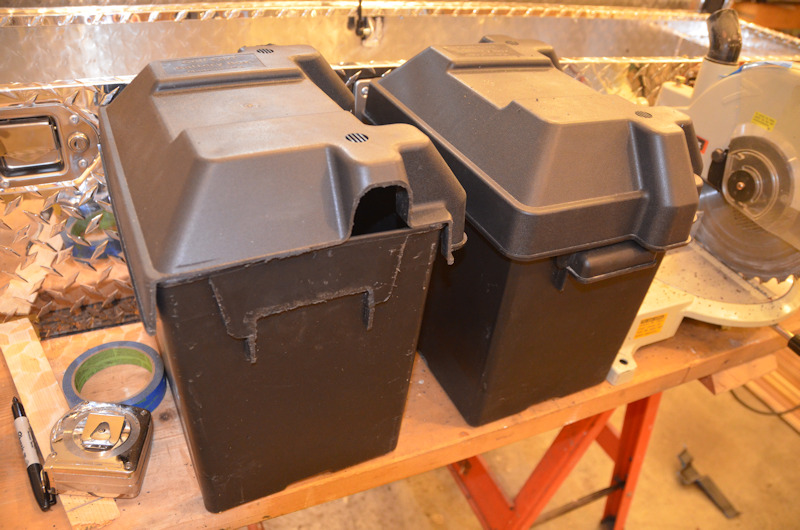
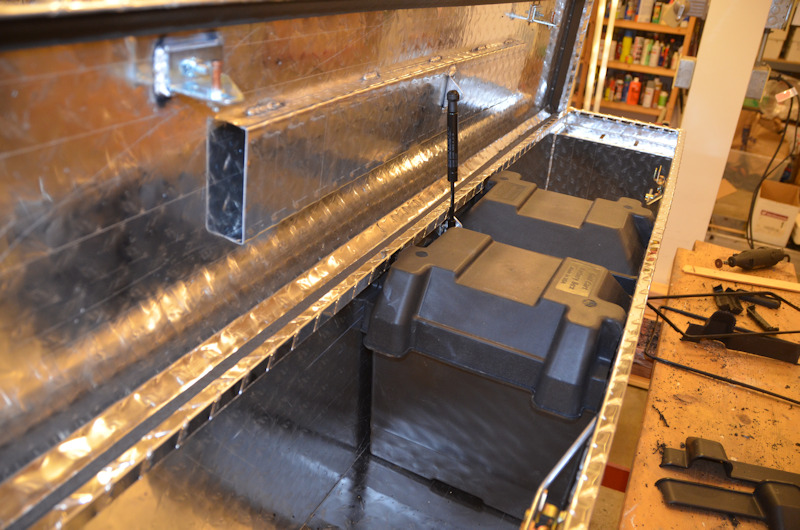
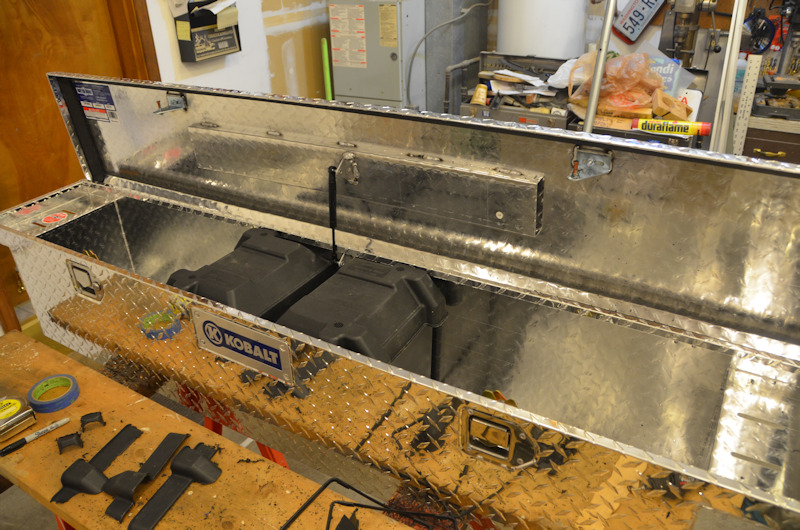
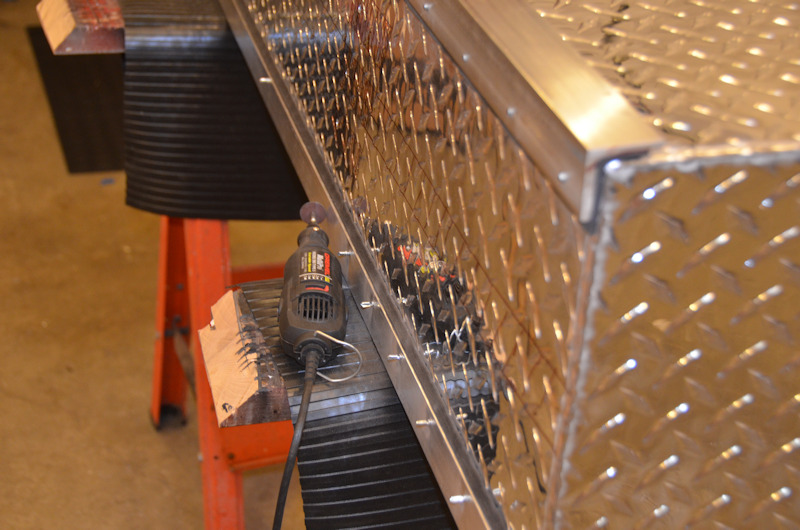
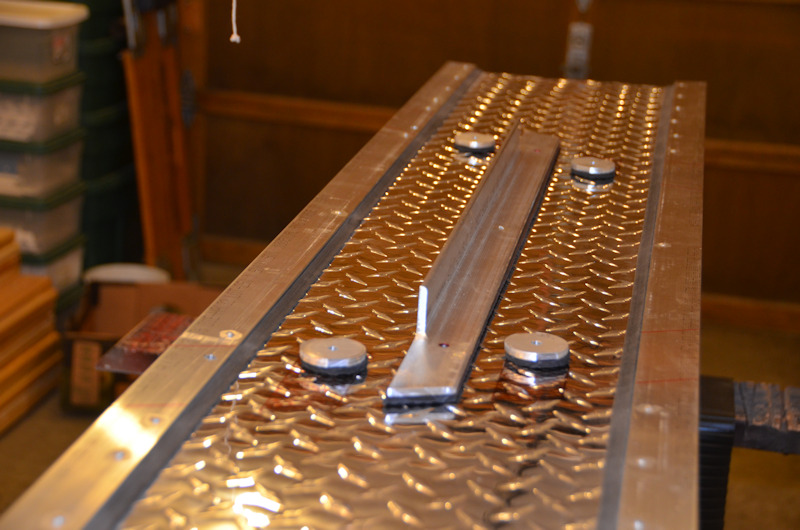
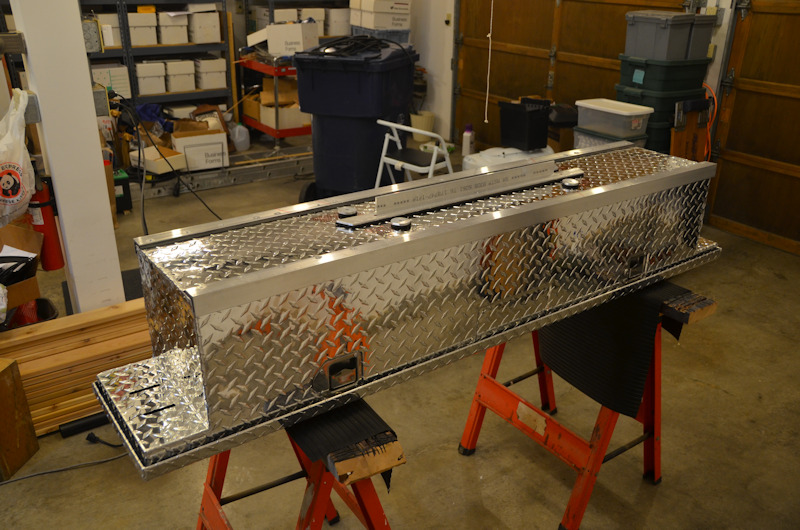
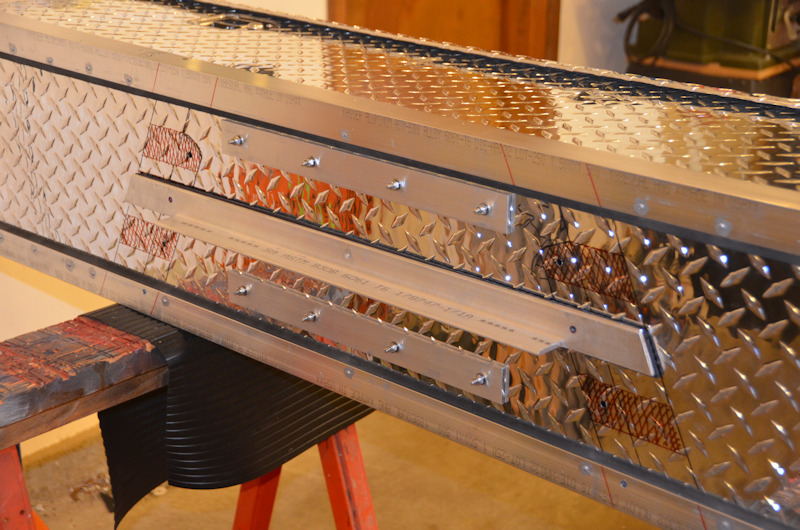
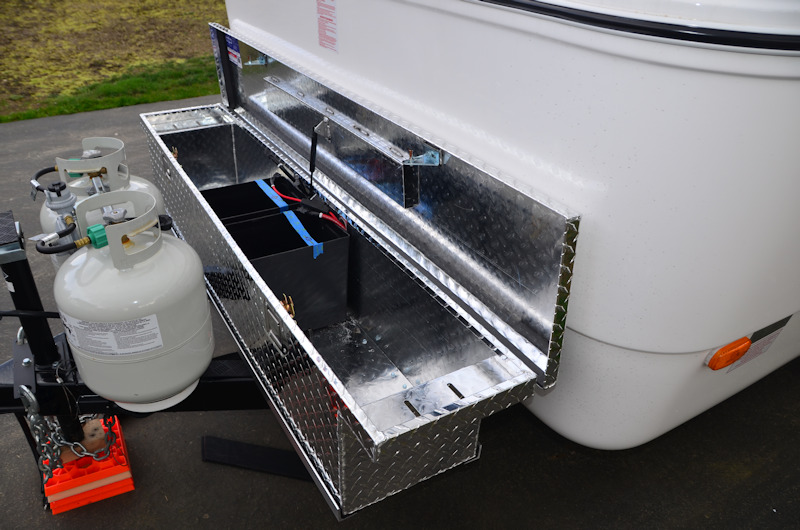
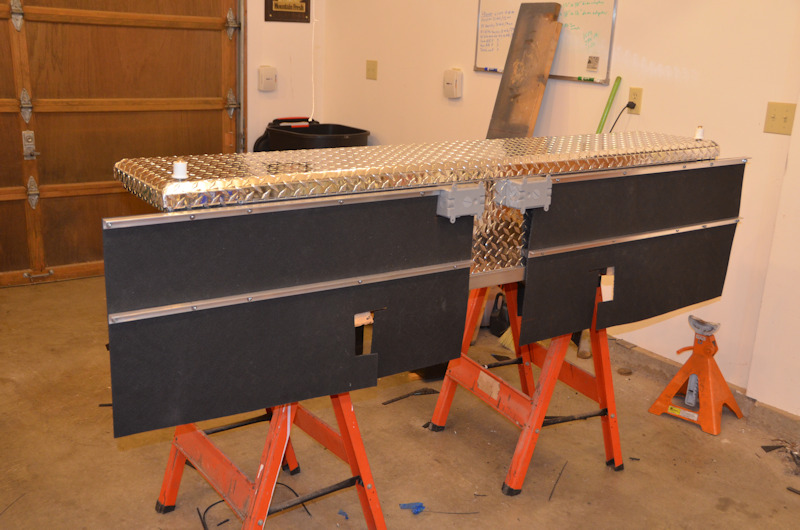
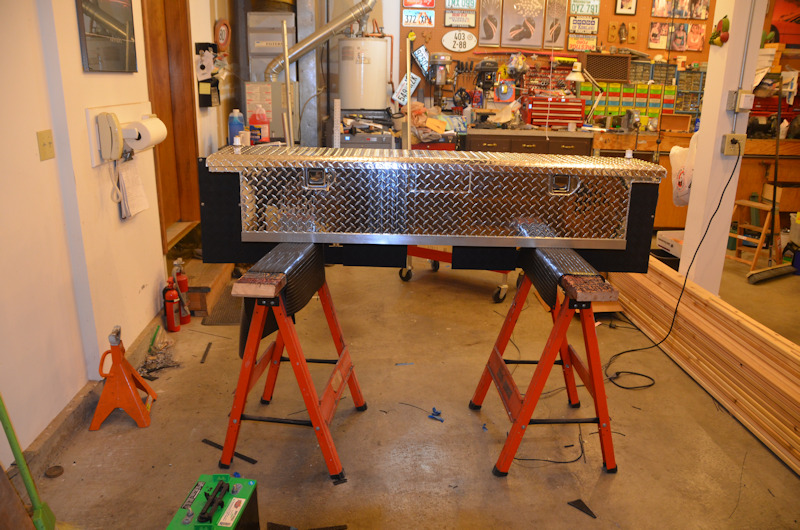
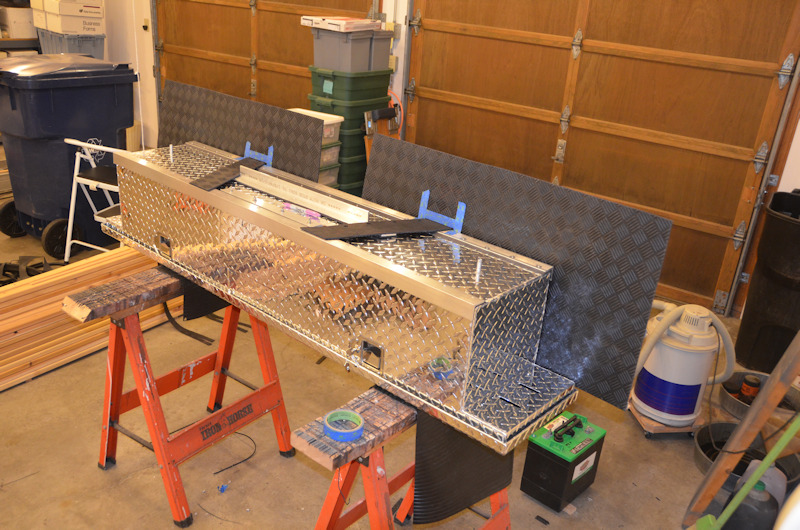
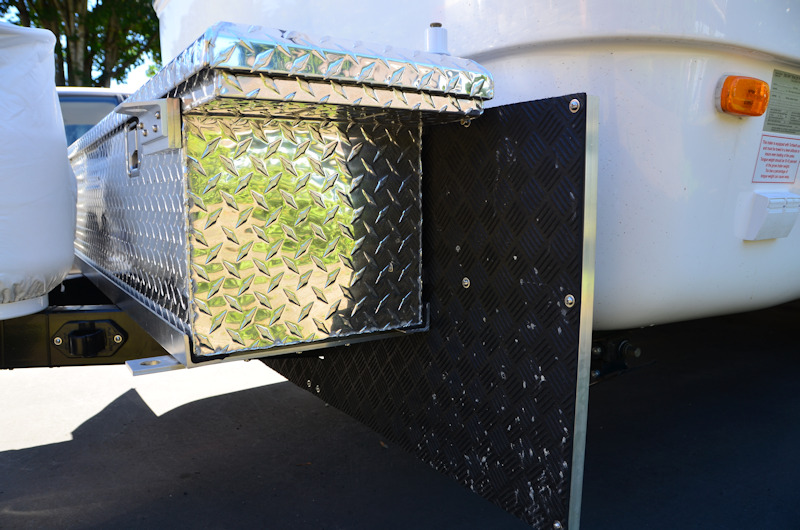
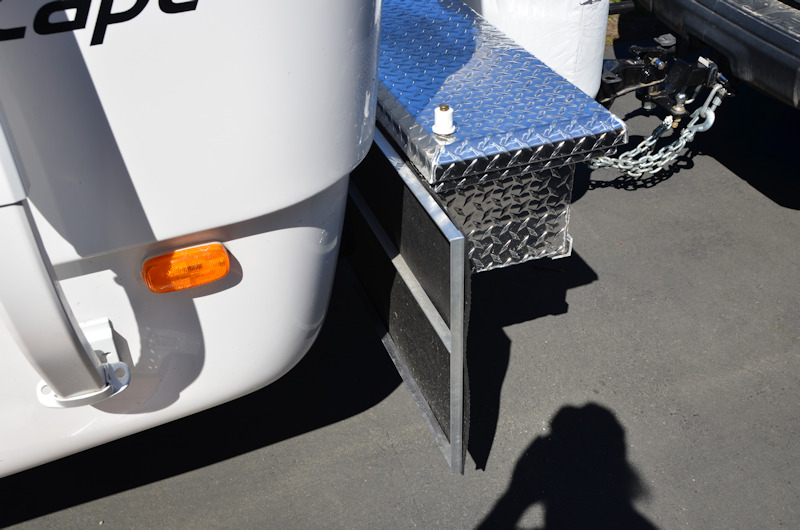
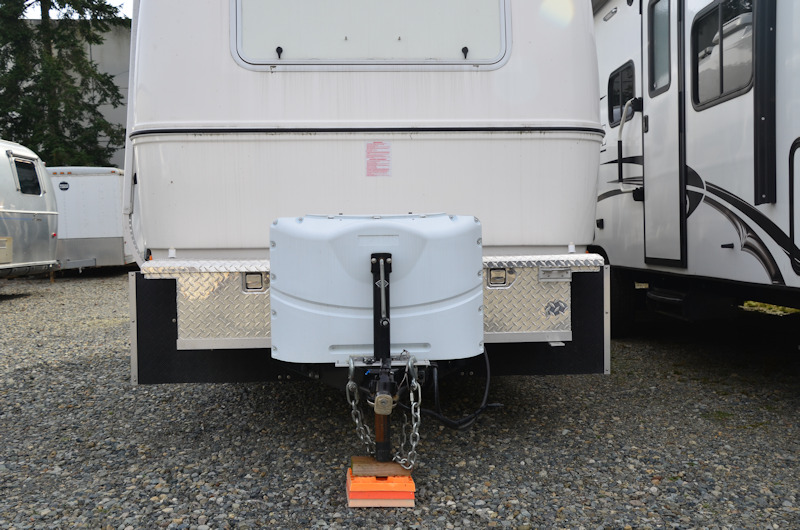
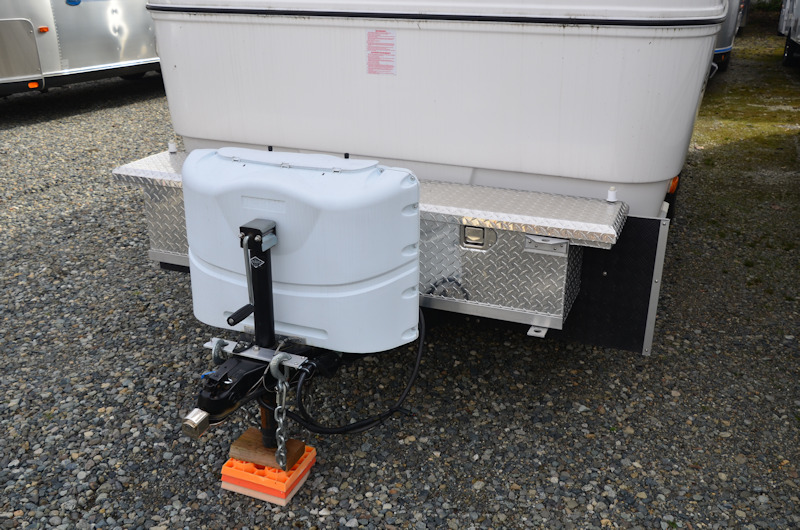
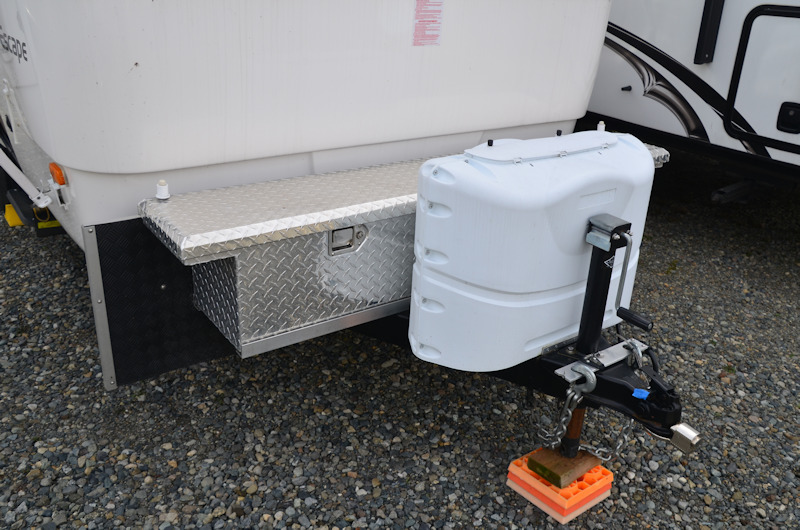
Next up was a storage box for the tongue - the big plastic bins on the back seat of the 4Runner were definitely not a good long term solution for hauling all the hitching and setup stuff. The $700 price and 60 pound weight of Escape's fiberglass box - beyond the above-mentioned aesthetic objection - moved us to seek cheaper and lighter options, and not particularly wanting to spend the time building something from scratch (although it would have been an interesting project), one of those ubiquitous pickup truck diamond plate aluminum tool boxes seemed to be a viable option, but it turned out that in seeking a tall-ish box to accommodate the tall battery boxes, the front-to-rear dimension also increased and then the box wouldn't fit between the front of the trailer shell and the propane tanks. Wanting to move neither the front of the trailer rearward nor the propane tanks forward, a shallower-than-desired box would be required. Additionally, most of the pickup truck tool storage boxes had ears extending up and over the top of the sides of the truck bed, and would look sort of goofy poking out sideways on the trailer. In any case, we found what appeared to be a nicely made 30 pound box at Lowe's, and it was on sale for a mere $129. It really needed to be a little bit taller, but with some creative trimming it looked like the battery boxes could be made to fit ok - but just barely. Initially, the inside front-to-rear clearance for the battery boxes was short by about 1/4" due to the jumbo sized 3/16" pop rivets that were used to attach the manufacturer's nameplate and were poking into the box. The rivets were drilled out and dimes were epoxied in their place to close up the holes. The box was lockable using a standard lock and flat key and looked like it would be easy to pick, so a new barrel lock set was installed, the aluminum rivets that were used to attach the lock mounting plate were drilled out and replaced with steel rivets, and the lock mounting plate hardware was replaced with stainless steel bolts, washers, and nylock nuts,
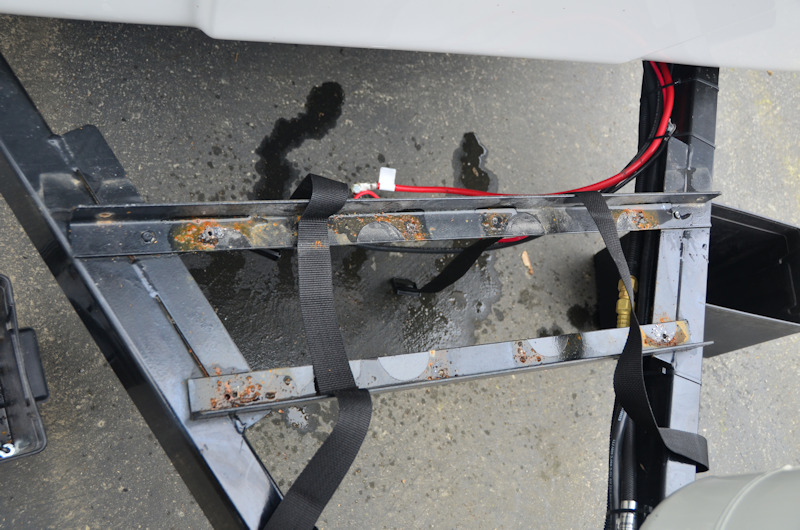
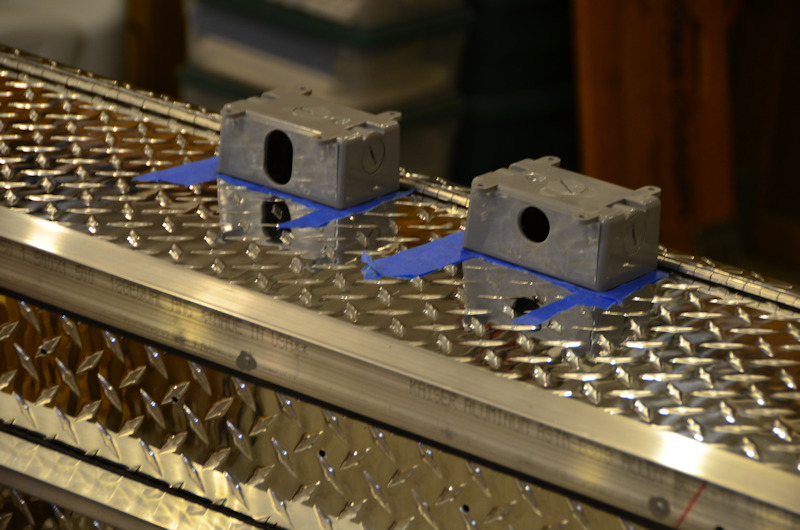
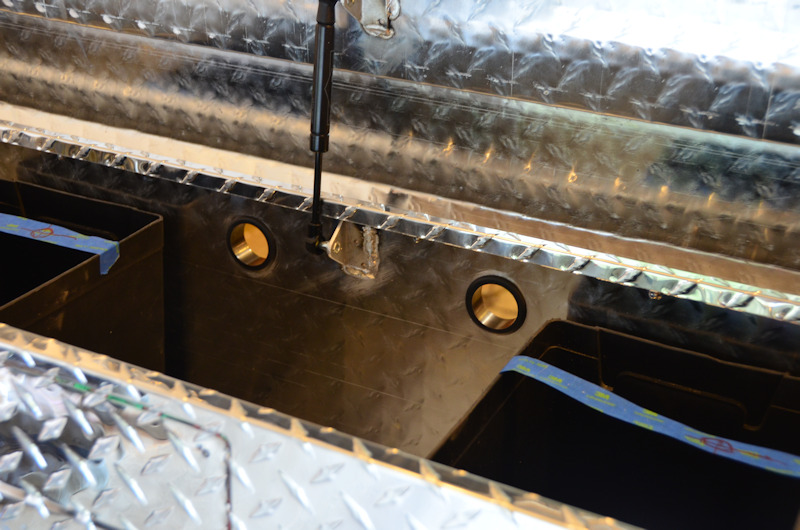
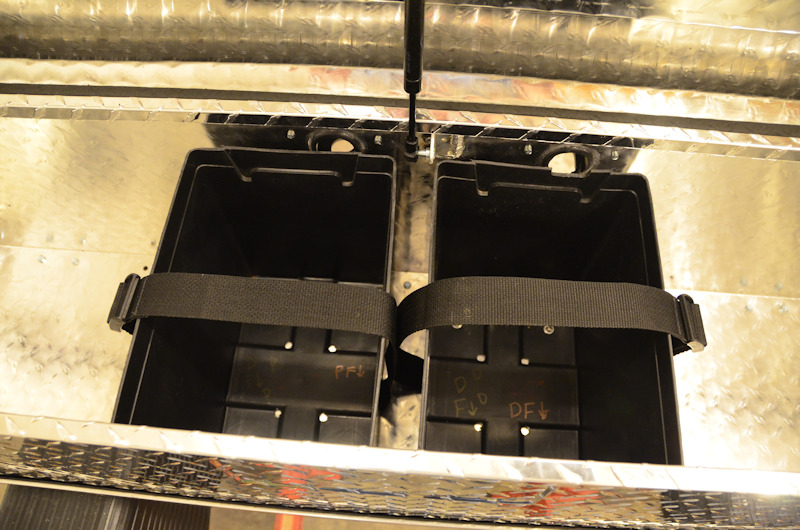
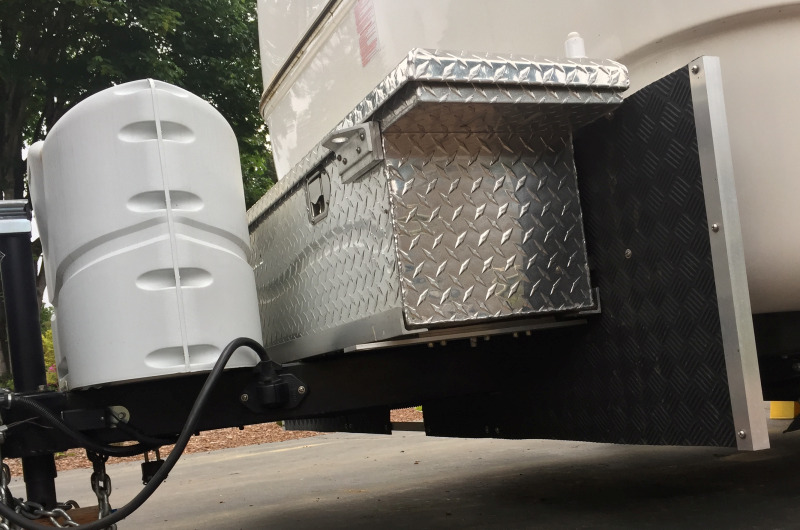
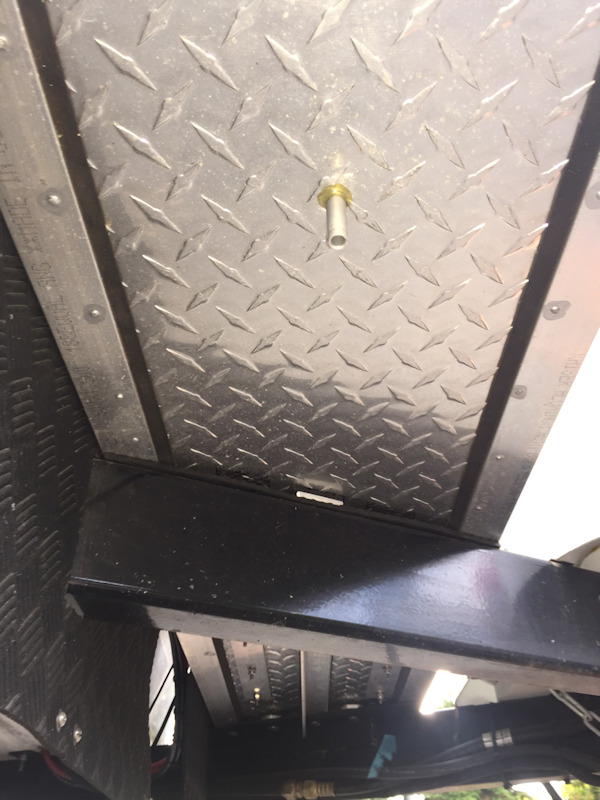
The box was made of the usual .06" thick aluminum, so the bottom would need to be supported well enough to support the 120 pound weight of the two 6 volt batteries, with the weight spread across the tongue frame. The trailer was only about 6 months old at this point, and the standard battery mount - two pieces of angle stock over the tongue frame - was already rusty and ugly, so it was a relief to get rid of everything and get the batteries and their boxes out of the elements. The two vents added to the top rear corners of the box, along with the generously sized cable access holes in the back of the box, would allow hydrogen to escape, and some drain holes (complete with cute little aluminum downspout tubes epoxied to the bottom of the box intended to help inhibit water ingress and promote water egress) were added to the bottom just in case the thing leaked and started to fill with water. The box was bolted to the trailer through the original battery mounting brackets welded to the frame, three lengths of 2" x 3/16" aluminum angle were used between the top of the frame and the bottom of the box to support the battery weight, and the whole thing was sitting on 3/16" rubber pads to preclude any metal-to-metal issues. The front and rear bottom corners of the box were supported by the 2" x 3/16" aluminum angle, with garage door bottom weather seal strips bent to 90 degrees used to cradle the box in the angles to eliminate any chafing, and the wiring cable access holes were shielded from rain by plastic single-gang wet location electrical boxes turned around and through-bolted through the back side of the box. By now, the front storage box had taken on a life of it's own and was being referred to as the "FrankenBox". The last thing that was done was to graft a combination mud flap / stone guard to the back of the poor box. While the box itself protected the front of the trailer from any errant rocks or road debris that might be thrown up, the 1/4" rubber flap extended out past the ends of the box to protect the sides of the trailer, and also dropped down below the frame of the trailer, going all the way across to protect the trailer's delicate bottom.

The trailer was winterized when we picked it up at the factory, and in anticipation of a winter's worth of cold weather we planned to just leave it winterized for the duration of the winter, including the "Very Big Very First Trip" . We had expected some chance of cold weather, in particular on the mountain passes and maybe even in the high desert at Joshua Tree, but we were surprised to wake up after our first night in the trailer to 24 degree temperatures in normally mild Lincoln City, OR, located right on the ocean and therefore usually quite temperate. We were used to having no in-trailer water system in the Chalet, so we were ok doing the water jug routine with the Escape for this trip, and had easy access to campground water and, generally, showers as well. None of the campgrounds we stayed at had electric hookups, so we were real glad that we had the 160 watt solar system and usually sunny skies. A few trips later, at a campground that had no shower options but did have water and sewer hookups, we tried showering in the trailer's tiny bathroom and found that it worked really quite well, except we thought that the shower curtain was a bit lacking. We got a full size shower curtain that would extend a couple of feet past the ends of the original shower curtain rack on either side, and put in some Command Hooks that would effectively allow the curtain to go around the corners of the shower stall area - around the corner and past the toilet in the front of the bathroom and around the corner and over to the sink in the rear - being supported by the hooks. It was hard to take meaningful pictures in the small bathroom, but we tried anyhow.
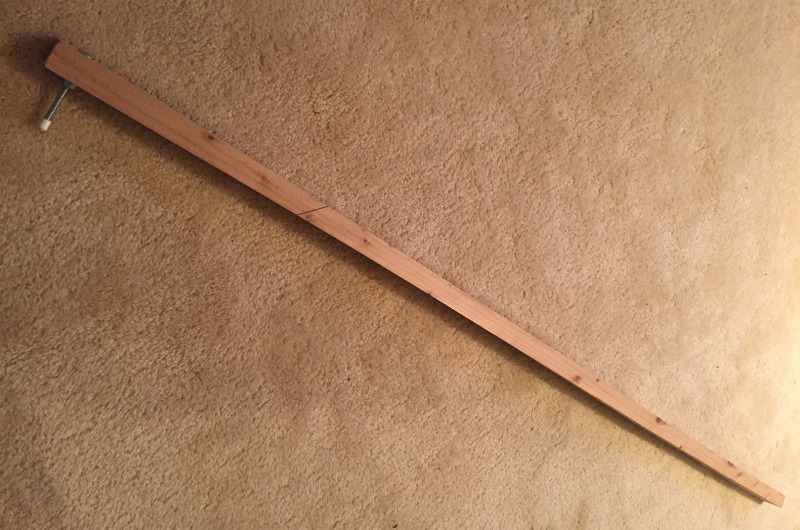
Given our advancing ages, being in possession of short legs and marginal knees, and the fact that we would often stumble back to the trailer after a (for us) long and hard day of hiking, we always grunted when going up the steps into the trailer, especially, it seemed, the climb from the step up to the level of the trailer floor, which always seemed to be more of a climb than from the ground to the step. Sure enough, the tape measure confirmed that the rise from the step to the floor was about 2" more than the rise from the ground to the step. We made a step riser out of a chunk of 2x8 that sits on the top surface of the step, and makes the two step rises more equal. A couple of 1/4" carriage bolts going through the 2x8 and then through a couple of holes along the outside edge of the step stamping secured the riser to the step using wing nuts beneath the step. Later refinements included changing from hard-to-handle and fumbly wing nuts to 1/4" coupler nuts that made it easier to get the threads started, and the application of a nice big piece of self-adhesive non-slip traction material, complete with a stylish glow-in-the-dark yellow visibility stripe, and ultimately, in place of the coupler nuts, some large diameter aluminum round thumb nuts with 1/2" aluminum spacers epoxied to them and the fuzzy side of stick-on velcro on the spacer-to-step contact surfaces - with the thumb nuts being bright red anodized so they'll be easy to find when they get dropped and roll under the trailer - and switching over from zinc to stainless steel carriage bolts. Continuing with the stainless fastener motif, the 4 sets of nuts, bolts, and washers that secure the step assembly to the trailer frame were cut over to stainless, and neoprene washers were used to avoid metal-to-metal contact between the parts, thereby avoiding the subsequent rust. Being somewhat premium in size and therefore weight, we wanted to give the cantilevered step a little help and lessen the load on the step-to-frame attachment points. To this end, we filed out a couple of holes in the step to accommodate the square shoulders of a couple of 3/8" carriage bolts, and, again with neoprene washers, used 3/8" coupler nuts on the bottom sides of the step stamping to secure the carriage bolts permanently to the steps, providing female threads into which a pair of long 3/8" carriage bolts could be threaded in from below and extend down to the ground. Various lengths of carriage bolts allow for various topographical terrain conditions beneath the step, and for soft conditions like sand or mud, round bases both small and large, incorporating reliefs for the heads of the carriage bolt heads, complete with embedded washers, were made.
It was obvious that we would end up installing any number of electrical gizmos, and so would need a fused distribution block. Amazon offered a nice marine 12 circuit unit with ground lugs from BlueSea, and there was a perfect spot for it under the driver side dinette bench seat, near the surge protector. Having gotten it mounted - without drilling holes through the top of the black tank - it was then time to give it 12 volts and ground feeds, tapping them from the junction box where the 7-pin tow vehicle cable terminates. The 12 volt feed was available from the big huge wire-nut - ugh - connection, and ground would just be taken from the box ground screw. Wanting to get rid of the wire nut, and needing to tap in the additional 12 volt wire, a bottomless electrical box was mounted atop the original box to provide extra room, a lug terminal was bolted to one side of the new box, and the conductors, with freshly installed proper lug terminals replacing the wire nut, were installed,
First up for the new distribution block was adding some switched USB and 12 volt ports and a volt meter in the end of the overhead cabinet by the door. To run wires up to the overhead cabinet, we needed to open up the trim piece in the front passenger side corner by the dinette, not knowing exactly what to expect, and hoping that everything would go back together ok. There was an open gap in the foamy wall covering running behind the corner trim piece from the bench seat up into the dead space at the front of the cabinet, and the only issue was how to get the wires into the dead space and then into the cabinet in order to run them to the rear-facing end of the cabinet. Fortunately enough, there was a little opening in the top of the front inside wall of the cabinet that allowed a bent coat hanger to be pushed upward into the dead space and then - eventually and with much wiggling around of the wire - come poking out through the little opening, which could then be used to pull the wires. After some amount of thought, it was decided we would have two dual USB ports and a single 12 volt socket switched together, and a separately switched volt meter. Looking around on Amazon, there were a number of cheapo plastic panels in various configurations with discrete 1-1/8" round USB, 12 volt socket, and volt meter devices. We decided to forgo the plastic panels and just flush mount the round devices, and got some 5/8" rocker switches from Radio Shack (RIP) and cut the butt ends off a couple of 12 volt sockets and epoxied in the switches. That way we would have the six things - 4 devices and two switches - all matching and mounted in 1-1/8" holes. That was all well and good and USB cables could be plugged in and smaller devices - iPhone, external battery packs, flashlights, MP3 player, etc - could sit right there on the fancy new - genuine oak - above-the-door shelf while charging. In the course of finishing the shelf, it was determined that to closely match the factory ETI finish when staining oak, two coats of Varathane Summer Oak stain provide a close match.
Just when this project was drawing to a close, good neighbor Ed from next door stopped by and suggested that it would be nice to have some USB ports hidden inside the cabinet and have the cables magically pop out from their hiding place through a hole at the end of the shelf. A little too late Ed, but such a good idea nonetheless that it was decided to tap 12 volt and ground wires for two more dual USB port units, and build a false end wall for the inside of the cabinet to hide the electrical sausage. As an added bonus, the false end wall would hide what was far and away the most egregiously crappy workmanship in the whole trailer: The rear wall of the cabinet was a real eyesore - big gaps in the vinyl wall covering and ugly gaps in the woodwork. The argument - not entirely invalid - would be that in order to see the crappy finish work you would have to stick your head inside he cabinet and look to the rear - difficult to do unless you were in possession of a remarkably small head. In any case, wood blocks had to be added to the end of the cabinet to give the new false wall something to be screwed to, and a finger hole was needed to allow the wall to be grasped and moved around - in particular it was such a tight fit that once it was pressed into place there was no easy way to pull it back out (after any number of trial fittings) without a finger hole.
Having finished with the shelf and adding everything to the end of the cabinet, it was time to decide where to install the switches to control the other stuff that would be run off of the new distribution block. There was not much room for switches anywhere on the faces of the dinette bench seats, and they would be somewhat inconvenient to reach if mounted down there by the floor anyhow, and also be subjected to accidental switching when bumped. The only reasonable place was somewhere on the face of one of the overhead cabinets, and it was decided that 6 switches would be mounted in the face of the cabinet near the door. When we ordered the trailer, we requested that 8 runs of 14-gauge wire be run between the two dinette bench seats, along the front of the trailer down along the floor, so we had a way to get power from the driver side to the passenger side, and get the switched power back to wherever we needed it. It turned out that it would have been very easy to run these wires ourselves. The switch for the 2-way switched rear backup lights would need to be a 3-position (ON-OFF-ON) type, so we needed to find some matching switches that were available in both SPST and SPDT. Again going nautical with BlueSea, we found some nice switches with optional black plasticy-rubbery water proof covers - we didn't really need them to be waterproof, but wanted deluxe black switches, not just raw silver ones. They weren't exactly inexpensive, but appeared to be of high quality. The first switch was dedicated for use with the rear view camera, which had previously just been tapped off of an always-live 12 volt line - maybe that's why the first camera died after 18 months - with a series fuse thrown in, and as is frequently the case, what was quick and dirty and temporary had become quick and dirty and pretty much permanent.
From day one, the bathroom door appeared to be hanging crooked, with the door drooping down depressingly on the latch side. Although this wasn't terribly noticeable, the horizontal gaps at the top and bottom of the door - presumably there to provide fresh air to the bathroom - were grossly and irritatingly uneven. Although the bad bottom gap wasn't too noticeable being way down by the floor, the uneven top gap was particularly objectionable, since when stepping up and into the trailer, one's eyes would naturally look upwards, only to find the offending uneven gap. Some effort was made to shim the door hinges in an effort to ameliorate the situation, even though it was unlikely that was going to correct the issue, especially since it turned out that what was really going on was that while the door was plumb, the door frame, particularly the top edge, wasn't level, This clearly fell into the category of issues that are best addressed not by fixing the problem, but by hiding the problem. A thin strip of 1/4" oak was cut and then stained to match the door, and then was glued to the top edge of the door. The gap remained uneven, but the piece of oak did a great job of hiding it.
At times, situations dictate that we back into campsites, set up, hitch, and/or unhitch in the dark, so some rear lights, both on the trailer and the 4Runner, were in order. Some previous project's leftover 6-LED light units were used - two on the rear bumper of the trailer, and one just above the hitch receiver on the 4Runner. For maximum flexibility and convenience, we wanted the lights to be independently switchable from both inside the trailer and the 4Runner, so ran fused power from the vehicle battery to a relay, fed the switched output load side of the relay back to the hitch area to power the hitch light, and also to the center pin of the 7-pin connecter, to the junction box in the trailer, and thence to one ON side of a 3-position ON-OFF-ON switch, and finally back to the lights on the trailer's rear bumper. The other ON side of the switch picked up power from the trailer's 12 VDC system, and sent it to the rear bumper lights. That way, when the 7-pin connecter was plugged in and connected the tow vehicle to the trailer we could turn on and off all 3 lights from the dashboard of the tow vehicle, and when unplugged we could independently turn on the hitch light from the tow vehicle powered by its battery, and also turn on the trailer rear bumper lights powered by the trailer batteries. In the course of making this addition, we first used the 1/4" self-tapping screws on the inboard ends of the rear stabilizer jacks to pick up the ground connection for the rear bumper lights, all too easily stripping out the threads in the thin sheet metal frame cross-member. After being drilled out, some real 1/4" nuts, bolts, and washers were used for the jacks, and the ground was picked up elsewhere on the trailer frame.
Being old and brittle, we wanted a night light for the step to make it easier and safer to get in and out of the trailer in the dark, and found some nice compact 3-LED light units from superbrightleds.com. One of the freshly installed switches was called upon to control the light mounted to the trailer frame adjacent to the step.
While under the trailer installing the step light, it was, perhaps ill-advisedly, decided to install 4 more LED light units, one near each corner of the trailer, aimed upwards to reflect light off the bright white bottom of the trailer, thereby creating a soothing pool of indirect lighting on the ground below, useful for romantic mood lighting while sitting outside after dark and also for looking for the random rattlesnake or scorpion or other interloper when boondocking in the desert. Running the wiring, and in particular soldering the connections of multiple conductors while rolling around on the mechanics creeper under the trailer, perhaps made this one of those projects that involved more work and time and trouble than it turned out to be worth - not a good ROI.
Wanting to upgrade to a larger fire extinguisher and install a garbage can, we decided to use the under-utilized space just inside the door, holding the garbage can in place using Command Hooks inserted into slots so it could be lifted up and away easily.
Next, some Umbra hooks and some of those cute little Umbra hook/cubby bins were installed - a 5-hook unit on the wall between the front dinette and bathroom, a trimmed down 3-hook unit by the thermostat, and no fewer than 5 of the hook/cubby bins.
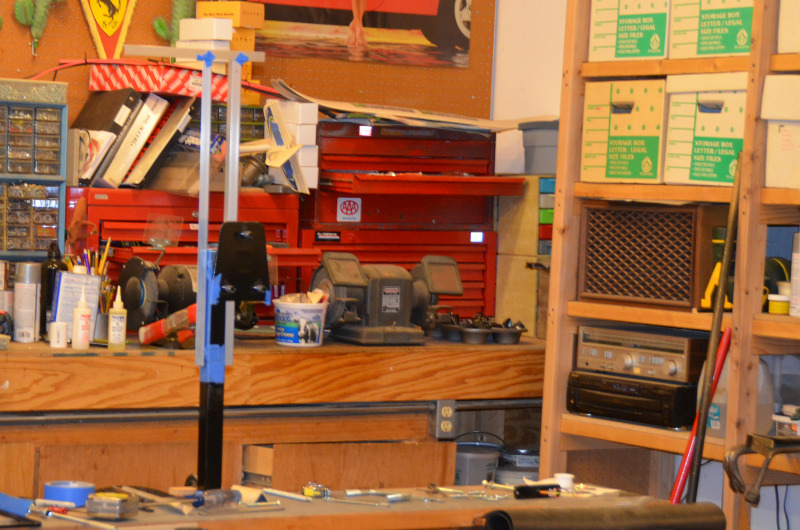
The FrankenBox was by now calling out for more attention, eager to be modified to serve as the mount for a 2-piece 3/4" conduit antenna mast. Some 1/4" aluminum stock was used - a flat piece bolted along the bottom and an angle piece on the front face - allowing the assembled mast to be fed down through the 2 holes, with the mast simply resting on the ground, and then locked into place using a pad lock so it couldn't be slid up and out of the brackets allowing someone walk off with our fancy cell and TV antennas. The 2 pieces of the mast slide together inside of a 12" length of square aluminum stock, and are easily secured together with padlocks. We got an over-the-air HD/analog TV antenna and a trucker's cell antenna - planning to use the former to feed a Hauppauge USB tuner on our laptop and the former to feed our Verizon 6620L JetPack Mobile hotspot - and figured out a way to quickly and easily mount them on the mast using wing nuts. Storing the 2 pieces of the mast conduit was a bit of a challenge - we didn't want to make them hard to access under the bed, and didn't want them rolling around in the 4Runner, so decided to make a couple of storage tubes out of lengths of 2" PVC pipe clamped to the rear bumper. The antennas themselves would live in the driver's side dinette bench seat, out of the way and protected, albeit somewhat inconvenient to get to. We would only be deploying the mast and mounting the antennas when parked somewhere for a longish period of time, and even then most likely only if bad weather kept us trailer-bound, so the moderate inconvenience involved with setting everything up was not much of an issue. To get the cables inside the trailer, a duplex pass-through was installed adjacent to the driver's side dinette bench seat, and finally a switched USB port was installed to power the TV antenna signal amplifier.
After listening to the chef bemoan the lack of a good place to conveniently keep spices and various kitchen paraphernalia and cooking ingredients, a spice rack of just the right dimensions was discovered on Amazon and promptly ordered and installed, but only after the 4 superflous little decorative ball feet were cut off the bottom corners.
It was obvious that there was a lot of wasted space by the head (the passenger side for us) of the bed, "behind" the wall separating the kitchen area from the bed area, so some shelf brackets and shelves were installed. We had opted to have Escape reinforce that wall so had no concerns about the weight of the shelves and contents, but first we had to determine exactly where the reinforcing was located - and not located. Right where a couple of the shelf bracket mounting screws needed to go we found a void that was apparently left in order to accommodate the wiring running up to the stove hood, so had to rearrange things somewhat to make sure we were screwing into the solid part of the wall and avoid hitting any wiring. In order to avoid interfering with the overhead reading light, the top shelf could only stick out a few inches, and was used to velcro-mount the 12 VDC-to-18VDC converter for the VPAP machine. The next lower shelf was to be used for the VPAP machine itself, set on the shelf backwards to allow the power cable to plug into the machine through a small hole drilled into the shelf edge. Below that, a special shelf was made to accommodate an mp3 music player and Bose SoundLink speaker, allowing the latter to slide on and off the shelf, but be locked into position if desired. We had decided not to have any sound system permanently installed in the trailer, in part to avoid using up cabinet space for the unit and speakers, instead using the portable Bose speaker so it could be used at various locations in the trailer, or even outside. The bottom shelf would be used to hold miscellaneous items - reading glasses, watch, charging cables, etc. The forward outboard corners of the 3 bottom shelves were indelicately introduced to a hole saw to permit the VPAP's nose hose to snake it's way unobtrusively down to the pillow area. Small wood screws and pieces of angle stock were used to fasten the shelves to the wall, keeping them secure while traveling.
Knowing that we needed a good out of the way place to hang towels or whatever to dry, we made some towel racks to mount inside the 2 dinette overhead cabinet doors. Some lengths of stainless steel tube stock were cut and internally threaded and mounted using stainless hooks, so when something needs to hang up to dry, we just open the cabinet doors. Some 1/4" spacers were used to move the tube stock away from the inside of the cabinet doors, making it easier to feed towels or whatever between the tube and the door. These worked so nicely that the chef requested one for the cabinet door over the kitchen counter as well.
By far, the most irritating part of setting up the trailer at a camping spot had always been trying to get the finely threaded locking ring for the power cord screwed onto the fitting on the trailer. Thanks to a post on the Escape owner's forum, we ordered a bayonet locking ring from Amazon, and - presto! - no more fighting with getting the threads started. And after wrestling around too many times with the big heavy 30-amp power cord, we ordered a 12" 30-to-20-amp pig tail adapter so we could just use a regular outdoor 12-gauge extension cord between the campground power pedestal and the trailer, along with another bayonet locking ring. Not having A/C, the commonly-provided 20-amp GFCI would be sufficient - we just have to be careful to not run too much concurrent load, so no microwave, hair dryer, space heater, and refrigerator all at once. We carry 20', 12', and 6' 20-amp extension cords with us, and also pack the original 30-amp cord way in the back under the bed just in case we encounter another snooty RV park that will only allow the original manufacturer-provided power cord to be used at their facility - yep, we're not making that up! We also carry a 30-to-20-amp adapter in case a 20-amp receptacle isn't provided, along with a 50-to-30 amp adapter for those admittedly infrequent times when we only have 50 amps available.
The wasted space at the foot of the bed was used for a magazine rack, mounted to the reinforced wall near the thermostat. In a cost-saving effort, birch plywood was used instead of oak, but it turned out that using two coats of Varathane resulted in a close match to the factory ETI oak color - the first coat being Summer Oak and the second coat being Golden Oak to darken it slightly and take away some of the slightly orange tint.
On the theory that one can never have too many power outlets, a dual USB port was added below the flip-up counter extension by the door, with the power tapped from the existing 12 volt socket. Similarly, another dual USB port was added by the head of the bed, again with power taken from the adjacent 12 volt socket. To avoid every last bit of parasitic drain, switches were installed to enable powering off the USB ports when not being used. When we ordered the trailer, we had requested that 8 lengths of 14-gauge wire be run from the driver side dinette bench seat, behind the bathroom and refrigerator, and terminating in the storage space beneath the bed. We used two of these to power an under-the-bed-storage-area light, utilizing yet another one of the 3-LED light units from superbrightleds.com, and mounted a switch for it by the head of the bed - not inside the cargo hatch - in order to avoid having to go outside to turn it off after realizing, upon retiring for the night, that some twit had left it turned on.
If and when the sad day comes that we're stuck by the side of the road with a flat tire - or worse - we fashioned an easily wing-nut-mountable emergency white-and-amber LED flasher that can be bolted to the extended rear license plate mounting bolts and plugged into the 12 volt socket that we had Escape install nearby. If we're parked on the shoulder or forced to tow slowly we're hoping that it will grab the attention of these drunk / stoned / sleeping / smart phone preoccupied drivers who might otherwise run into us.
The latch on the retracting screen door was apparently considered by the designer to be an adequate appendage to use when opening and closing the screen door, but it really isn't. Two small pieces of angle aluminum, one on the inside and one on the outside, were used to overcome this deficiency, being through bolted using holes that were very carefully drilled through the door frame to avoid compromising the inner workings of the retraction mechanism.
To avoid having the refrigerator and bathroom doors swing open while in transit, some thin angle aluminum was used to make a couple of key-holed retainers that slide down over cap-headed screws adjacent to the doors, keeping the potentially wayward doors latched - we really didn't want to go with awkward belts or bungees. Additionally, some thin birch plywood was used to make cabinet door holder-closers for the two pairs of doors below the kitchen counter by simply sliding through and then down over the door handles and thus locking the doors together. However, following a speed run along the Oregon coast on Highway 101, we discovered that both the closet door and the drawer below it had gotten loose, the door presumably swinging wildly fore and aft on its hinges and the drawer and its contents landing on the floor. Fortunately, no damage was done, but something clearly had to be done to prevent a recurrence. A couple of small blocks of oak were screwed to the framing between the two stacked kitchen drawers and between the closet door and the drawer below it, then a piece of thin plywood was screwed into the oak blocks, locking everything closed when rotated to vertical and allowing easy access when rotated to horizontal.
Footwear is typically not allowed inside our oh-so-neat-and-clean trailer, and when entering and exiting the trailer we often found ourselves teetering precariously when perched atop the step while kicking off, or snaking our feet into, our sandals. We installed an additional grab handle just inside the door, spaced out from the mounting surface using a couple of layers of 1/2" wood painted to match the adjacent wall color. The new grab handle was provided by our friends at ETI - an exact match to the original one mounted outside the trailer.
The original factory showerhead left much to be desired, and we picked up a fancy new adjustable, and clearly superior, one from Amazon, but unfortunately while very gently - but apparently not gently enough - tightening the plastic nut that fastens the showerhead to the hose, the nut cracked and rendered the original hose forever unusable. This happened just before we were leaving on a trip, and we luckily were going to pass right by a Camping World on the way, so we stopped in and found a nice shower hose on sale for a few bucks off. It's plastic, but made up of many small segments, making it nice and flexible unlike the original nylon/plastic rigid-ish one that would always, irritatingly enough, hysteretically insist on returning to it's previous shape.
Having always been dismayed when seeing towing chains hanging off the tongues of trailers and sitting forlornly in the dirt - or worse in the mud - we vowed to put a stop to it, at least for our trailer. A slab of 1/4" aluminum was clamped onto the tongue using the forward-most jack mounting bolt, providing holes into which the chain hooks could be inserted. A couple of wiring clamps were added to support the weight of the 7-conductor cable, along with a 2-way level. It never made sense, at least to us, that ETI mounted the front-to-rear level by the trailer door where it could not be seen while raising or lowering the tongue using the tongue jack. Provision was also was made for hanging a cut off piece of a broken tape measure blade - just the right length so that when it was able to swing freely it meant that the hitch was high enough up in the air so the 4Runner could be backed up and the ball would clear the hitch - no more guessing about it. This flurry of activity around the trailer tongue continued with the addition of big beefy forged safety chain hooks and an opulent plastic 7-pin cable-end holder, and the replacement of the 3 original rusty 3/8" jack mounting bolts and washers with shiny new stainless steel items, replete with a slab of the 1/16" foamy rubber sheet stuff sandwiched between the jack mounting flange and the tongue frame. Finishing up the rehab on the tongue, the ugly hand-brushed brush-marked black paint from the factory was all sanded down smooth and re-painted using rattle can gloss black, and the rusty nuts, bolts, and washers holding the cover plate on the top of the jack were replaced with their stainless steel counterparts after drilling out the holes for 1/4" bolt clearance..
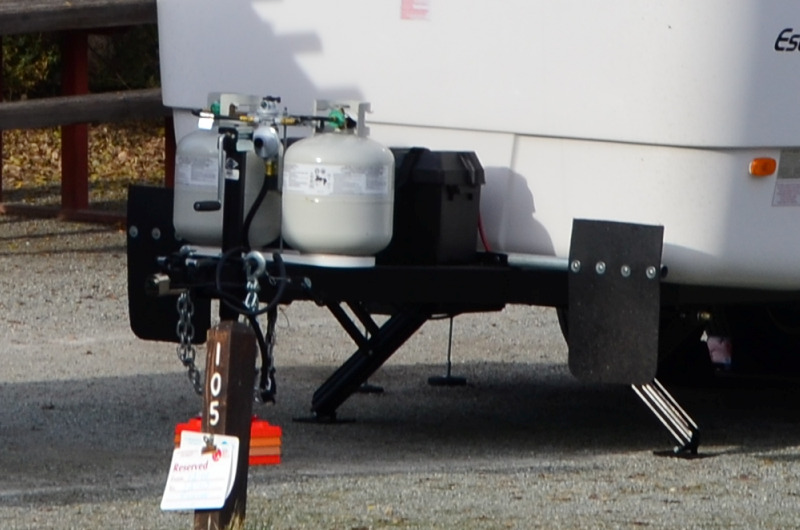
Having seen too many wayward plastic propane tank covers all busted up and sitting dejectedly by the side of the road, a method by which to secure ours was needed. A padlock and chain running beneath the tanks and looping around the tank mounting tray would not only help prevent an airborne misadventure - one would speculate that there have been some unfortunate consequences when following drivers have taken evasive action to avoid errant tank covers - but also help somewhat to deter those pesky ne'er-do-wells from messing with our tanks and their valuable contents. Spotting bullet-riddled propane tanks while driving the fun-filled dirt roads at Joshua Tree National Park suggested that some bored individuals get their kicks causing propane explosions by shooting at propane tanks, so apparently propane bottle theft can transcend mere financial incentives. Some angle aluminum stock was pop riveted to the bottom edges of the cover, both to spread the load and provide anchor points for the chain. Not particularly caring for the aesthetics of the big dorky-looking plastic covers, we had initially replaced ours with a more pleasant design, consisting of a finely taylored vinyl covering. Unfortunately, after just one winter it had absorbed a Seattle-load of humidity and the inside was awash in mildew, so the original plastic cover was reinstated.
The big huge sheet metal wing nut used to clamp the crossbar that holds down the propane tanks was just begging to have a padlock added to prevent unauthorized loosening, so holes were drilled in both the wing nut and the cross-piece mounting bracket through which a padlock could be inserted.
After seeing the raw plywood edge inside the sink cover lifter-upper hole a few times too many, a brown plastic desktop wiring trim piece was filed down to the correct OD and found its rightful place in the universe, nicely concealing the offending plywood ugliness.
The incandescent light in the range hood was chronically dim, so an appropriate LED replacement was installed in the original's place.
The FrankenBox received yet more attention with the addition of 4 LED duplex lights inside the lid. Not wanting to have a dedicated switch for this, power was taken from the switched side of the step light switch.
The antenna mast PVC storage tubes u-bolted to the rear bumper had started looking increasingly crappy, so it was decided to make new mounts and move them forward to reside on the frame rails, sanwiched between the back of the storage box and the front of the trailer shell. Some very leggy 3" x 3/16" thick aluminum angle was procured from On-Line Metals, and a couple of mounting brackets were made and screwed to the frame, allowing the tubes to be hidden pretty well out of sight. The abandoned angle brackets remaining on the rear bumper were repurposed with a few long stainless screws to hold the loose end of the water hose off the ground and out of the mud while putzing around with the water heater and fresh water tank, sanitizing and winterizing/dewinterizing and whatnot. Additionally, a 1/4" stainless eye-bolt was installed, through which a padlock can be inserted to lock the 20-amp power cord and 30-to-20-amp adapter pigtail together and thence to the trailer. Obviously, if someone wants to steal the power cords, they will, but this will force them to either cut the lock or the eye-bolt, pick the lock, cut an end off of the power cords, or unscrew the 8 awkward-to-access nylock nuts on the eye-bolt, hopefully discouraging their nefarious activities.
After a fair bit of web shopping and review reviewing, we picked up a TireMinder Solar TPMS for the trailer. The system came with a signal booster which got mounted beneath the overhead cabinet by the trailer door, giving it a good signal path from the transmitters on the wheels through the trailer's fiberglass and plywood floor to the booster, and then from the booster through the front trailer window and its plastic rock cover, through the 4Runner's rear window, and finally to the monitor mounted on the dashboard. This avoided having the signal try to fight its way through any of the foil-faced reflextix trailer insulation, the aluminum storage box and propane bottles on the trailer tongue, and the 4Runner tailgate. The booster required 12 volts, so power was drawn from the switched side of the rear view camera, the idea being that we would generally want both the camera and booster on when in transit, and both off when parked, plus this would save a switch for something else later.
Whenever opening or closing the water heater access door, the blatant fragility of the little plastic latchy thing would call out to us, so we installed a stainless steel version, which hopefully will have better longevity. The prospect of the latch failing and letting loose the access door while at speed was daunting enough to prompt this change.
Having fought with the standard 2-legged dinette table more times that we would like, particularly when breaking down the table and trying to get the lower leg tapers broken loose from the floor sockets, we finally bit the financial bullet and ordered a Springfield pneumatic 3-section table base. The original pair of table leg floor sockets was removed, a new slider mechanism for the tabletop was built using aluminum sliding channel stock, and the whole mess was bolted together using a base of 1/2" plywood covered with matching original ETI floor covering and trimmed out with aluminum angle. The base was included in part to cover the original screw holes and in part to lend some stability by having a larger footprint than would be provided by the round Springfield base alone, and was screwed to the trailer floor using a goodly number of small wood screws, all hidden under the round table base. The Springfield leg latches were made more accessible by drilling holes and adding some long eyebolts, and an oak dowel with a hook screwed into the end works well to reach under the table to open and close the latches without having to crawl around on the floor to reach under the table, especially when it is in the lowered position.
When it's lights out time, it seems like there is always all sorts of stuff floating around - magazines, books, reading glasses, smart phones, tablets - with no convenient place for any of it to spend the night, so a couple of magazine-sized cubby holes were built and mounted to the bottom of the overhead cabinet above the head of the bed. Each one has two sides of 1/2" plywood and a bottom sheet of thin birch plywood, and has two pieces of stainless steel tube stock mounted along the edges which are useful for hanging glasses and whatnot, and we can hang up to 4 small aimable USB-powered fans right above our pillows. To provide power, we mounted a small combination 4-port USB / 200 watt inverter unit, powered by a 12 volt supply and switched on/off by a switch mounted by the head of the bed. The inverter is handy for use with our 120 volt camera battery charger, so now the multiple camera batteries can be cycled through the charger without having to get out of bed to swap them around. The worst part of this project was feeding the 12 volt line up through the corner trim piece between the back and side wall. After repeated unsuccessful tries to fish the wire up into the dead space at the rear corner of the trailer, the rear false wall was torn out in frustration. Once the wire was finally fed into the corner dead space, it then had to be fed down into the air space between the "floor" in the interior of the overhead cabinet and the bottom plywood making up the bottom of the cabinet itself, running over to the overhead light and then a few more inches to a hole torn into the plywood and down into the inverter. A length of split wire loom was used to dress things us and protect the wires. NB: If there is any chance that 12 volts would ever be needed in your Escape's overhead cabinets, it would be most advisable to have ETI run the conductors while the trailer is being built rather than fighting with trying to retrofit the wiring in later.
It was obvious that there was some goodly amount of unused space below the furnace, just begging for a new opening to be cut in the cabinet face thereby making it accessible for storage. Reace at ETI was most helpful in providing us with a new cabinet door of the correct dimensions so that it would line up vertically with the side edges of the drawer and closet door above, and horizontally with the top and bottom edges of the soon-to-be adjacent existing cabinet door. Fortunately, the 1x2 framing along the sides of the closet door and the drawer below it ran uninterrupted up from the floor, providing a good mounting place for the hinges and the keep-the-door-shut springy latch thing, and all that was needed was to add some 1x2's along the top and bottom of the new opening. Inside, some wiring - for the propane alarm and the electric trailer brakes - was blocking full use of the space, so the conductors were lengthened and relocated - the propane alarm was moved rearward and mounted on its ear, the brake wiring was re-routed through a new hole in the floor, and it was all run up the inside of the wall, protectively tucked into a handy channel in the framing. Unfortunately, the hinges and door handle that came with the new door did not exactly match the existing hardware on the other doors, so the hinges and door handle from the single bench seat cabinet door were used on the new door, and the new door's hardware was used on the bench seat door - far enough away that the discrepancies would never be noticed - with the added benefit that the new hinges were spring-loaded to help keep the door closed when closed and hold it open when open. The original cabinet space had back and side "walls" that needed to be removed in order to create a single new large space that could be accessed from both doors, and new "walls" were made of 1/2" plywood and installed. To allow access for storage above the wheel wells for bulky light stuff, this new enclosure was made only 9-1/2" tall, and in the low area between the wheel wells there was a good spot to store the our little electric space heater and dehumidifier. The only issue that remained was that the propane line for the refrigerator was running up through the space, but the time and effort it would take to relocate it wouldn't be worth it. Someday a protective enclosure for the pipe should be installed to avoid the chance of damage to the pipe.
The dreaded disco strobe malady eventually visited itself upon us, when both of the fore and aft crappy-quality ceiling lights began to, alarmingly and irritatingly enough, spasmodically flash on and off, a frequent hot topic on the Escape owner's forum. It seemed like after some amount of time and use, possibly due to repeated heat expansion and contraction cycles, part(s) of the 12-LED circuit card suffer from compromised solder connections and, with the consequent arcing or thermal expansion and contraction, contact would alternately be made and broken, resulting in some of the individual groups of 3 LEDs flashing on and off. The short term solution was to simply apply a thick coat of black paint to the offending LED's, albeit with the consequent overall dimmage of the emitted light. The consensus on the owner's forum was that the original lights used by Escape, and even the warranty replacements, were of marginal quality and longevity, so some new units of hopefully better quality were found on Amazon, along with some intriguing remotely controlled (RF!) 10-level PWM LED dimmers. The thought was to add dimming capability to the forward ceiling light to provide a touch of subdued and romantic trailer-trash ambience along with the strictly pragmatic ability to turn the light on and off remotely while lying in bed. As an added bonus, they were also actually flasher controllers, with no fewer than 8 selectable flashing patterns - each with a selectable flashing frequency - so we hadn't lost our disco strobe light capability after all - quite the contrary! Additionally, a remote transmitter was mounted by the door to allow the light to be turned on before even entering the trailer. It was decided to mount the actual receiver/controller unit outside of the light fixture itself, there being some concern about the high temperatures and lack of elbow room within. The initial purchase included two replacement light fixtures, 2 spare light fixtures, and a set of 3 of the dimmers / remote controller pairs - figuring that one of the 3 would be DOA, one would die shortly after being installed, and the remaining one might last for a while. After being installed and used successfully for a while, it was decided that acquiring some spares would be prudent, and an additional set of 5 controllers and transmitters was ordered for the low, low price of $12.99 - get 'em while you can.
Additional stuff to be documented later:
Awning arm mounts for wind socks, hanging LED lights,
pink plastic flamingoes,
etc
Conspicuity reflecto tape running the full width of the rear bumper
Paper towel holder
Stainless steel door hinges and pin-in-star Torx
mounting screws
Long wrench for fresh tank drain valve
Cargo hatch
door lock replaced with barrel lock and key (same as storage box lock and
key)
Black / gray sewer line cover cap with garden hose connection for use with external grey tank -
made of clear plastic so can check that the pipe is completely empty before
removing the cap,
ahem
This is about it for the time being, although there are sure to be more tweaks coming when time allows, boredom calls, or necessity necessitates.

Last Updated 03/23/19 02:15:23 AM
Version 1.0.0.0.1.5b Early Beta - but who's really counting?
This website and the entirety of its marginal contents are Copyrighted ©2018-2019 by us, and all rights are reserved. Neeneer, neener, neener. No part of this website, may, in whole or in part, be copied, photocopied, reproduced, or otherwise messed around with in any form or fashion without permission from us. So there. Remember that bandwidth is a terrible thing to waste.